50+ Yoga Asanas for All Levels: Benefits, Step-by-Step Instructions, Sanskrit Names, Modifications and Expert Tips (2026)
- Why This Is the Only Yoga Poses Guide You Will Ever Need
- What Is Yoga? Understanding the Complete Practice
- The Major Types of Yoga: Which Style Is Right for You?
- Getting Started: What You Need to Begin Your Yoga Practice
- The 15 Essential Yoga Poses with Images
- 20 More Essential Yoga Poses
- Yoga Poses for Specific Goals: Targeted Sequences That Get Results
- Yoga Poses for Specific Populations and Conditions
- Yoga Safety: Essential Precautions Before You Begin
- Pranayama: The Yoga Breathing Practices That Transform Your Asana
- Meditation and Yoga: The Inner Practice That Completes Your Journey
- Frequently Asked Questions About Yoga Poses (FAQ for SEO)
- Conclusion: Your Yoga Journey Begins Right Here, Right Now
Why This Is the Only Yoga Poses Guide You Will Ever Need
Yoga is one of the most ancient, most complete, and most transformative systems of physical and mental development ever created by human beings. Practiced for over 5,000 years, yoga has spread from the sacred texts of ancient India to every corner of the modern world, and for a profoundly simple reason: it works. It works for your body. It works for your mind. It works for your life.
This master guide to yoga poses is the most comprehensive yoga asanas list you will find anywhere online. Whether you are a complete beginner stepping onto a yoga mat for the very first time, an intermediate practitioner looking to deepen your understanding, or an experienced yogi seeking a reliable reference for your practice, this guide was written to serve all of you with equal depth and care.
Inside this guide, you will discover 35 essential yoga poses, each with its Sanskrit name, precise step-by-step instructions, a complete list of physical and mental benefits, expert alignment tips, and practical modifications. You will learn how to practice yoga safely, how to build a sequence, how to choose the right type of yoga for your goals, and how to create a sustainable home practice that delivers real, lasting results.
This is not a list of yoga pose names accompanied by a single sentence of description. This is a genuine, in-depth yoga poses guide created with the knowledge that you deserve real information that helps you practice better, feel better, and live better. Everything here is created for and published exclusively on YogaSniff.com, your trusted home for yoga and meditation.
What Is Yoga? Understanding the Complete Practice
Yoga is far more than a collection of physical postures. The word ‘yoga’ comes from the Sanskrit root ‘yuj,’ meaning to yoke or to unite. Yoga is the practice of uniting the body, the mind, and the breath into a single, coherent, present-moment experience. The physical postures (asanas) are just one of the eight limbs of yoga as described by the sage Patanjali in the Yoga Sutras, written approximately 400 CE.
The eight limbs of yoga are: Yama (ethical principles), Niyama (personal disciplines), Asana (physical postures), Pranayama (breath control), Pratyahara (withdrawal of the senses), Dharana (concentration), Dhyana (meditation), and Samadhi (blissful union). In modern Western yoga practice, the focus is primarily on asana, pranayama, and meditation, which together form a comprehensive system for physical health, stress management, and inner peace.
The physical benefits of consistent yoga practice are well-documented: improved flexibility, increased strength, better posture, enhanced balance, reduced chronic pain, and improved cardiovascular health. The mental and emotional benefits are equally powerful: reduced anxiety and depression, improved sleep quality, greater emotional resilience, sharper concentration, and a profound sense of inner calm that carries into every area of daily life.
The Major Types of Yoga: Which Style Is Right for You?
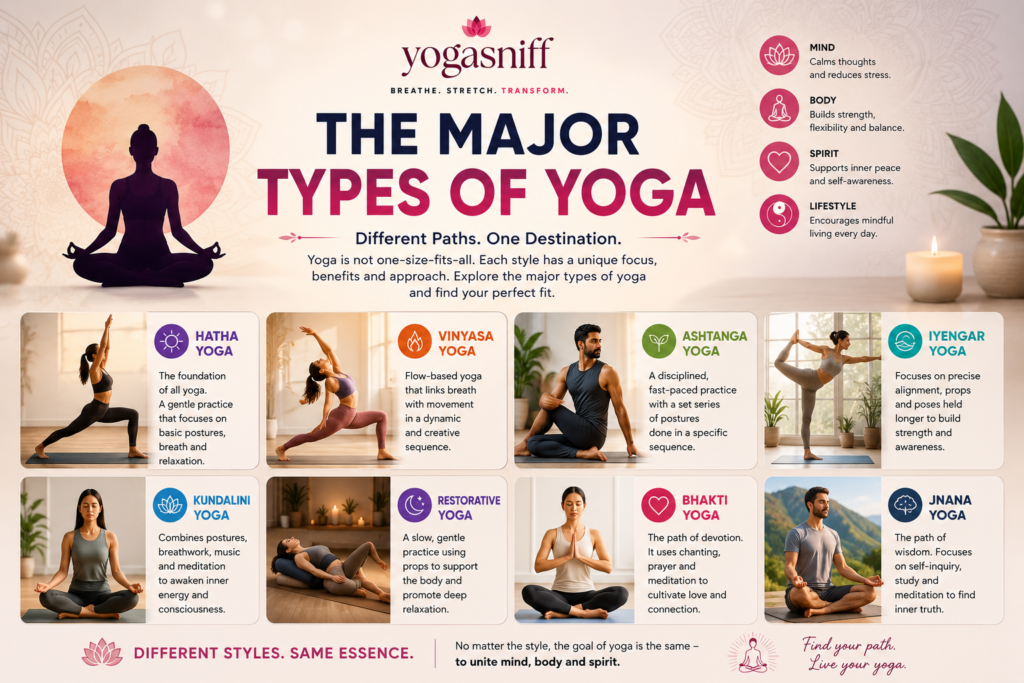
Before exploring the individual yoga poses, it is helpful to understand the major styles of yoga so you can choose the approach that best matches your body, your goals, and your personality.
| Style | Description & Best For |
| Hatha Yoga | The foundation of all physical yoga. Hatha yoga classes are typically slower-paced and focus on holding individual poses with alignment attention. Ideal for beginners and those seeking a classical, mindful approach. |
| Vinyasa Yoga | A dynamic, flowing style that links breath to movement in continuous sequences. Vinyasa yoga is excellent for building strength, cardiovascular fitness, and flexibility. It is one of the most popular styles in the world. |
| Ashtanga Yoga | A structured, rigorous style with a fixed sequence of poses always practiced in the same order. Ashtanga builds exceptional strength and flexibility and is deeply traditional. Best suited for dedicated practitioners. |
| Iyengar Yoga | Famous for its extraordinary precision and attention to anatomical alignment. Iyengar yoga uses props such as blocks, straps, and bolsters extensively and is ideal for those with injuries or a desire for surgical precision. |
| Yin Yoga | A slow, meditative practice where poses are held for 2 to 5 minutes, targeting the deep connective tissues of the body. Yin yoga is among the best types of yoga for deep flexibility and is deeply calming. |
| Restorative Yoga | A completely passive practice using bolsters, blankets, and blocks to support the body in restful positions. Restorative yoga activates the parasympathetic nervous system and is among the best yoga practices for stress and burnout. |
| Kundalini Yoga | A spiritual and energetic practice combining dynamic movement, breathwork, chanting, and meditation. Kundalini yoga works directly with the body’s energy system and is deeply transformative. |
| Bikram / Hot Yoga | Yoga practiced in a room heated to 35 to 40 degrees Celsius. The heat enables deeper stretching and intense detoxification. Best for those who enjoy heat and want a challenging physical practice. |
| Power Yoga | A Western adaptation of Ashtanga yoga focused on strength, conditioning, and athletic performance. Power yoga is among the most physically demanding types and is excellent for athletes seeking yoga for strength. |
Getting Started: What You Need to Begin Your Yoga Practice
One of the most beautiful things about yoga is its radical accessibility. You do not need an expensive gym membership, elaborate equipment, or a perfect body to begin. Here is everything you need to start practicing yoga poses at home today.
Essential Equipment for Yoga at Home
- A good quality yoga mat. This is your single essential piece of equipment. Look for a mat with adequate grip, 4 to 6mm of thickness for joint cushioning, and a length that accommodates your full height. A good mat transforms your practice.
- Yoga blocks (2 recommended). Blocks are not just for beginners. They are essential tools used by every level of practitioner to modify poses, improve alignment, and deepen stretches safely.
- A yoga strap. A strap extends your reach in poses where your hands cannot yet meet or where your flexibility is still developing. It is one of the most useful props for yoga poses for beginners.
- A blanket. Folded blankets provide cushioning for the knees and ankles, support for seated poses, and warmth during restorative practice and Savasana.
- Comfortable clothing. Wear clothing that allows full freedom of movement in every direction. You do not need to spend a fortune. Any stretchy, comfortable exercise clothing works perfectly.
- A quiet, dedicated space. Even a small corner of a room that you designate as your yoga space makes an enormous psychological difference. Clear enough floor space for your mat plus a foot on either side.
How to Structure Your Yoga Practice for Maximum Results
A complete and well-structured yoga session follows a natural arc that prepares the body, builds toward peak poses, and then brings it gently back to stillness. Here is the optimal structure used by professional yoga teachers worldwide:
- Centering and breathwork (3 to 5 minutes): Begin seated or lying down. Close your eyes, observe your natural breath, and set a clear intention for your practice.
- Warm-up (5 to 10 minutes): Begin with gentle mobilization. Cat-Cow Pose, gentle spinal twists, and hip circles awaken the spine and prepare the joints for deeper work.
- Standing sequence (10 to 20 minutes): Build heat and strength with standing yoga poses. Warrior poses, Triangle, and balancing postures form the energetic core of the practice.
- Peak poses (10 to 15 minutes): Work toward the most challenging poses of your session. These might be a deeper backbend, a balance pose, or a more advanced inversion.
- Floor sequence and cool-down (10 to 15 minutes): Transition to the floor for seated forward folds, hip openers, gentle twists, and restorative poses.
- Savasana (5 to 10 minutes minimum): Always end with Corpse Pose. This final resting pose is non-negotiable and is where the true integration of your practice takes place.
The 15 Essential Yoga Poses with Images
The following fifteen yoga poses form the bedrock of an intelligent, well-rounded yoga practice. Each pose has been covered with full depth including Sanskrit name, level, step-by-step instructions, complete benefits, expert alignment tips, and practical modifications for every body. The images from YogaSniff.com are indicated clearly at each pose so you can place them directly in your published blog post.
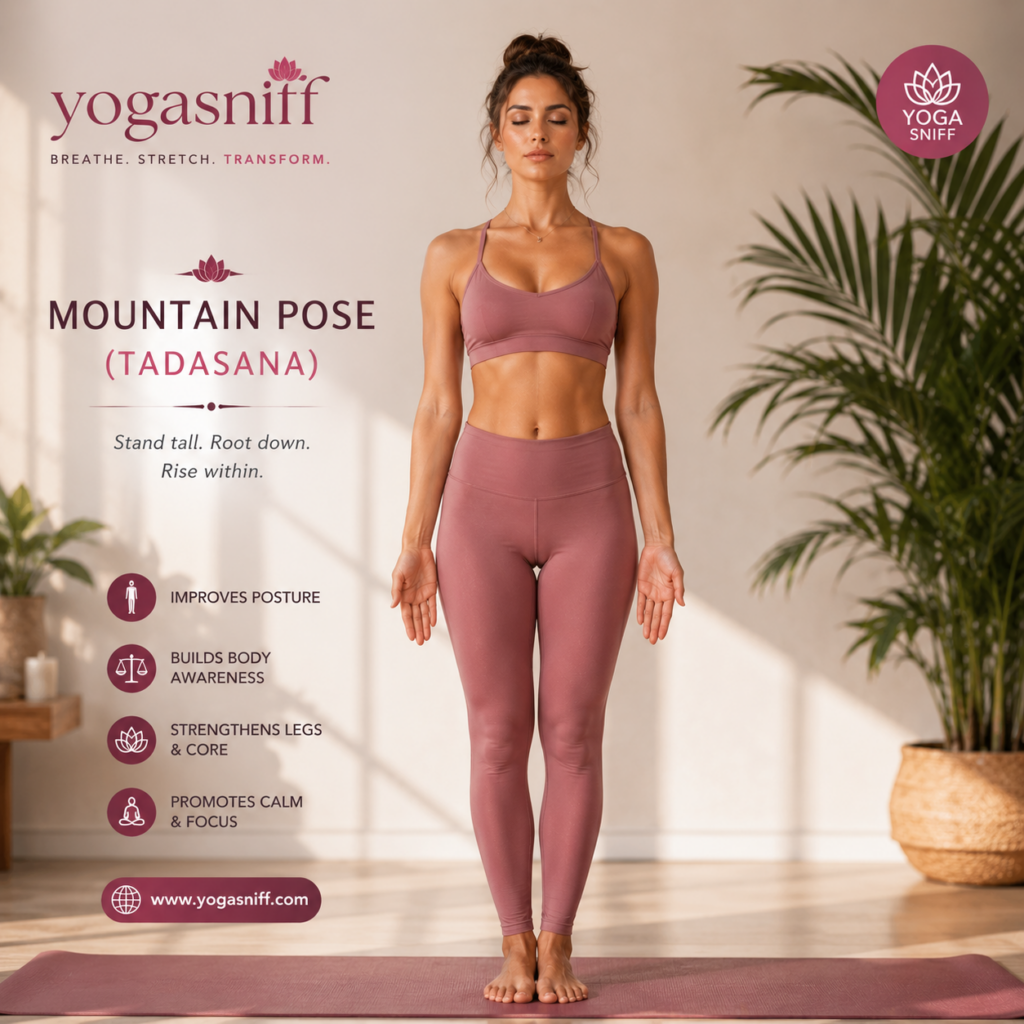
1. Mountain Pose (Tadasana)
| Detail | Information |
| Sanskrit Name | Tadasana |
| Level | Beginner |
| Type | Standing Balance |
| Duration | 30 seconds to 1 minute |
| Target Muscles | Core, legs, glutes, spinal muscles |
Mountain Pose is the foundation of all standing yoga poses. Despite looking simple, Tadasana is one of the most powerful postures in yoga because it teaches you how to stand with full awareness, proper alignment, and deep inner stillness. Every standing pose in yoga begins and ends in Mountain Pose, making it the cornerstone of any yoga asanas list.
Step-by-Step Instructions
- Step 1: Stand with your feet together or hip-width apart, pressing all four corners of your feet firmly into the mat.
- Step 2: Engage your thigh muscles and draw them slightly upward, lifting your kneecaps gently without locking your knees.
- Step 3: Lengthen your tailbone toward the floor and draw your lower belly in and up to activate your core.
- Step 4: Broaden your collarbones, roll your shoulders back and down, and let your arms hang naturally at your sides with palms facing forward.
- Step 5: Lengthen the back of your neck, tuck your chin slightly, and gaze directly forward at a fixed point.
- Step 6: Breathe deeply and hold for 30 to 60 seconds while maintaining full body awareness from feet to crown.
Key Benefits
- Improves posture and spinal alignment by training the body to stand tall and balanced.
- Builds body awareness and teaches proper anatomical alignment that carries into all other poses.
- Strengthens legs, knees, and ankles through sustained engagement and weight distribution.
- Promotes calm and mental focus by encouraging deep breathing and a present-moment state.
- Reduces flat feet by training the arches through mindful foot engagement.
- Increases lung capacity by opening the chest and creating space for the breath.
Expert Tip from YogaSniff
| Press through all four corners of your feet equally. Imagine a string gently pulling the crown of your head toward the ceiling. This single habit transforms your Mountain Pose from passive standing to active, powerful grounding. |
Modifications and Variations
If you feel unsteady, practice with your back against a wall. Beginners can also separate the feet hip-width apart for a wider, more stable base.
mountain pose yoga, tadasana benefits, standing yoga poses for beginners, yoga asana for posture
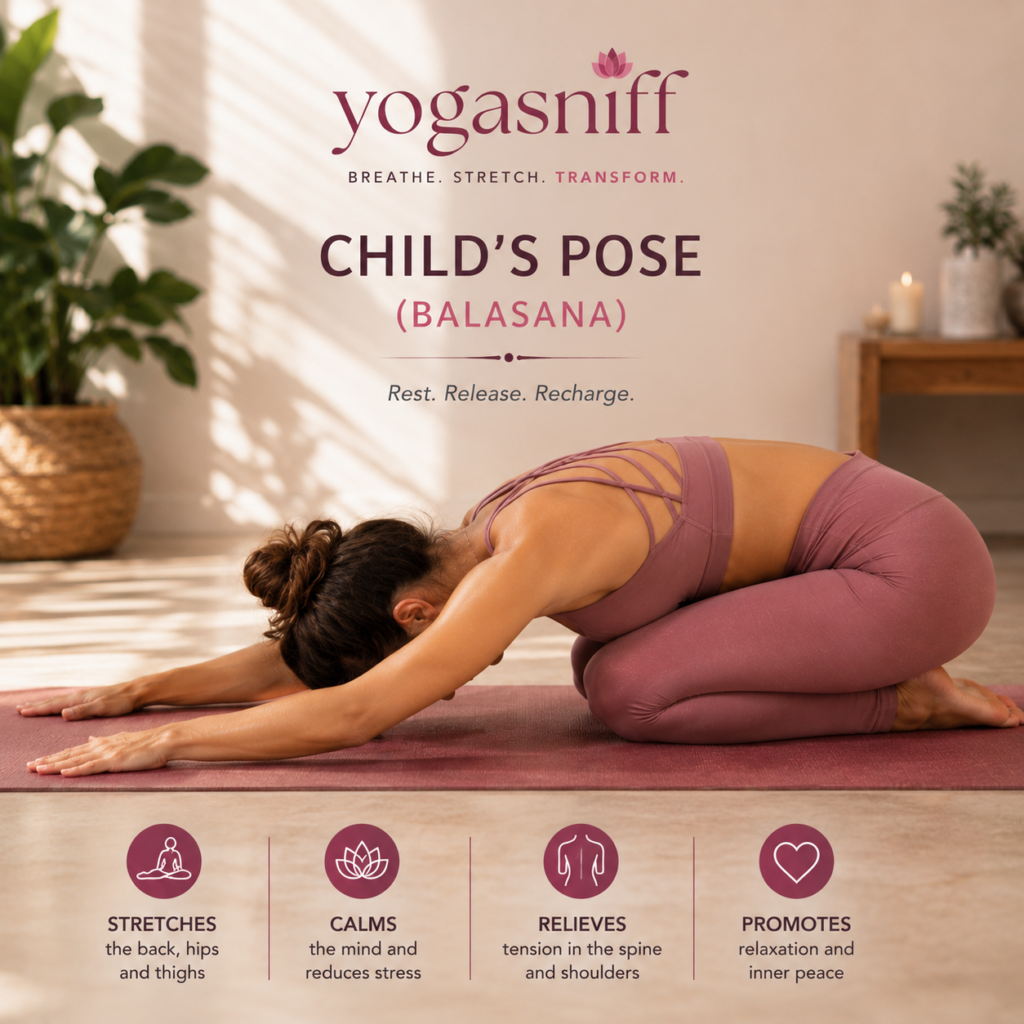
2. Child’s Pose (Balasana)
| Detail | Information |
| Sanskrit Name | Balasana |
| Level | Beginner |
| Type | Resting / Forward Fold |
| Duration | 1 to 3 minutes |
| Target Muscles | Hips, thighs, lower back, spine |
Child’s Pose is the universal resting posture in yoga. Whether you are a complete beginner or a seasoned practitioner, Balasana is the pose you always return to when your body needs to reset, breathe, and release. It is one of the most therapeutic yoga poses for back pain, anxiety, and fatigue, and it forms an essential part of any yoga for stress relief routine.
Step-by-Step Instructions
- Step 1: Begin in a tabletop position on your hands and knees with wrists under shoulders and knees under hips.
- Step 2: Bring your big toes together and then widen your knees to about hip-width apart or wider for a deeper hip release.
- Step 3: Exhale and slowly lower your hips back toward your heels, extending your arms long in front of you on the mat.
- Step 4: Rest your forehead on the mat and allow your entire upper body to melt downward with each exhale.
- Step 5: Close your eyes, soften your jaw, and breathe deeply into your lower back and the sides of your ribcage.
- Step 6: Hold for 1 to 3 minutes or as long as needed, returning to this pose anytime during your practice.
Key Benefits
- Stretches the hips, thighs, and ankles releasing deep tension stored in the lower body.
- Calms the nervous system by activating the parasympathetic response through gentle forward folding.
- Relieves lower back pain by gently decompressing the lumbar spine.
- Reduces stress and anxiety making it one of the top yoga poses for mental health.
- Promotes inner peace and relaxation by encouraging surrender and letting go.
- Improves digestion through gentle compression of the abdominal organs.
Expert Tip from YogaSniff
| Place a folded blanket between your thighs and calves if your hips do not reach your heels. A rolled blanket under the forehead works beautifully if the floor feels too far away. |
Modifications and Variations
For wide-knee Child’s Pose, separate your knees to the edges of the mat to create more space for the belly and chest. This version is especially recommended during pregnancy.
child’s pose yoga, balasana benefits, resting yoga pose, yoga for stress relief, yoga poses for back pain
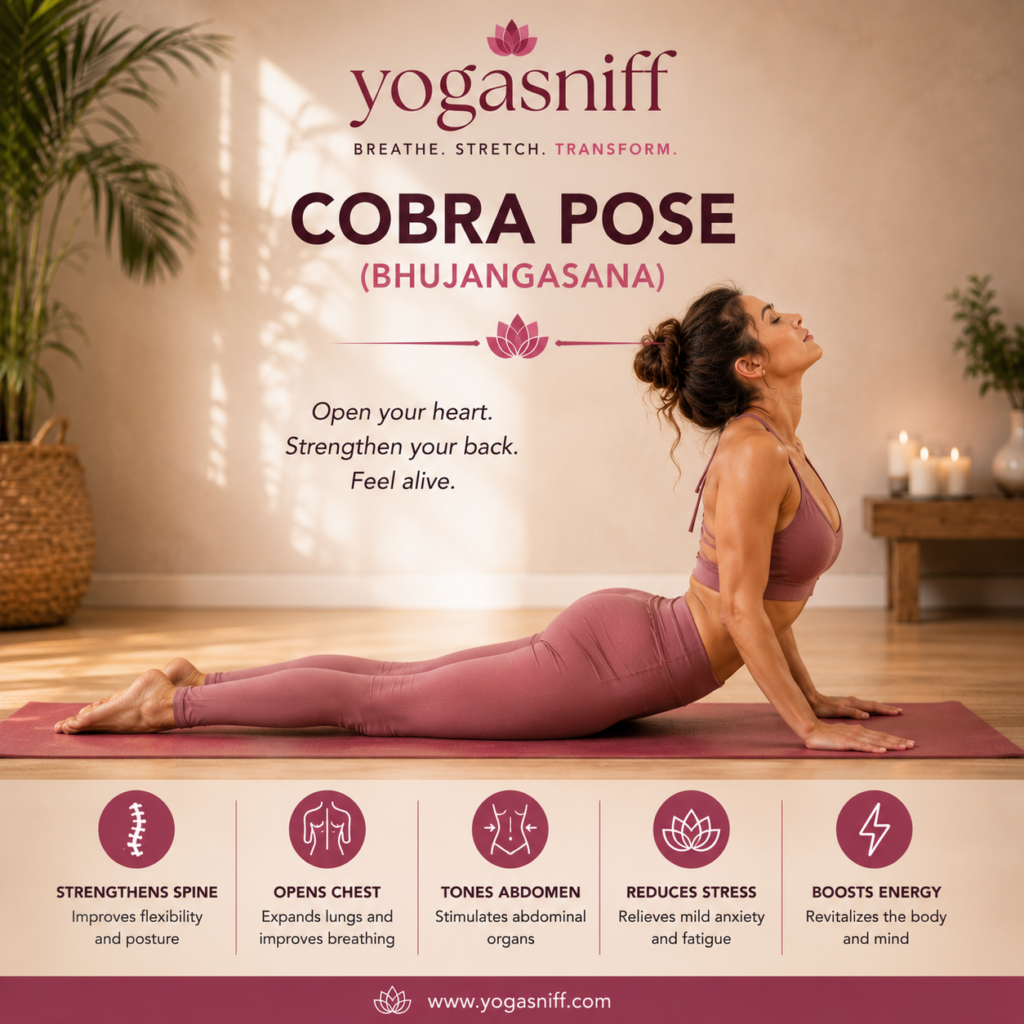
3. Cobra Pose (Bhujangasana)
| Detail | Information |
| Sanskrit Name | Bhujangasana |
| Level | Beginner to Intermediate |
| Type | Backbend |
| Duration | 15 to 30 seconds |
| Target Muscles | Spine, chest, shoulders, abdomen, glutes |
Cobra Pose is one of the most widely practiced backbend yoga poses in the world and is a core component of Surya Namaskar (Sun Salutation). Bhujangasana opens the heart, strengthens the spine, and energizes the entire body. It is one of the best yoga poses for back strength and is particularly effective as yoga for lower back pain relief when practiced correctly.
Step-by-Step Instructions
- Step 1: Lie face down on your mat with your legs extended behind you and the tops of your feet pressing into the floor.
- Step 2: Place your palms flat on the mat directly beneath your shoulders, fingertips spread wide, elbows tucked close to your ribcage.
- Step 3: Press the tops of your feet and your pubic bone gently but firmly into the mat.
- Step 4: Inhale deeply and begin to lift your chest off the mat by pressing into your palms, using your back muscles rather than arm strength.
- Step 5: Keep your elbows slightly bent, draw your shoulder blades back and down away from your ears, and open your heart forward.
- Step 6: Hold for 15 to 30 seconds with steady breathing, then slowly exhale as you lower back down to the mat.
Key Benefits
- Strengthens the entire spine and the muscles surrounding it, improving spinal flexibility and posture.
- Opens the chest and lungs expanding breathing capacity and benefiting respiratory health.
- Tones the abdominal muscles by stimulating the digestive organs through gentle compression.
- Reduces stress and fatigue by activating the adrenal glands and boosting energy levels.
- Stimulates digestion and may help relieve constipation and bloating.
- Strengthens the shoulders and arms when practiced consistently over time.
Expert Tip from YogaSniff
| Keep your shoulders away from your ears at all times. The height of your lift matters far less than the quality of your alignment. Even a small lift with perfect form is more beneficial than a dramatic backbend with collapsed shoulders. |
Modifications and Variations
Beginners should practice Baby Cobra, lifting only 2 to 3 inches off the mat. Advanced practitioners can progress to Full Cobra or Upward Facing Dog (Urdhva Mukha Svanasana).
cobra pose yoga, bhujangasana benefits, backbend yoga poses, yoga for lower back pain, yoga poses for spine strength
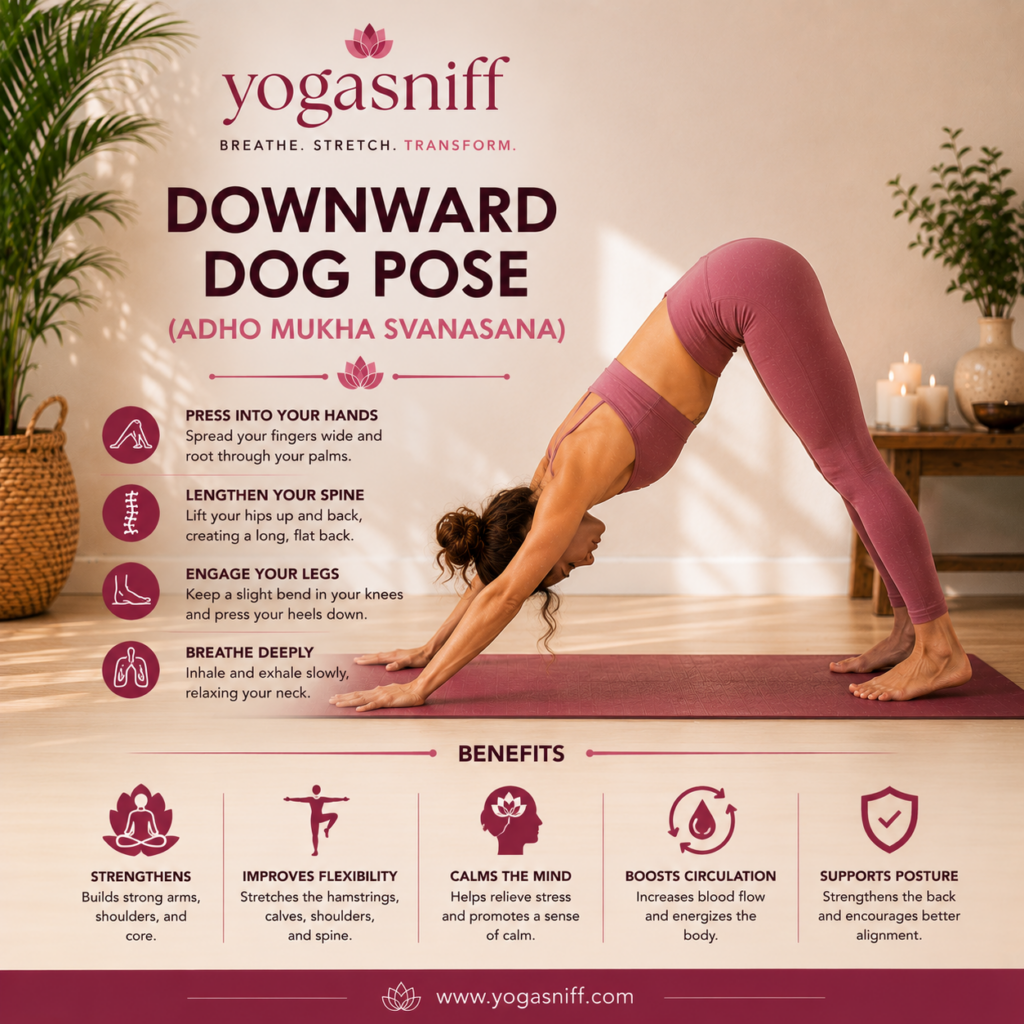
4. Downward Facing Dog (Adho Mukha Svanasana)
| Detail | Information |
| Sanskrit Name | Adho Mukha Svanasana |
| Level | Beginner |
| Type | Inversion / Forward Fold |
| Duration | 1 to 3 minutes |
| Target Muscles | Hamstrings, calves, shoulders, arms, spine, core |
Downward Facing Dog is arguably the most recognized yoga pose in the world and for very good reason. It is a full-body strengthening and stretching pose that simultaneously works your arms, shoulders, core, hamstrings, calves, and spine. As both a resting pose and an active posture, Adho Mukha Svanasana is one of those essential yoga poses that appears in virtually every style of yoga practice.
Step-by-Step Instructions
- Step 1: Begin in a tabletop position with hands shoulder-width apart, fingers spread wide, and knees directly under your hips.
- Step 2: Tuck your toes under, press firmly into your palms, and exhale as you lift your hips up and back to form an inverted V shape.
- Step 3: Straighten your arms and legs as much as comfortable, keeping a micro-bend in both knees if your hamstrings are tight.
- Step 4: Press your chest gently toward your thighs and your heels toward the floor, even if they do not touch.
- Step 5: Spread your fingers wide, distributing your weight evenly through your entire hand to protect your wrists.
- Step 6: Breathe deeply for 1 to 3 minutes, pedaling your heels alternately to warm up and loosen the calves.
Key Benefits
- Builds strong arms and shoulders through sustained weight bearing and engagement.
- Improves flexibility in the hamstrings, calves, spine, and shoulders simultaneously.
- Calms the mind and relieves stress through the mild inversion and deep breathing it encourages.
- Boosts circulation by positioning the heart above the head, improving blood flow to the brain.
- Supports better posture by strengthening the back and encouraging proper spinal alignment.
- Energizes the entire body and is commonly used as a transitional rest pose in vinyasa flow.
Expert Tip from YogaSniff
| Think of pulling your navel toward your spine to protect your lower back. If you feel pressure in your wrists, press through the knuckles and pads of your fingers rather than the heel of the hand. |
Modifications and Variations
Place a folded blanket under your wrists for cushioning. Bend your knees generously if hamstrings are tight. Wall Downward Dog is a wonderful beginner alternative.
downward dog pose, adho mukha svanasana, yoga poses for beginners, full body yoga poses, hamstring stretch yoga
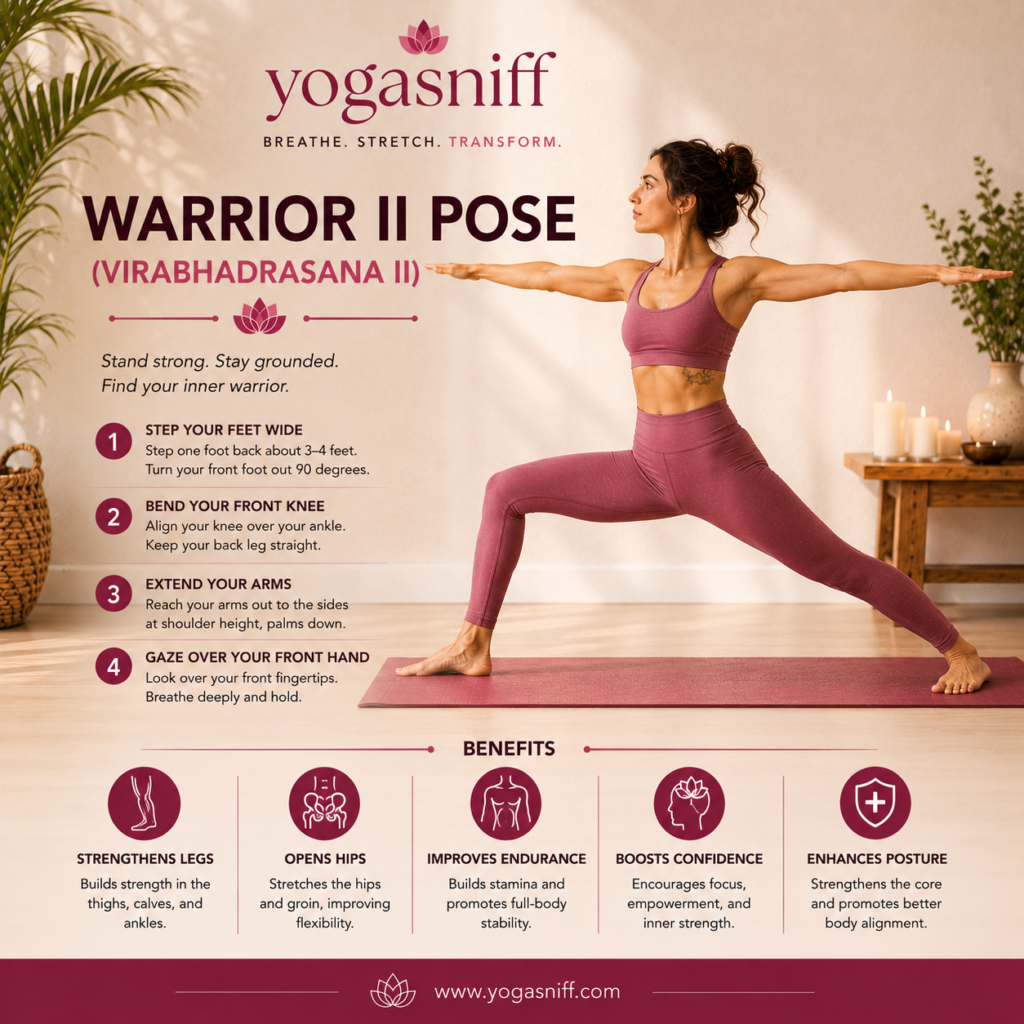
5. Warrior II Pose (Virabhadrasana II)
| Detail | Information |
| Sanskrit Name | Virabhadrasana II |
| Level | Beginner to Intermediate |
| Type | Standing Strength |
| Duration | 30 seconds to 1 minute per side |
| Target Muscles | Thighs, hips, groin, shoulders, arms, core |
Warrior II is one of the most powerful and iconic yoga poses in the entire practice. Named after the fierce warrior Virabhadra from Hindu mythology, this pose builds physical strength, mental endurance, and inner confidence simultaneously. It is one of the foundational yoga poses for leg strength and hip flexibility, and it plays a central role in most standing yoga sequences.
Step-by-Step Instructions
- Step 1: Step your feet wide apart, about 4 feet, and extend your arms out to the sides at shoulder height, parallel to the floor, palms facing down.
- Step 2: Turn your right foot out 90 degrees and angle your left foot in slightly, aligning your right heel with the arch of your left foot.
- Step 3: Exhale and bend your right knee to stack directly over your right ankle, aiming for a 90-degree angle in the front leg.
- Step 4: Keep your back leg straight and strong, pressing the outer edge of your back foot firmly into the mat.
- Step 5: Gaze over your right fingertips and draw your shoulder blades back and down, keeping your torso directly over your hips.
- Step 6: Hold for 30 to 60 seconds, then switch sides and repeat on the left.
Key Benefits
- Strengthens the legs, knees, and ankles building powerful lower body endurance.
- Opens the hips and groin improving flexibility in the hip flexors and inner thighs.
- Improves stamina and endurance by building heat and muscular strength through sustained holding.
- Boosts confidence and focus by cultivating the warrior mindset of strength and presence.
- Improves posture and alignment by training the core and back to support an upright torso.
- Tones the entire body from feet to fingertips through full-body engagement.
Expert Tip from YogaSniff
| Keep your front knee tracking directly over your second toe. Beginners often let the knee collapse inward, which places stress on the joint. Draw the knee outward to maintain safe and powerful alignment. |
Modifications and Variations
Reduce the depth of your lunge if your hips or knees feel strain. A chair placed beside the front leg provides excellent support for beginners and seniors.
warrior 2 pose yoga, virabhadrasana II, standing yoga poses, yoga for leg strength, yoga poses for confidence
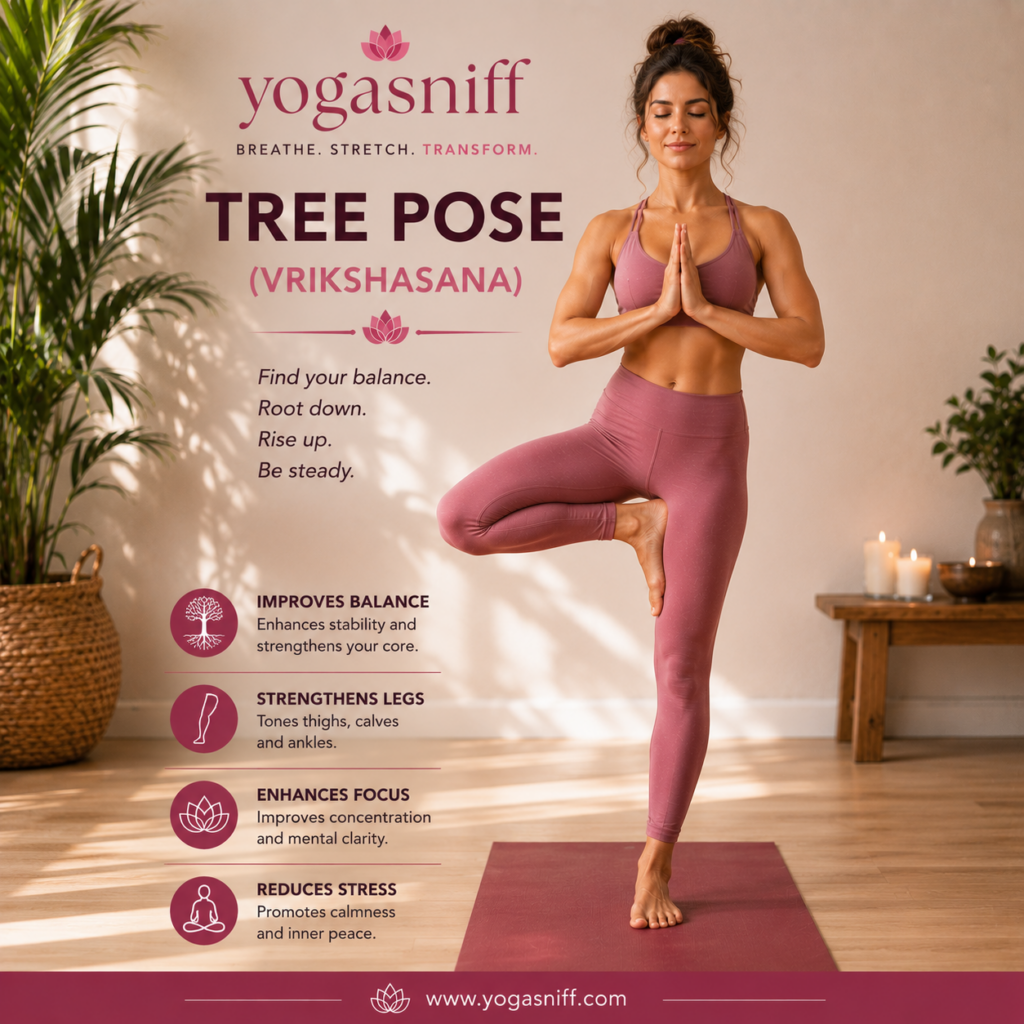
6. Tree Pose (Vrikshasana)
| Detail | Information |
| Sanskrit Name | Vrikshasana |
| Level | Beginner to Intermediate |
| Type | Standing Balance |
| Duration | 30 seconds to 1 minute per side |
| Target Muscles | Legs, ankles, core, glutes, inner thighs |
Tree Pose is the most beloved standing balance pose in yoga and one of the most visually iconic yoga postures in existence. Vrikshasana teaches you to stand on one leg with the grace, stillness, and rootedness of a tree, developing concentration, balance, and inner calm. It is one of the best yoga poses for mental focus and is a cornerstone of balance yoga sequences.
Step-by-Step Instructions
- Step 1: Begin in Mountain Pose. Shift your weight to your left foot and press it firmly into the mat.
- Step 2: Bend your right knee and place the sole of your right foot against the inner left calf, inner left thigh, or anywhere except directly on the knee joint.
- Step 3: Find your balance and bring your hands to prayer position at the heart center, or extend the arms overhead like branches.
- Step 4: Fix your gaze (your drishti) on a still, unmoving point in front of you at eye level to help maintain balance.
- Step 5: Keep your standing leg strong and slightly engaged but not locked, and your hips level and square.
- Step 6: Hold for 30 to 60 seconds, breathe steadily, then release and repeat on the opposite side.
Key Benefits
- Improves balance and proprioception by training the body to find stability on one leg.
- Strengthens the legs and tones the thighs, calves, and ankles through sustained single-leg standing.
- Enhances mental focus and concentration by requiring a steady gaze and a calm, present mind.
- Opens the hips by externally rotating the lifted leg and stretching the inner thigh and groin.
- Reduces stress and promotes calmness through the meditative quality of sustained balance work.
- Builds ankle stability reducing the risk of ankle sprains and improving overall joint health.
Expert Tip from YogaSniff
| Never place your foot directly against the side of your knee. This puts dangerous lateral pressure on the joint. Instead, place it above or below the knee. Pressing your foot and inner thigh against each other creates isometric tension that dramatically improves stability. |
Modifications and Variations
Keep your toes on the floor with your heel resting against the standing ankle for a gentler version. Practice near a wall for added support while building confidence.
tree pose yoga, vrikshasana, balance yoga poses, yoga for focus and concentration, standing balance yoga
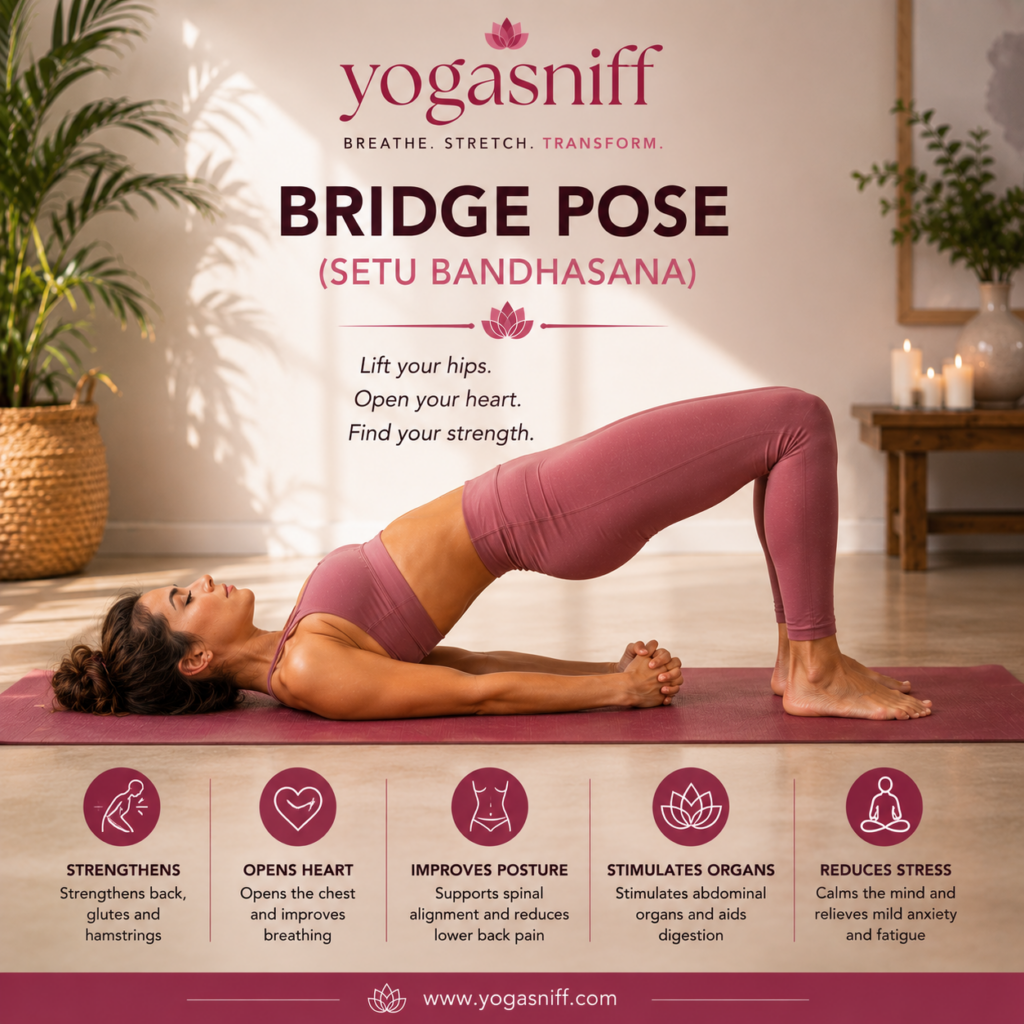
7. Bridge Pose (Setu Bandhasana)
| Detail | Information |
| Sanskrit Name | Setu Bandhasana |
| Level | Beginner |
| Type | Backbend / Gentle Inversion |
| Duration | 30 seconds to 1 minute |
| Target Muscles | Glutes, hamstrings, lower back, chest, core |
Bridge Pose is a gentle yet deeply effective backbend that strengthens the posterior chain while simultaneously opening the chest and stretching the hip flexors. Setu Bandhasana is one of the most therapeutic yoga poses for lower back pain and is widely prescribed in yoga therapy. It is also one of the most effective yoga poses for glutes and makes an excellent preparatory pose for deeper backbends.
Step-by-Step Instructions
- Step 1: Lie on your back with your knees bent and feet flat on the mat, hip-width apart, heels close to your sitting bones.
- Step 2: Place your arms alongside your body with palms facing down. You can also interlace your fingers beneath your lower back.
- Step 3: Press your feet firmly into the mat, engage your core and glutes, and on an inhale lift your hips toward the ceiling.
- Step 4: Roll your shoulders under your body and draw your shoulder blades together to open and lift your chest.
- Step 5: Keep your thighs parallel, avoid letting your knees splay outward, and engage your inner thighs.
- Step 6: Hold for 30 to 60 seconds with smooth, steady breathing, then slowly lower down vertebra by vertebra on an exhale.
Key Benefits
- Strengthens the glutes, hamstrings, and lower back building powerful posterior chain support.
- Opens the chest and heart improving breathing capacity and countering the forward-hunch of modern life.
- Reduces lower back pain by strengthening the muscles that support the lumbar spine.
- Stimulates the thyroid and abdominal organs due to the gentle chin-to-chest position.
- Calms the mind and relieves mild anxiety making it one of the most therapeutic yoga poses for mental health.
- Improves spinal alignment by training the back body to work in proper coordination.
Expert Tip from YogaSniff
| Do not tighten your gluteal muscles so aggressively that they compress the lower back. Focus instead on driving your hips up through the power of your legs and the lift of your chest. |
Modifications and Variations
Place a yoga block under your sacrum for Supported Bridge Pose, which is deeply restorative and requires no muscular effort. This is a wonderful choice for yoga for beginners at home.
bridge pose yoga, setu bandhasana, yoga poses for lower back pain, yoga for glutes, backbend yoga poses for beginners
8. Cat-Cow Pose (Marjaryasana-Bitilasana)
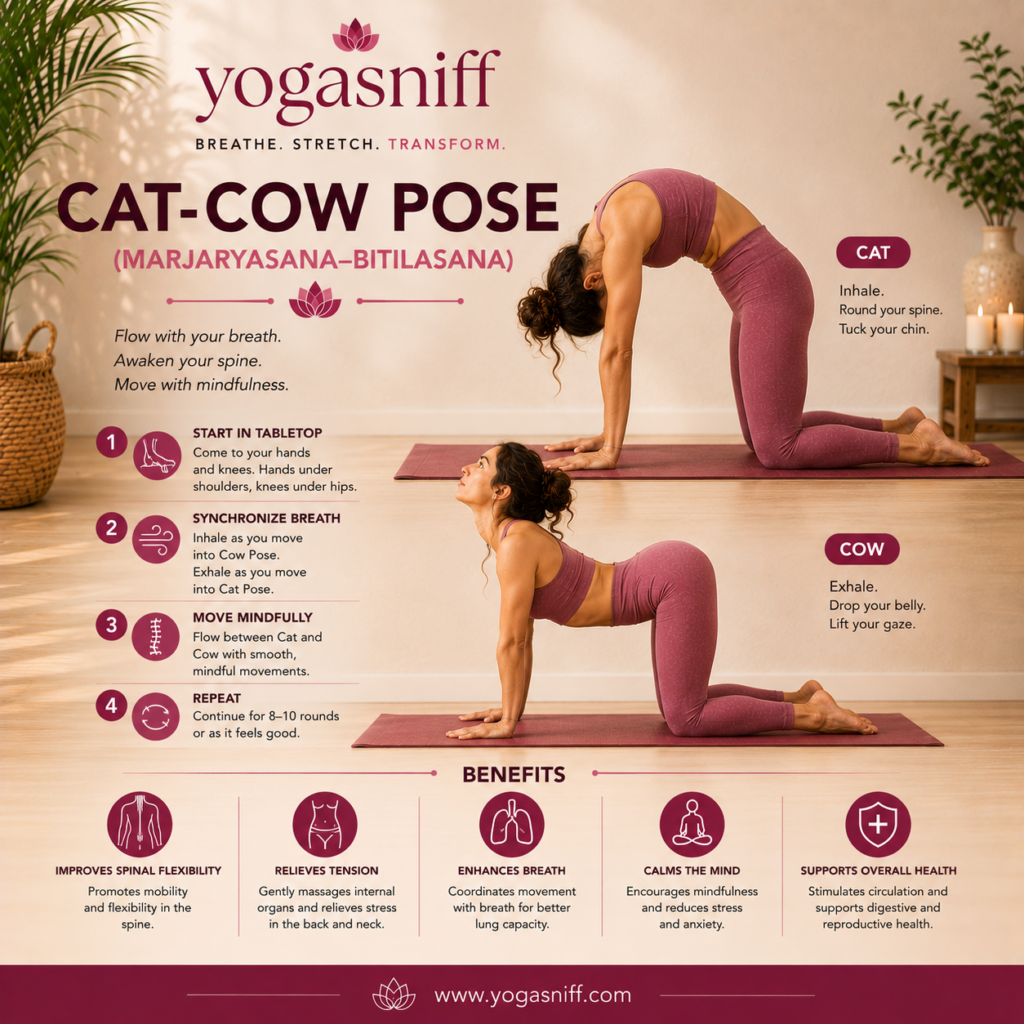
| Detail | Information |
| Sanskrit Name | Marjaryasana (Cat) / Bitilasana (Cow) |
| Level | Beginner |
| Type | Spinal Mobilization / Warm-Up |
| Duration | 1 to 3 minutes (8 to 10 rounds) |
| Target Muscles | Spine, core, neck, hips, abdominal organs |
Cat-Cow is a gentle, flowing spinal mobilization that links movement with breath and is the single most recommended warm-up in all of yoga. Practiced as a flowing sequence between the two positions, Marjaryasana-Bitilasana wakes up the spine, massages the abdominal organs, and synchronizes the breath with movement. It is one of the most essential yoga poses for back pain, stiffness, and spinal health.
Step-by-Step Instructions
- Step 1: Begin in a tabletop position with your wrists beneath your shoulders and knees beneath your hips, spine in a neutral position.
- Step 2: For Cow Pose: inhale deeply, drop your belly toward the mat, lift your chest and gaze forward, and let your tailbone rise toward the ceiling.
- Step 3: For Cat Pose: exhale fully, round your spine toward the ceiling, tuck your chin to your chest, and draw your navel up and in.
- Step 4: Flow continuously between these two positions, allowing each inhale to bring you into Cow and each exhale into Cat.
- Step 5: Move slowly and deliberately with the breath, making the movement as fluid and wave-like as possible.
- Step 6: Continue for 8 to 10 rounds, then return to neutral tabletop and pause to feel the effects.
Key Benefits
- Improves spinal flexibility by mobilizing every segment of the spine from the neck to the tailbone.
- Relieves tension and stiffness in the back and neck, making it ideal for morning yoga practice.
- Stimulates and massages the abdominal organs improving digestion and internal organ function.
- Coordinates breath with movement training the fundamental pranayama-asana connection.
- Calms the mind through the rhythmic, meditative quality of the flowing movement.
- Supports overall health by stimulating circulation and improving spinal nerve function.
Expert Tip from YogaSniff
| The magic of Cat-Cow is entirely in the breath. Let the breath lead the movement rather than moving first and breathing after. This distinction transforms it from a simple stretch into a true yogic practice. |
Modifications and Variations
If wrist pain is present, practice on your fists or use yoga blocks under your hands. A seated version in a chair is ideal for anyone who cannot comfortably come to hands and knees.
cat cow pose yoga, marjaryasana bitilasana, yoga for back pain, spine flexibility yoga, yoga warm up poses
9. Triangle Pose (Trikonasana)
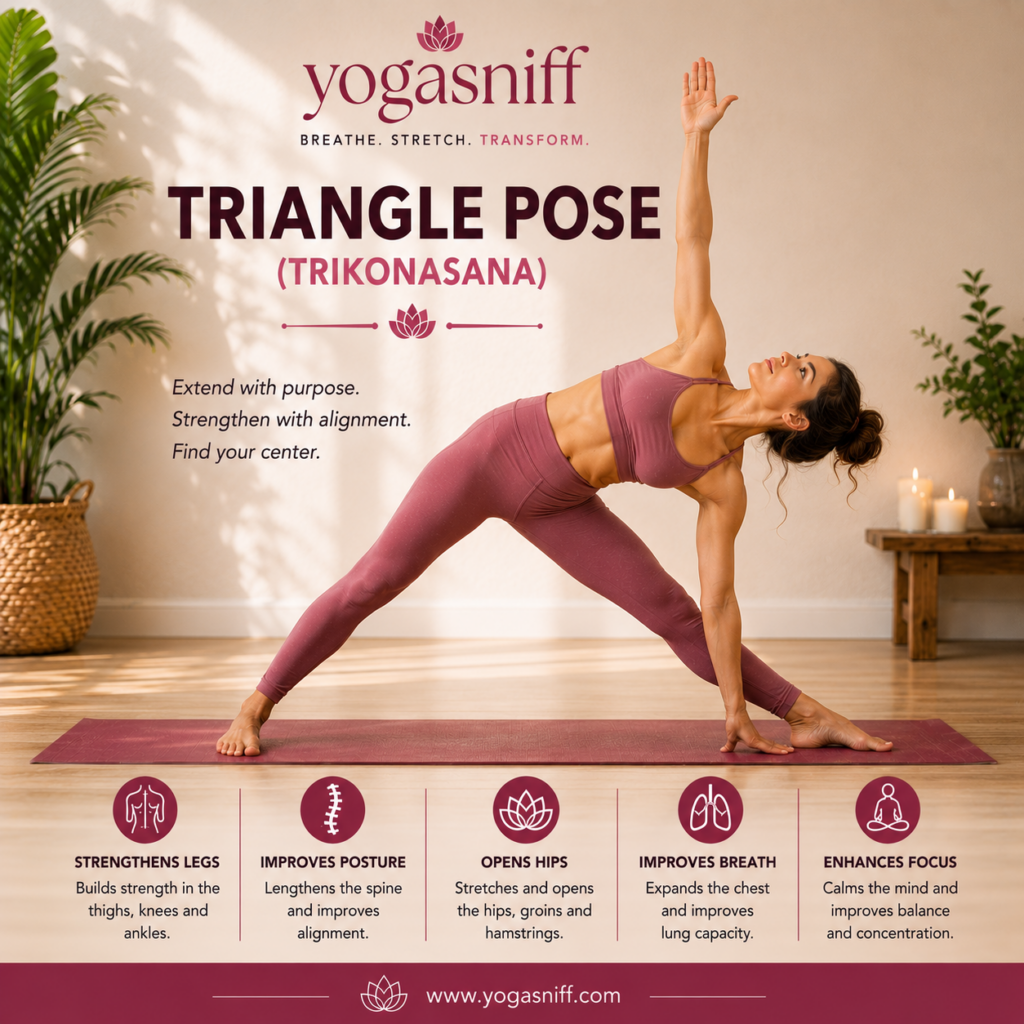
| Detail | Information |
| Sanskrit Name | Trikonasana |
| Level | Beginner to Intermediate |
| Type | Standing Lateral Bend |
| Duration | 30 seconds to 1 minute per side |
| Target Muscles | Legs, hips, hamstrings, groin, spine, chest |
Triangle Pose is a fundamental standing posture that creates a beautiful geometry in the body while simultaneously stretching and strengthening multiple muscle groups. Trikonasana is widely celebrated as one of the most complete standing yoga poses because it addresses strength, flexibility, balance, and body awareness all at once. It is a key pose in Iyengar yoga, Ashtanga, and virtually every yoga style.
Step-by-Step Instructions
- Step 1: Stand with feet about 4 feet apart. Turn your right foot out 90 degrees and angle your left foot in 15 to 30 degrees.
- Step 2: Extend your arms out to the sides at shoulder height, parallel to the floor, with palms facing down.
- Step 3: Inhale to lengthen the spine, then exhale and hinge from your right hip, extending your torso to the right directly over your right leg.
- Step 4: Lower your right hand to your shin, ankle, a block, or the floor, without collapsing your torso forward.
- Step 5: Extend your left arm straight toward the ceiling, stacking it over your right arm, and turn your gaze up toward your left hand.
- Step 6: Hold for 30 to 60 seconds, keeping both sides of the torso equally long, then inhale to rise and repeat on the left.
Key Benefits
- Strengthens the legs, knees, and ankles building powerful, stable lower body support.
- Improves posture by lengthening the spine and training the body to extend laterally with control.
- Opens the hips and groin through the wide-legged stance and external rotation.
- Improves breathing by expanding the chest and ribcage through the lateral opening.
- Enhances focus and concentration by requiring a steady gaze and precise alignment.
- Stimulates the abdominal organs aiding in digestion and relieving sluggishness.
Expert Tip from YogaSniff
| The most common mistake in Triangle Pose is reaching too far forward with the lower hand, which collapses the front torso. Place a yoga block on the outside of your front ankle and rest your hand there to maintain the full length of both sides of your body. |
Modifications and Variations
Use a yoga block on any height under your lower hand. Keep a micro-bend in both knees to protect the joints and make the pose more accessible for tight hamstrings.
triangle pose yoga, trikonasana benefits, standing yoga poses, yoga for flexibility, lateral bend yoga poses
10. Seated Forward Bend (Paschimottanasana)
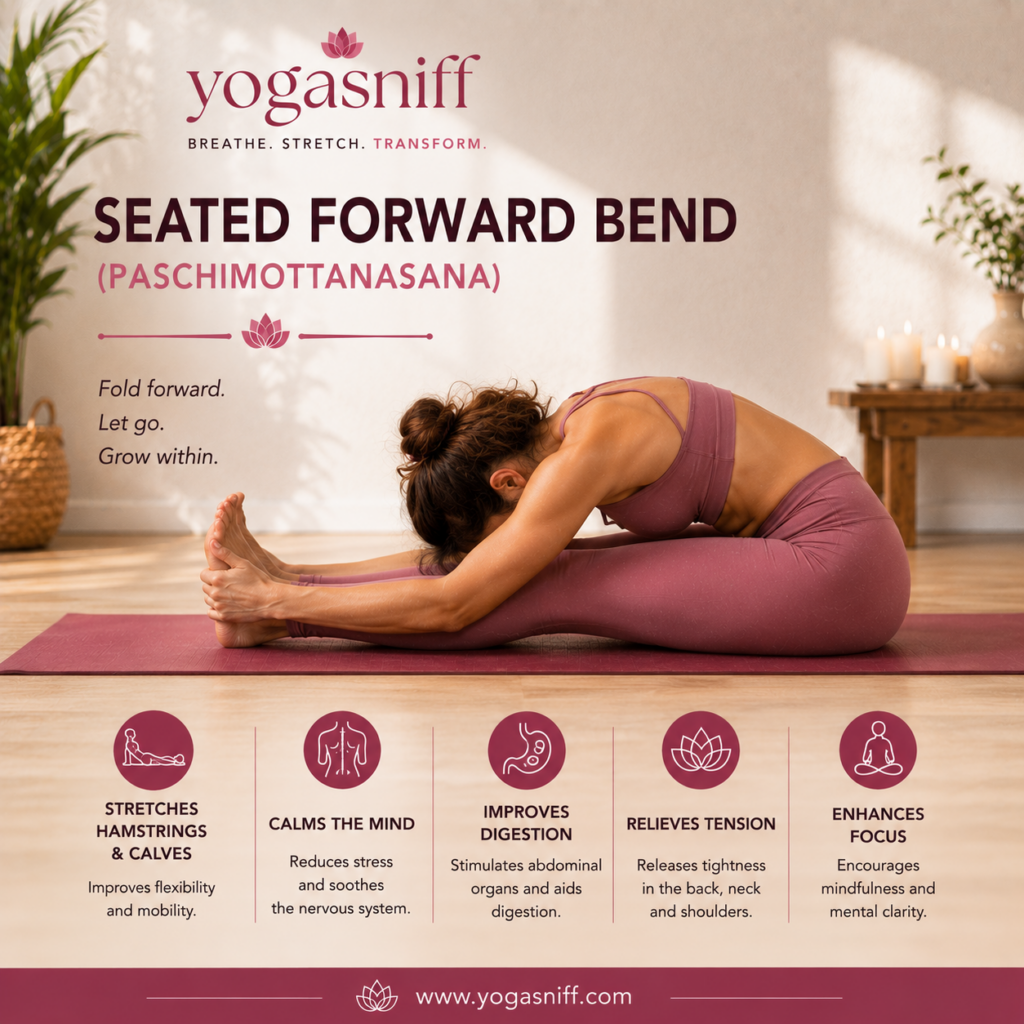
| Detail | Information |
| Sanskrit Name | Paschimottanasana |
| Level | Beginner to Intermediate |
| Type | Seated Forward Fold |
| Duration | 1 to 3 minutes |
| Target Muscles | Hamstrings, lower back, calves, spine, shoulders |
Seated Forward Bend is one of the most important poses in all of yoga, particularly in Hatha and Ashtanga traditions. Paschimottanasana stretches the entire posterior side of the body from the heels to the crown of the head, which is why its Sanskrit name translates to ‘intense stretch of the West side of the body.’ It is one of the most effective yoga poses for hamstring flexibility and is deeply calming for the nervous system.
Step-by-Step Instructions
- Step 1: Sit on your mat with both legs extended straight in front of you, feet flexed so your toes point toward the ceiling.
- Step 2: Sit on a folded blanket if your lower back rounds heavily or if your hamstrings are very tight.
- Step 3: Inhale and lengthen your spine tall, reaching the crown of your head toward the ceiling.
- Step 4: Exhale and hinge from your hips, not your waist, reaching your hands toward your feet, shins, or ankles.
- Step 5: Hold wherever you can reach without your lower back rounding aggressively, keeping a long spine as your primary goal.
- Step 6: With each inhale lengthen, with each exhale fold a little deeper. Hold for 1 to 3 minutes.
Key Benefits
- Stretches the hamstrings and calves improving lower body flexibility more effectively than almost any other single pose.
- Calms the mind and soothes the nervous system making it one of the best yoga poses for anxiety.
- Improves digestion through the abdominal compression that stimulates digestive organs.
- Relieves tension in the back and shoulders accumulated from sitting, commuting, or stress.
- Enhances mental focus through the inward, meditative quality of a forward fold.
- Stretches the spine and can help relieve mild sciatica and lower back discomfort.
Expert Tip from YogaSniff
| A long spine with a slight bend in the knees is always superior to a deep fold with a rounded back. Sit on the edge of a folded blanket to tilt the pelvis forward and immediately improve the quality of your fold. |
Modifications and Variations
Use a yoga strap looped around the feet to hold the forward fold without rounding. Bend the knees generously and place a rolled blanket beneath them for maximum comfort.
seated forward bend yoga, paschimottanasana, hamstring stretch yoga, yoga for flexibility, forward fold yoga poses
11. Side Plank Pose (Vasisthasana)
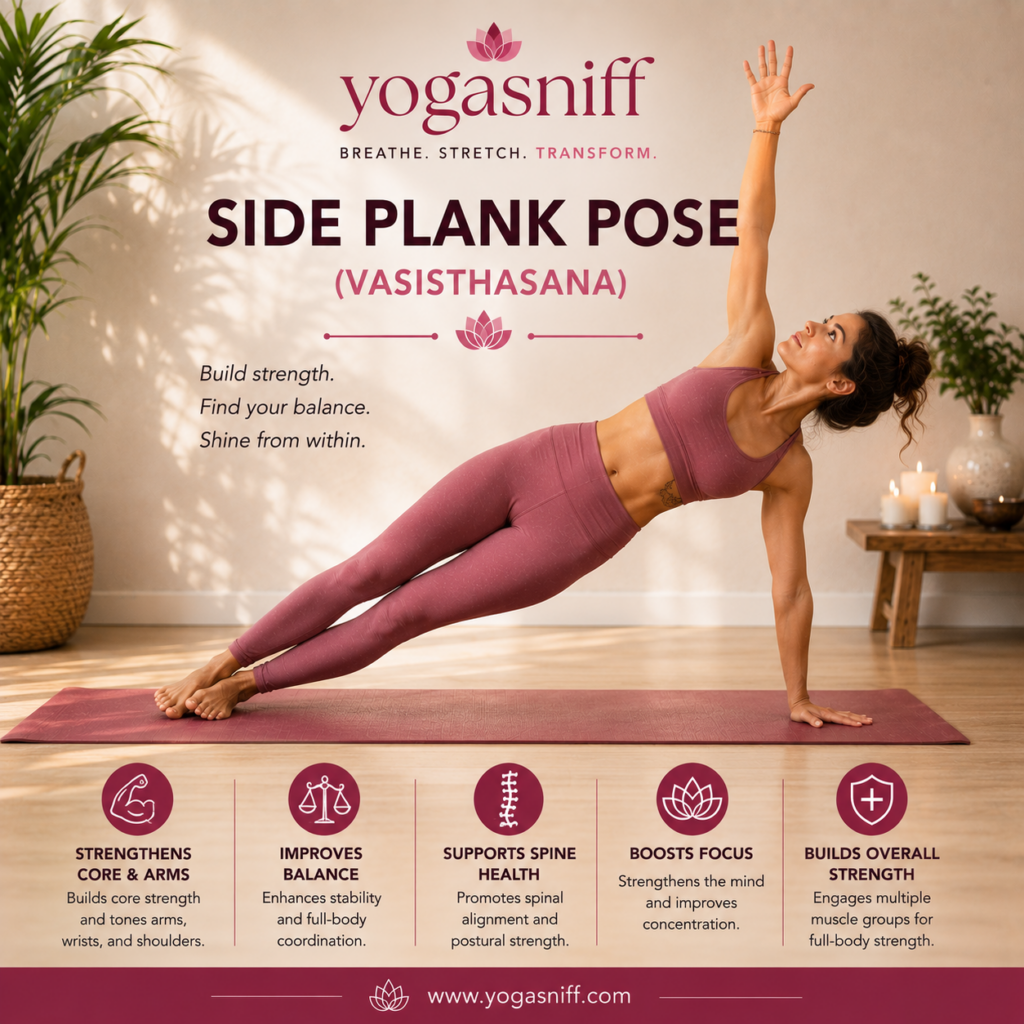
| Detail | Information |
| Sanskrit Name | Vasisthasana |
| Level | Intermediate |
| Type | Arm Balance / Core Strengthening |
| Duration | 15 to 45 seconds per side |
| Target Muscles | Core, obliques, shoulders, arms, wrists, hips |
Side Plank is one of the most challenging and rewarding yoga poses for core strength. Named after the sage Vasishtha, this powerful arm balance tests your ability to maintain full-body alignment and strength while balanced on one hand and the outer edge of one foot. It is one of the most effective yoga poses for abs and obliques and is a cornerstone of any yoga for strength routine.
Step-by-Step Instructions
- Step 1: Begin in a standard plank position with your wrists under your shoulders and your body in one long straight line.
- Step 2: Shift your weight to your right hand and the outer edge of your right foot, stacking your left foot on top of the right or placing it in front.
- Step 3: Lift your left arm toward the ceiling, stacking it over your right shoulder, and turn your gaze upward toward your left hand.
- Step 4: Engage your core powerfully to prevent your hips from sagging toward the floor.
- Step 5: Keep your body in one straight diagonal line from head to heel, with no collapsing at the hips or shoulders.
- Step 6: Hold for 15 to 45 seconds, breathing steadily, then lower and repeat on the left side.
Key Benefits
- Strengthens the core and obliques building the lateral stability that most other exercises miss.
- Improves balance and coordination by requiring full-body integration on a single point of support.
- Supports spinal health by strengthening the muscles along the sides of the spine.
- Tones the arms, wrists, and shoulders through sustained weight bearing.
- Builds overall body strength by engaging multiple muscle groups simultaneously.
- Boosts mental focus because maintaining the pose demands unwavering concentration.
Expert Tip from YogaSniff
| Press the floor away from you through your supporting hand rather than sinking into it. This subtle shift activates your shoulder girdle and protects your wrist joint from compression. |
Modifications and Variations
Drop your bottom knee to the mat for a supported version (Half Side Plank) that still provides significant core and shoulder strengthening benefits with much greater stability.
side plank pose yoga, vasisthasana, yoga for core strength, arm balance yoga poses, yoga for abs
12. Crow Pose (Bakasana)
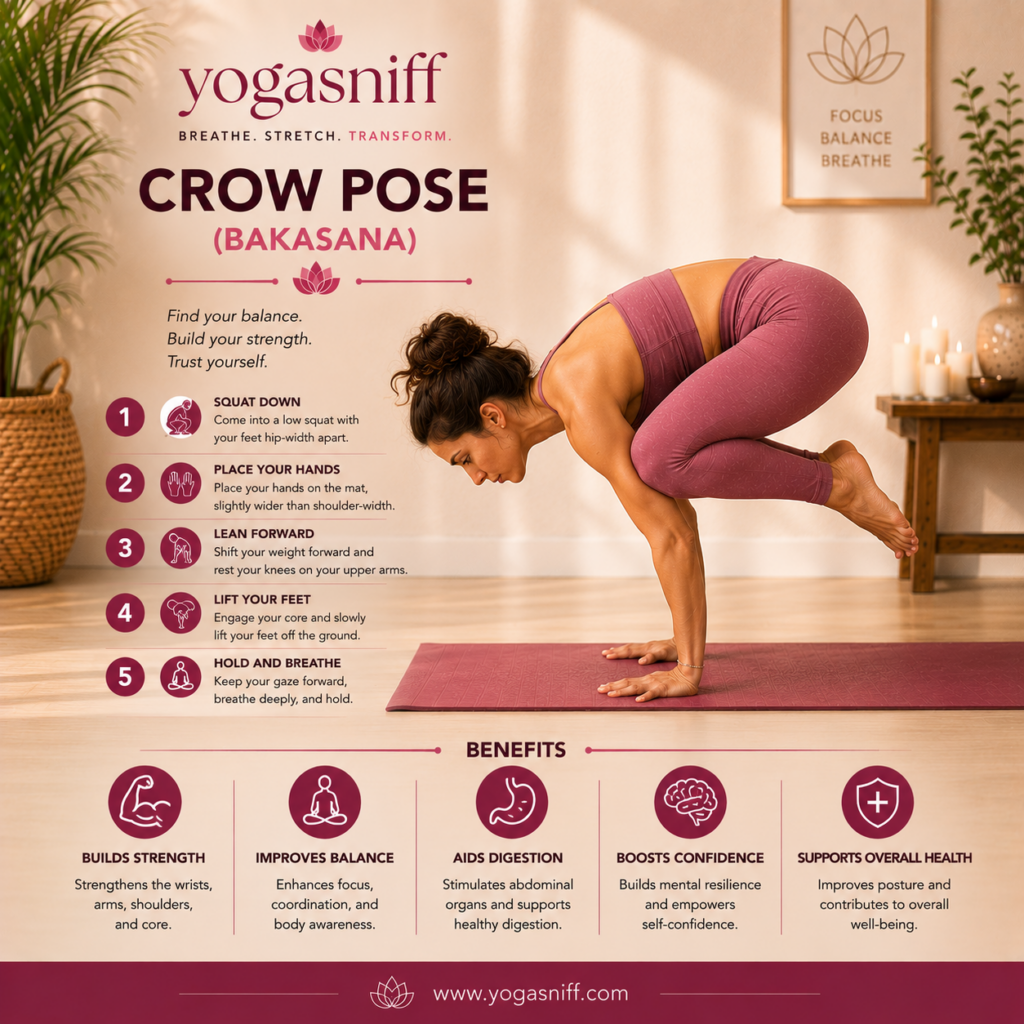
| Detail | Information |
| Sanskrit Name | Bakasana |
| Level | Intermediate to Advanced |
| Type | Arm Balance |
| Duration | 10 to 30 seconds |
| Target Muscles | Arms, wrists, shoulders, core, hip flexors |
Crow Pose is the gateway arm balance in yoga and one of the most exciting poses beginners work toward. Bakasana requires a combination of arm strength, core engagement, and the mental courage to shift your weight forward and trust your arms to hold you. It is one of the best yoga poses for building arm strength and is a transformative milestone in any yoga practice.
Step-by-Step Instructions
- Step 1: Come into a low squat with your feet hip-width apart. Place your palms flat on the mat, shoulder-width apart, fingers spread wide.
- Step 2: Bend your elbows slightly, creating a shelf with your upper arms. Place your inner knees on the backs of your upper arms, as high up toward your armpits as possible.
- Step 3: Shift your gaze forward about a foot in front of your hands and begin to shift your weight forward into your hands.
- Step 4: Lift one foot off the mat, then the other, drawing your knees as close to your armpits as possible.
- Step 5: Squeeze your knees against your arms for support, engage your core powerfully, and round your upper back to create lift.
- Step 6: Hold for 10 to 30 seconds, breathing steadily. Lower with control and rest in Child’s Pose.
Key Benefits
- Builds significant arm and wrist strength through full body weight bearing on the hands.
- Improves balance and proprioception by training the body to find equilibrium on two small points.
- Strengthens the core through the intense hip flexor and abdominal engagement required.
- Builds confidence and mental resilience by overcoming the fear of falling forward.
- Improves overall body coordination by requiring all parts to work in perfect integration.
- Aids digestion through the compression of the abdominal region in the pose.
Expert Tip from YogaSniff
| Place a folded blanket or pillow in front of you when learning. The psychological safety of knowing there is something soft to fall on dramatically reduces the fear that keeps most beginners from making progress. |
Modifications and Variations
Practice with each foot briefly lifting off individually before attempting both together. A yoga block under each foot can help beginners find the correct weight shift without requiring as much hip flexibility.
crow pose yoga, bakasana, arm balance yoga poses, yoga for arm strength, intermediate yoga poses
13. Wild Thing Pose (Camatkarasana)
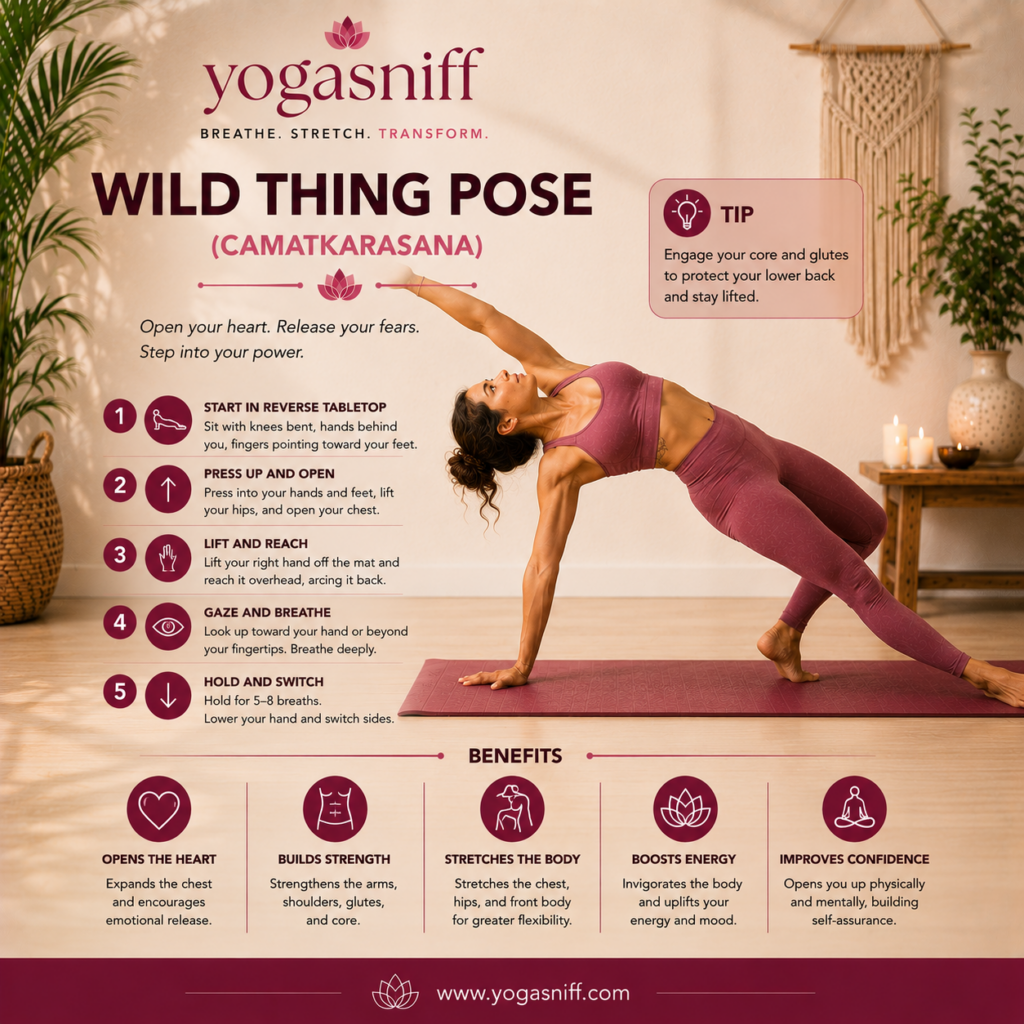
| Detail | Information |
| Sanskrit Name | Camatkarasana |
| Level | Intermediate |
| Type | Backbend / Arm Balance Hybrid |
| Duration | 15 to 30 seconds per side |
| Target Muscles | Chest, shoulders, core, hip flexors, glutes, spine |
Wild Thing is one of yoga’s most joyful and expressive poses, often called ‘the ecstatic unfolding of the heart.’ Camatkarasana is a dynamic backbend that flows from Side Plank and creates a beautiful arc through the entire front body. It is one of the most energizing yoga poses for chest opening and is known to lift mood, release emotional tension, and invigorate the entire body and spirit.
Step-by-Step Instructions
- Step 1: Begin in Downward Facing Dog. Shift your weight to your right hand and the outer edge of your right foot, coming into Side Plank (Vasisthasana).
- Step 2: Bend your left knee and step the left foot back behind you, placing the ball of the foot on the mat with toes pointed back.
- Step 3: Lift your left hand off the mat and begin to arc it overhead, opening your chest fully toward the sky.
- Step 4: Let your head drop back gently, following the arc of the arm and allowing your heart to open completely.
- Step 5: Press through your right hand and lift your hips as high as possible while keeping your right foot firmly planted.
- Step 6: Hold for 15 to 30 seconds, breathing expansively, then return through Side Plank and repeat on the left.
Key Benefits
- Opens the heart and chest dramatically expanding breathing capacity and emotional release.
- Builds strength in the arms and shoulders through the combination of side plank and backbend.
- Stretches the hip flexors and front body counteracting the tightness from prolonged sitting.
- Boosts energy and uplifts mood through the invigorating heart-opening and full-body expansion.
- Improves spinal flexibility by moving the spine into a lateral and backward arc simultaneously.
- Builds confidence and self-expression through its inherently joyful and expansive nature.
Expert Tip from YogaSniff
| Engage your core and glutes before lifting your hips to protect your lower back. The more you can press into the standing hand and foot, the more your hips will lift and the more beautiful and safe the pose becomes. |
Modifications and Variations
Practice the pose close to a wall for support. Keeping the lifted foot on the floor rather than stepping it back is a gentler variation that still provides the heart-opening benefit.
wild thing pose yoga, camatkarasana, heart opening yoga poses, backbend yoga poses, intermediate yoga poses
14. Pigeon Pose (Eka Pada Rajakapotasana)
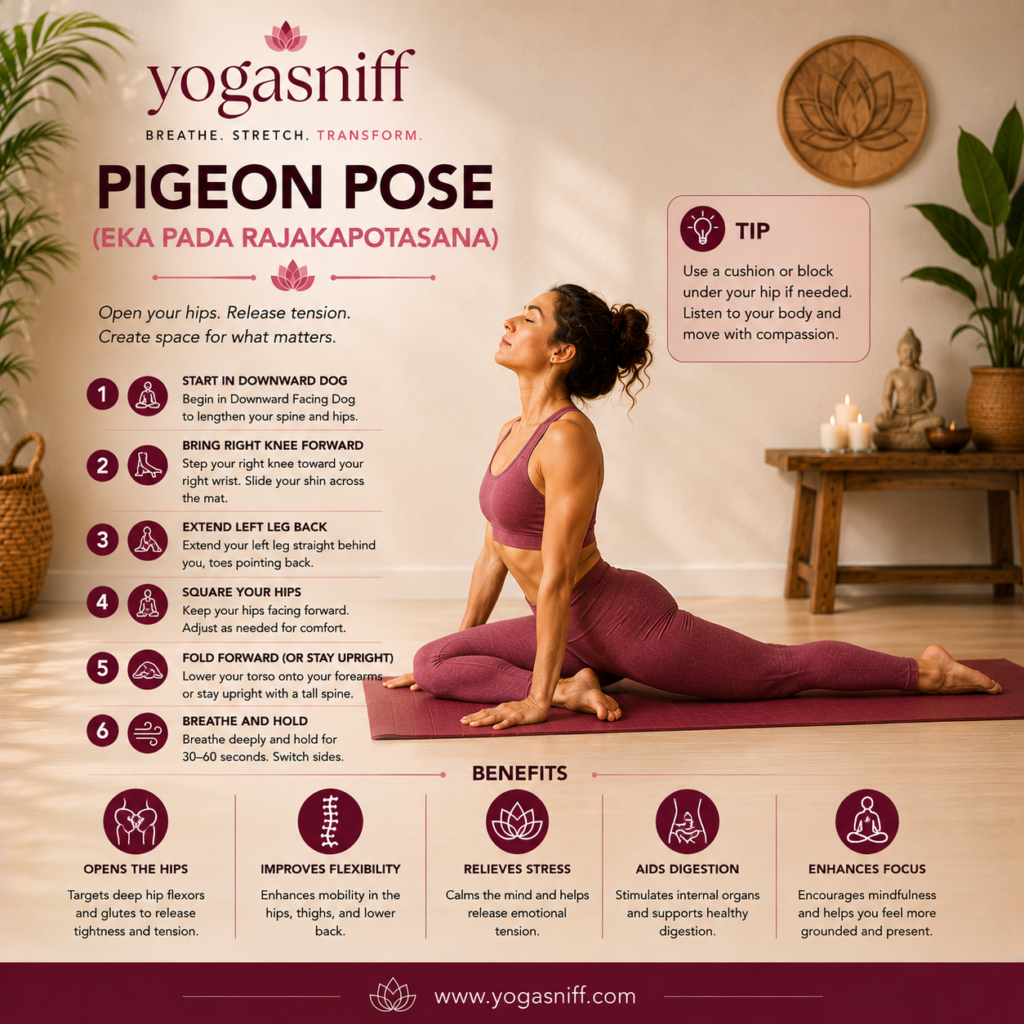
| Detail | Information |
| Sanskrit Name | Eka Pada Rajakapotasana |
| Level | Intermediate |
| Type | Deep Hip Opener |
| Duration | 1 to 3 minutes per side |
| Target Muscles | Hip flexors, piriformis, glutes, groin, lower back |
Pigeon Pose is considered the most powerful hip-opening yoga pose in the entire practice. Eka Pada Rajakapotasana targets the deep external rotators of the hip, including the piriformis, which is the muscle most commonly associated with sciatica pain. It is one of the most requested yoga poses for hip pain, tight hips from running or cycling, and emotional release stored in the hip region.
Step-by-Step Instructions
- Step 1: Begin in Downward Facing Dog. Lift your right leg and bring your right knee forward toward your right wrist.
- Step 2: Place your right shin across the mat at an angle, with your right foot pointing toward your left wrist. The more parallel your shin is to the top of the mat, the more intense the hip stretch.
- Step 3: Slide your left leg straight back behind you, lowering the top of the left thigh to the mat. Keep your hips squared toward the front as much as possible.
- Step 4: Use your hands for support and sit upright if this is already intense. For a deeper stretch, walk your hands forward and lower your forearms or chest to the mat.
- Step 5: Breathe slowly and deeply, allowing the hip to release with each exhale. Resist the urge to rush or force.
- Step 6: Hold for 1 to 3 minutes, focusing on slow, surrendered breathing, then carefully come back to Downward Dog and switch sides.
Key Benefits
- Opens the hips deeply targeting the piriformis and deep external rotators that most exercises never reach.
- Improves flexibility in the hips and thighs creating freedom of movement in the lower body.
- Relieves sciatica pain by stretching the piriformis, which can compress the sciatic nerve when tight.
- Encourages emotional release as the hips are known in yoga tradition to store unprocessed emotions.
- Improves posture by releasing the hip flexors that pull the pelvis forward when chronically tight.
- Enhances athletic performance making it essential for runners, cyclists, and anyone who sits for long periods.
Expert Tip from YogaSniff
| Use a folded blanket or yoga block under the hip of your front bent leg if that hip is lifted off the mat. Keeping the hips level is far more important than going deep in this pose. Uneven hips indicate the body is not yet ready for that depth. |
Modifications and Variations
Reclined Pigeon (Supta Kapotasana or Figure Four) is an excellent supine alternative that provides all the same hip-opening benefits with complete spinal support and no wrist pressure.
pigeon pose yoga, eka pada rajakapotasana, hip opening yoga poses, yoga for tight hips, yoga for sciatica
15. Locust Pose (Salabhasana)
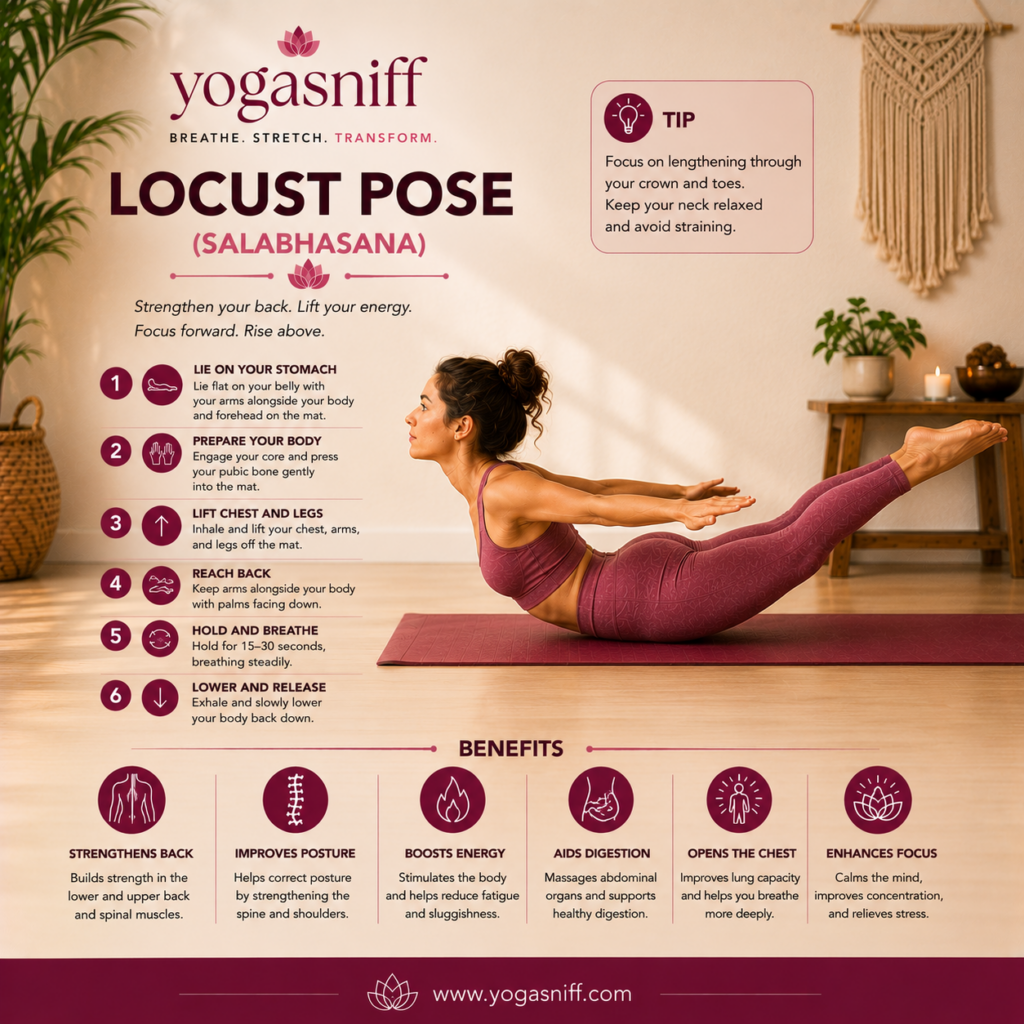
| Detail | Information |
| Sanskrit Name | Salabhasana |
| Level | Beginner to Intermediate |
| Type | Backbend / Prone Strengthening |
| Duration | 15 to 30 seconds, 2 to 3 rounds |
| Target Muscles | Lower and upper back, glutes, hamstrings, chest, shoulders |
Locust Pose is one of the most effective yoga poses for building back strength and is the essential counterpose to all the forward folding that modern life demands of our bodies. Salabhasana activates the entire posterior chain, from the lower back through the glutes and hamstrings, and is one of the most prescribed yoga poses for poor posture caused by desk work and prolonged sitting.
Step-by-Step Instructions
- Step 1: Lie face down on your mat with your arms alongside your body, palms facing down, and your forehead or chin resting on the mat.
- Step 2: Press your pubic bone and the tops of your feet gently into the mat to anchor the pelvis.
- Step 3: Inhale deeply, and on the exhale, simultaneously lift your head, chest, arms, and legs off the mat.
- Step 4: Keep your arms extended alongside your body or reach them back behind you with palms facing up.
- Step 5: Gaze forward or slightly down to keep the back of the neck long and avoid crunching the cervical spine.
- Step 6: Hold for 15 to 30 seconds, breathing steadily, then exhale and lower everything back down. Rest and repeat 2 to 3 times.
Key Benefits
- Strengthens the entire back body from the lower back to the upper back and shoulders.
- Improves posture by activating and toning the muscles that keep us upright and counteract slouching.
- Boosts energy by stimulating the adrenal glands and creating heat throughout the back body.
- Aids digestion by massaging the abdominal organs through the prone position and lifting.
- Opens the chest and improves breathing expanding the front body during the lift.
- Strengthens the hamstrings and glutes making it a complementary pose to all forward folds.
Expert Tip from YogaSniff
| Keep your neck relaxed and your gaze slightly forward rather than straight up. Imagine that someone has a thread attached to your breastbone pulling it forward rather than up, which creates length rather than compression. |
Modifications and Variations
Lift only the upper body and leave the legs on the mat for a gentler version (Half Locust Upper). Alternatively, lift only the legs and leave the upper body down (Half Locust Lower). Both are excellent preparatory stages.
locust pose yoga, salabhasana, yoga for back strength, prone yoga poses, yoga for posture improvement
20 More Essential Yoga Poses
16. Warrior I Pose (Virabhadrasana I)
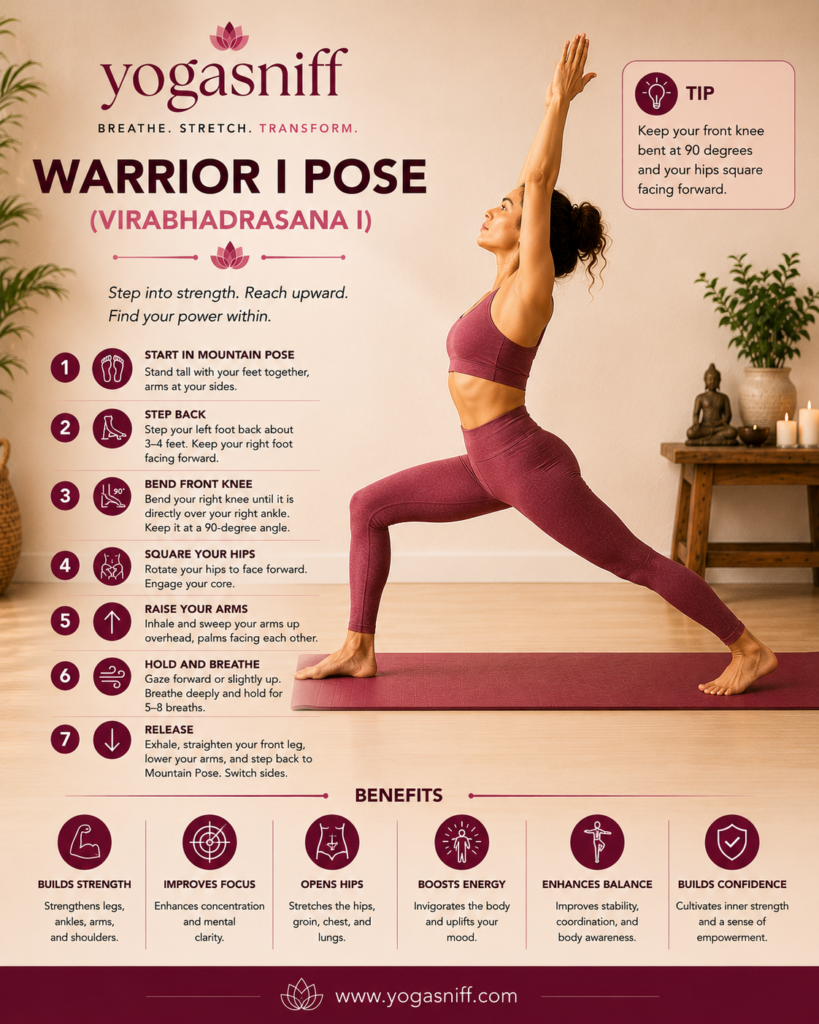
| Detail | Information |
| Sanskrit Name | Virabhadrasana I |
| Level | Beginner to Intermediate |
| Type | Standing Strength |
Warrior I is a powerful standing pose that combines a deep lunge with a dramatic upward arm extension. It builds strength, stability, and focus while deeply stretching the hip flexors. It is one of the most important yoga poses for building full-body power.
Key Benefits
- Strengthens legs, hips, and core
- Opens the chest and shoulders
- Stretches hip flexors and groin
- Builds stamina and endurance
- Improves focus and determination
Expert Tip
| Square your hips as much as possible toward the front of the mat. The back hip will naturally resist squaring, so keep working it gently forward without forcing. |
17. Warrior III Pose (Virabhadrasana III)
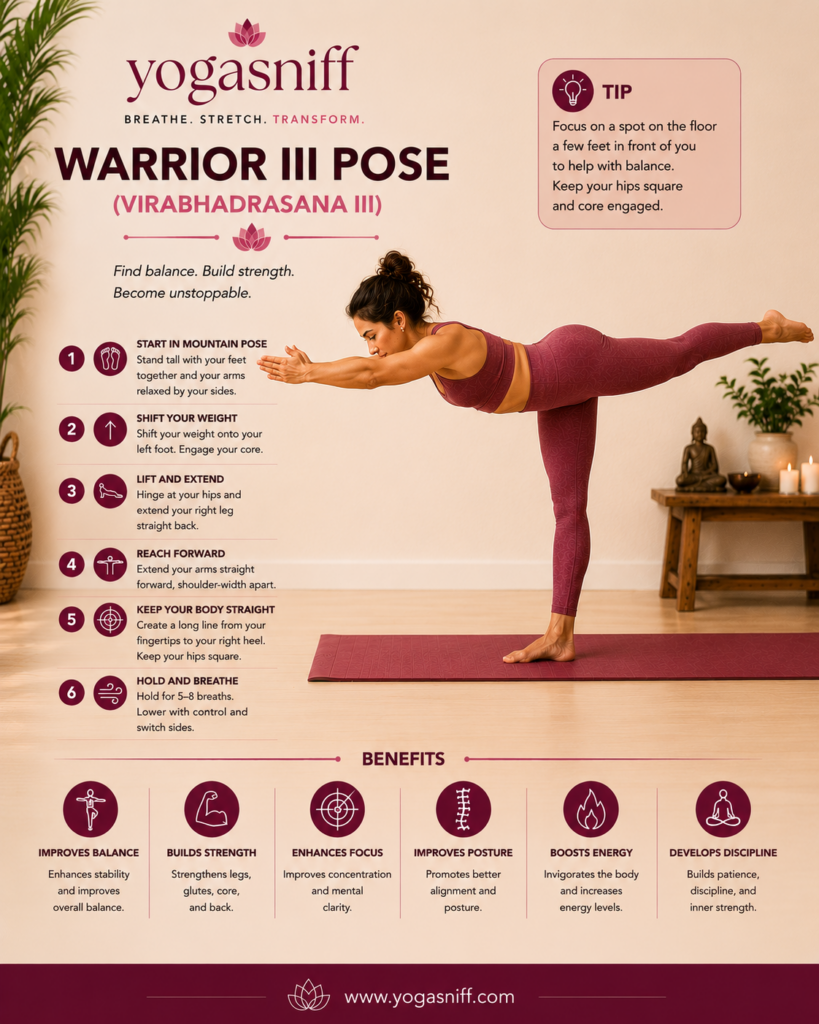
| Detail | Information |
| Sanskrit Name | Virabhadrasana III |
| Level | Intermediate |
| Type | Standing Balance |
Warrior III is the most challenging of the Warrior poses and one of the best yoga poses for balance and total body strength. Balancing on one leg with the torso and lifted leg parallel to the floor demands exceptional core strength, focus, and lower body stability.
Key Benefits
- Improves balance and coordination
- Strengthens the entire posterior chain
- Builds core strength
- Tones arms and shoulders
- Develops intense mental focus
Expert Tip
| Flex the foot of your lifted leg and press through the heel as if you are pushing a wall away behind you. This activates the entire back chain and makes the pose significantly more stable. |
18. Extended Side Angle Pose (Utthita Parsvakonasana)
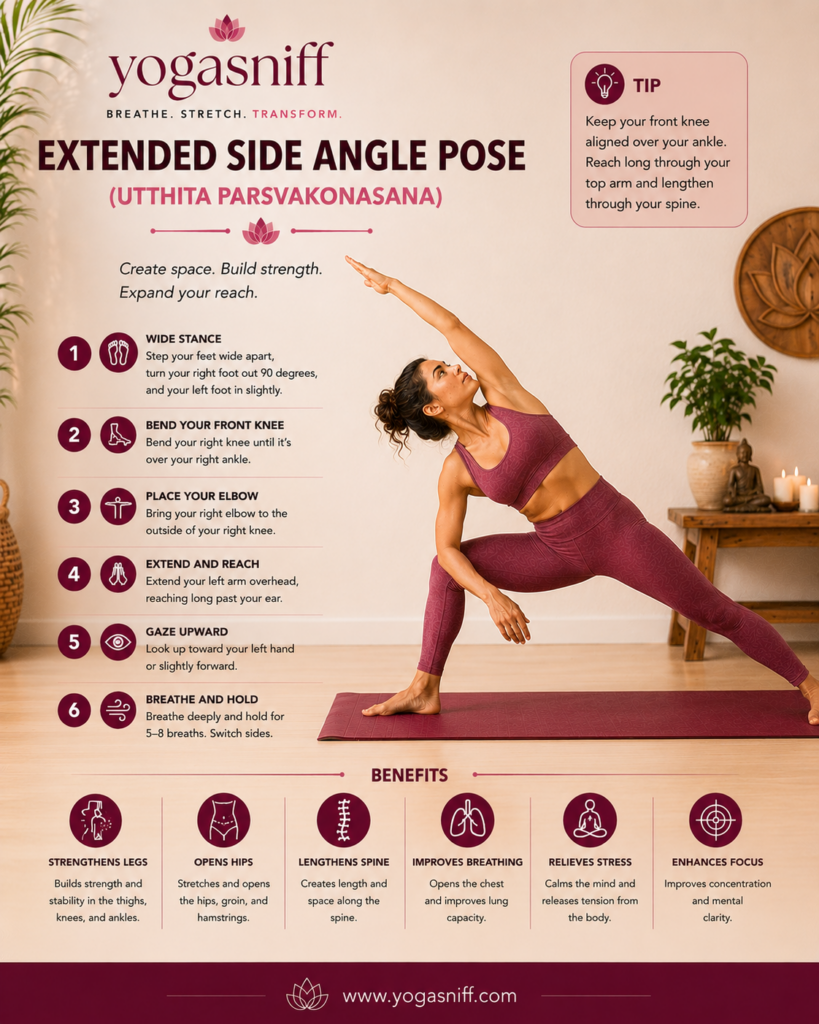
| Detail | Information |
| Sanskrit Name | Utthita Parsvakonasana |
| Level | Beginner to Intermediate |
| Type | Standing Strength |
Extended Side Angle Pose is a powerful standing posture that creates one long, diagonal line from the outer back foot through the fingertips. It stretches the entire side body, strengthens the legs, and opens the chest and lungs, making it one of the most complete yoga poses for the whole body.
Key Benefits
- Strengthens legs and ankles
- Stretches the groins, spine, and chest
- Stimulates abdominal organs
- Improves lung capacity
- Builds stamina
Expert Tip
| Press the outer edge of your back foot firmly into the mat while your front knee stays stacked over the ankle. This grounding creates the stability from which the full extension becomes possible. |
19. Half Moon Pose (Ardha Chandrasana)
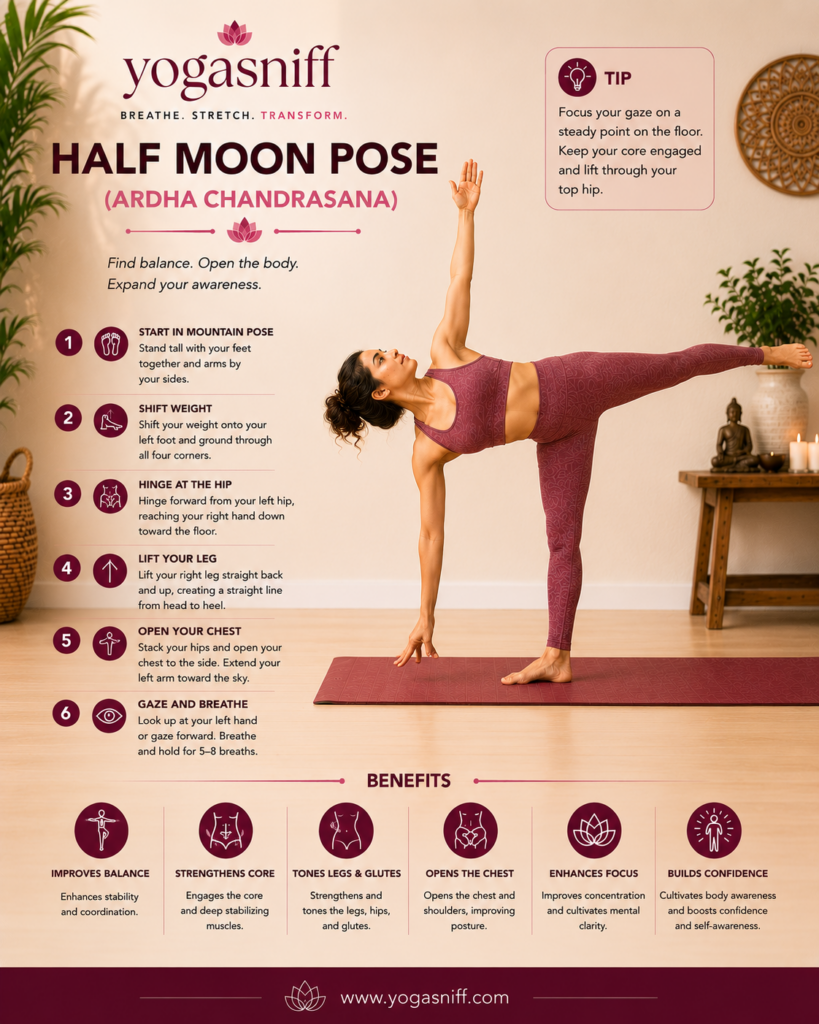
| Detail | Information |
| Sanskrit Name | Ardha Chandrasana |
| Level | Intermediate |
| Type | Standing Balance |
Half Moon Pose is a beautiful and challenging balancing posture that strengthens the legs and core while opening the hips and chest. It is a natural progression from Triangle Pose and is considered one of the most elegantly demanding yoga poses for balance and spatial awareness.
Key Benefits
- Improves balance and coordination
- Strengthens legs, ankles, and core
- Opens hips and chest
- Improves concentration
- Tones the entire body
Expert Tip
| Use a yoga block under your bottom hand to make this pose much more accessible. Place the block about a foot in front of your standing foot and slightly to the outside. |
20. Plank Pose (Phalakasana)
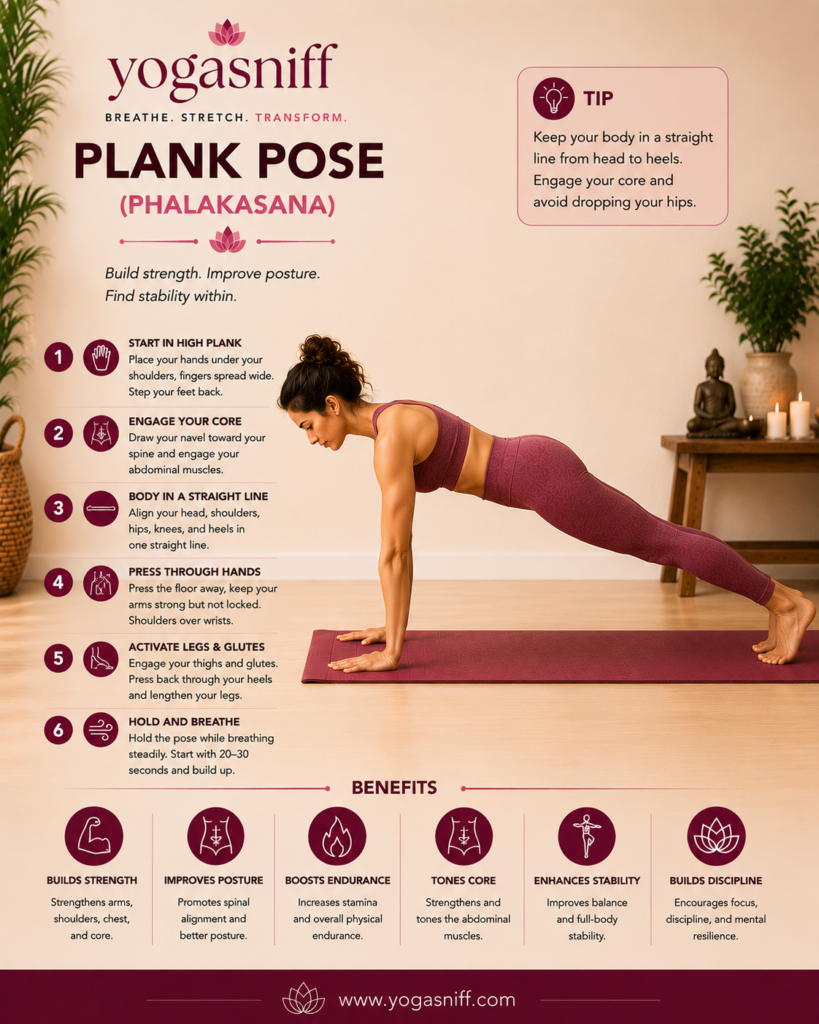
| Detail | Information |
| Sanskrit Name | Phalakasana |
| Level | Beginner |
| Type | Core Strength |
Plank Pose is one of the most universally effective poses for building total body strength. Phalakasana strengthens the core, arms, shoulders, and legs simultaneously and is the foundation of an enormous number of yoga transitions. It is one of the best yoga poses for core conditioning and upper body toning.
Key Benefits
- Builds core strength and stability
- Strengthens arms, shoulders, and wrists
- Tones the legs and glutes
- Improves posture
- Builds mental toughness
Expert Tip
| Avoid letting your hips sag toward the floor or pike up toward the ceiling. A straight body line from head to heel is the entire point of the pose. Engage your core by drawing your navel toward your spine. |
21. Low Lunge Pose (Anjaneyasana)
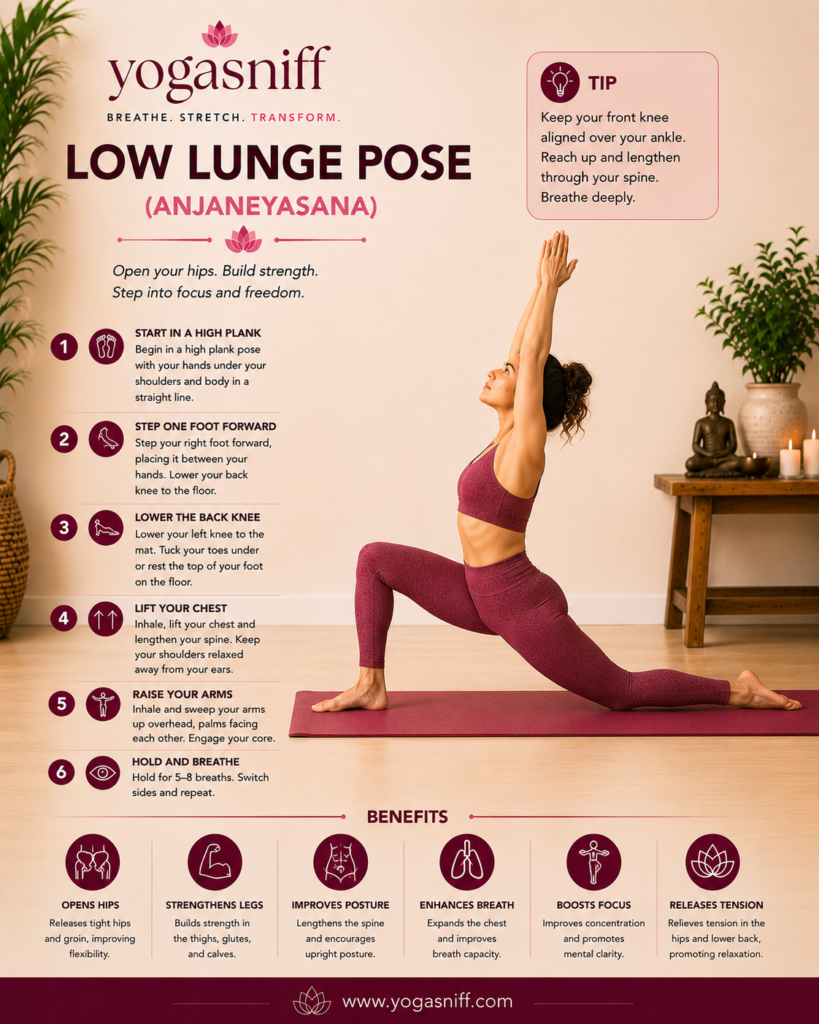
| Detail | Information |
| Sanskrit Name | Anjaneyasana |
| Level | Beginner |
| Type | Hip Opener |
Low Lunge is one of the most immediately effective yoga poses for releasing tight hip flexors. Anjaneyasana stretches the entire front of the back leg while strengthening the front leg and building core stability. It is an essential pose for yoga for runners, athletes, and anyone who sits for extended periods.
Key Benefits
- Deeply stretches hip flexors and groin
- Strengthens the front leg
- Opens the chest and shoulders
- Relieves lower back tension
- Improves balance
Expert Tip
| Sink your back hip toward the floor rather than letting it rise up. The depth of your hip flexor stretch comes directly from how far you lower that back hip while keeping the spine long. |
22. Chair Pose (Utkatasana)
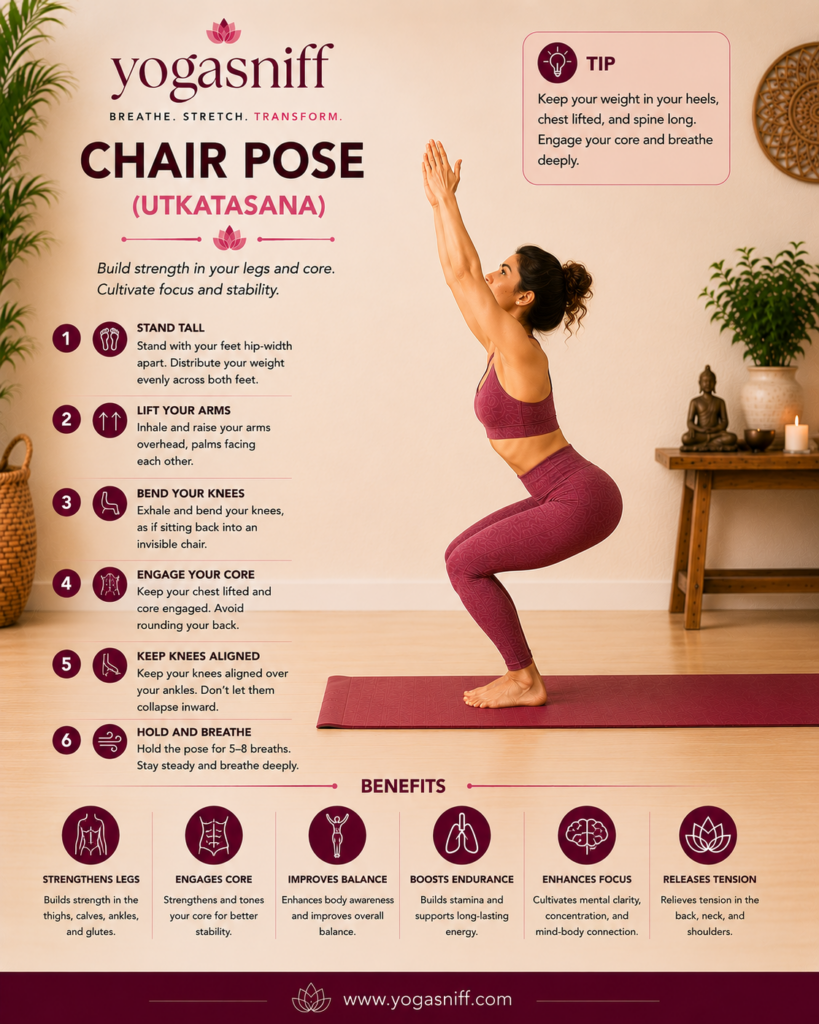
| Detail | Information |
| Sanskrit Name | Utkatasana |
| Level | Beginner |
| Type | Standing Strength |
Chair Pose is sometimes called the ‘fierce pose’ because it demands significant effort from the legs, core, and mind. Utkatasana is one of the most effective yoga poses for building leg strength, particularly in the thighs and glutes, and it generates tremendous internal body heat.
Key Benefits
- Strengthens thighs, glutes, and calves
- Engages and tones the core
- Improves ankle stability
- Builds determination and focus
- Generates body heat and boosts metabolism
Expert Tip
| Shift your weight into your heels so you can wiggle your toes. If you cannot, your weight is too far forward, which strains the knees rather than working the thighs and glutes. |
23. Camel Pose (Ustrasana)
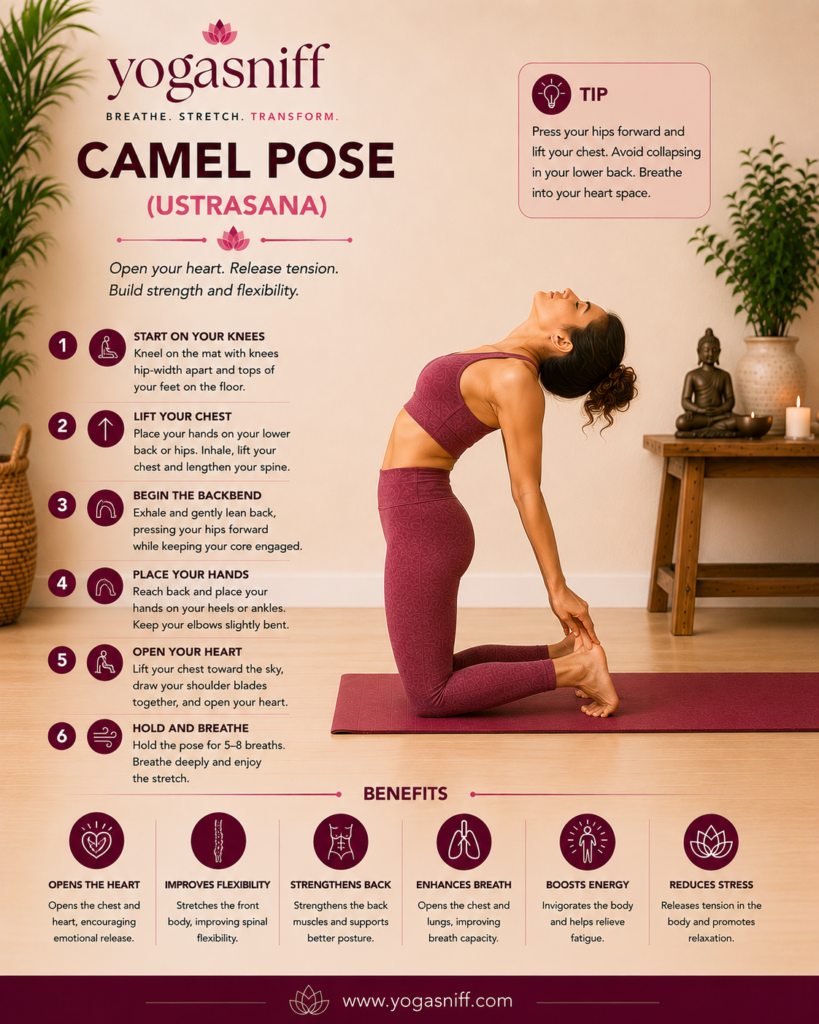
| Detail | Information |
| Sanskrit Name | Ustrasana |
| Level | Intermediate |
| Type | Deep Backbend |
Camel Pose is one of the deepest backbends in yoga practice and one of the most emotionally powerful yoga poses. Ustrasana opens the entire front body, including the chest, abdomen, hip flexors, and throat, while building strength in the back body. It is one of the most effective yoga poses for emotional release and energy activation.
Key Benefits
- Deeply opens chest and heart
- Stretches the entire front body
- Strengthens the back and spine
- Stimulates the thyroid and adrenal glands
- Releases emotional tension held in the chest
Expert Tip
| Keep your hips directly over your knees throughout the pose. Most beginners allow the hips to swing back, which compresses the lower back. Squeeze your inner thighs together and drive the hips forward as you backbend. |
24. Fish Pose (Matsyasana)
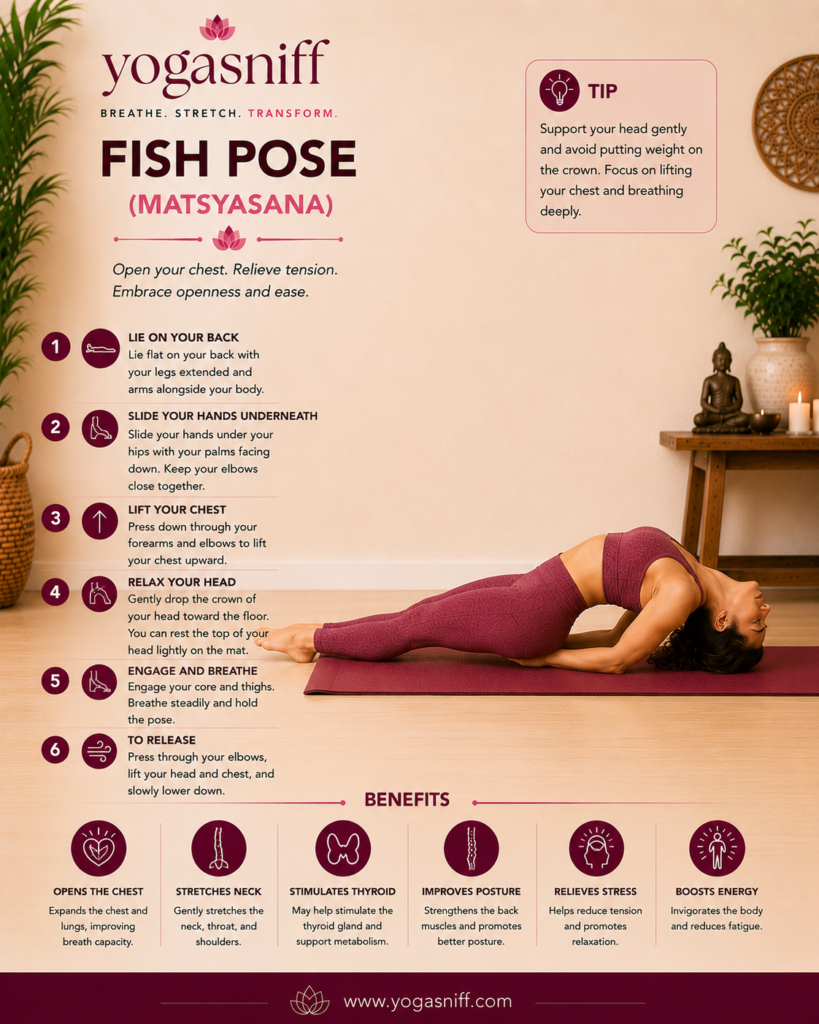
| Detail | Information |
| Sanskrit Name | Matsyasana |
| Level | Beginner to Intermediate |
| Type | Backbend |
Fish Pose is a gentle yet powerful backbend that opens the chest and throat and is traditionally considered the counterpose to Shoulder Stand. Matsyasana stimulates the thyroid gland, expands the lungs, and is one of the most beneficial yoga poses for improving breathing and releasing tension in the neck and shoulders.
Key Benefits
- Opens the chest and throat
- Stretches the neck and shoulders
- Stimulates the thyroid gland
- Improves breathing capacity
- Reduces tension and anxiety
Expert Tip
| Do not place excessive weight on your head. The crown of the head rests lightly on the mat while your weight is primarily supported through your elbows and forearms. Keep the throat relaxed and open. |
25. Upward Facing Dog (Urdhva Mukha Svanasana)
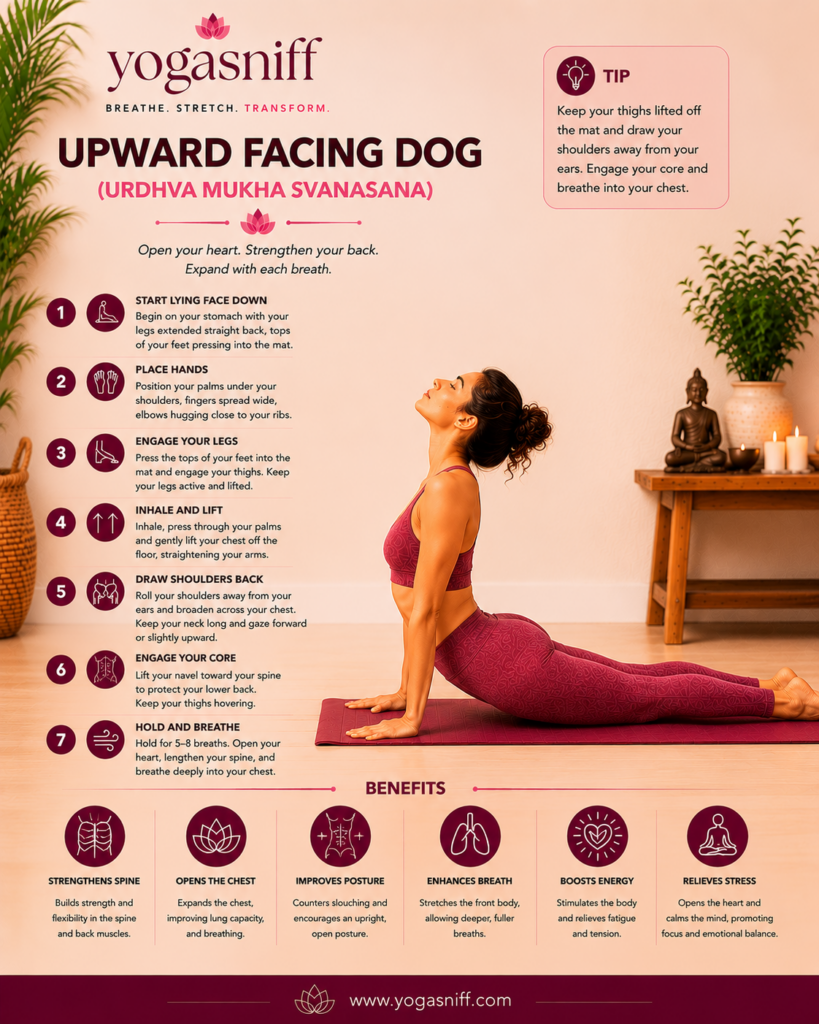
| Detail | Information |
| Sanskrit Name | Urdhva Mukha Svanasana |
| Level | Intermediate |
| Type | Backbend |
Upward Facing Dog is a powerful backbend that forms a key part of the Sun Salutation sequence in Vinyasa and Ashtanga yoga. Unlike Cobra Pose, the thighs and knees lift completely off the mat in Urdhva Mukha Svanasana, creating a more intense spinal extension and a full chest opening.
Key Benefits
- Strengthens the spine and arms
- Opens the chest and lungs deeply
- Stretches the abdomen and hip flexors
- Tones the glutes
- Energizes the entire body
Expert Tip
| Press through the tops of your feet and your palms simultaneously to lift your thighs completely off the mat. If your thighs remain on the mat, you are in Baby Cobra, not Upward Dog. Both are valuable; simply know which one you are practicing. |
26. Boat Pose (Navasana)
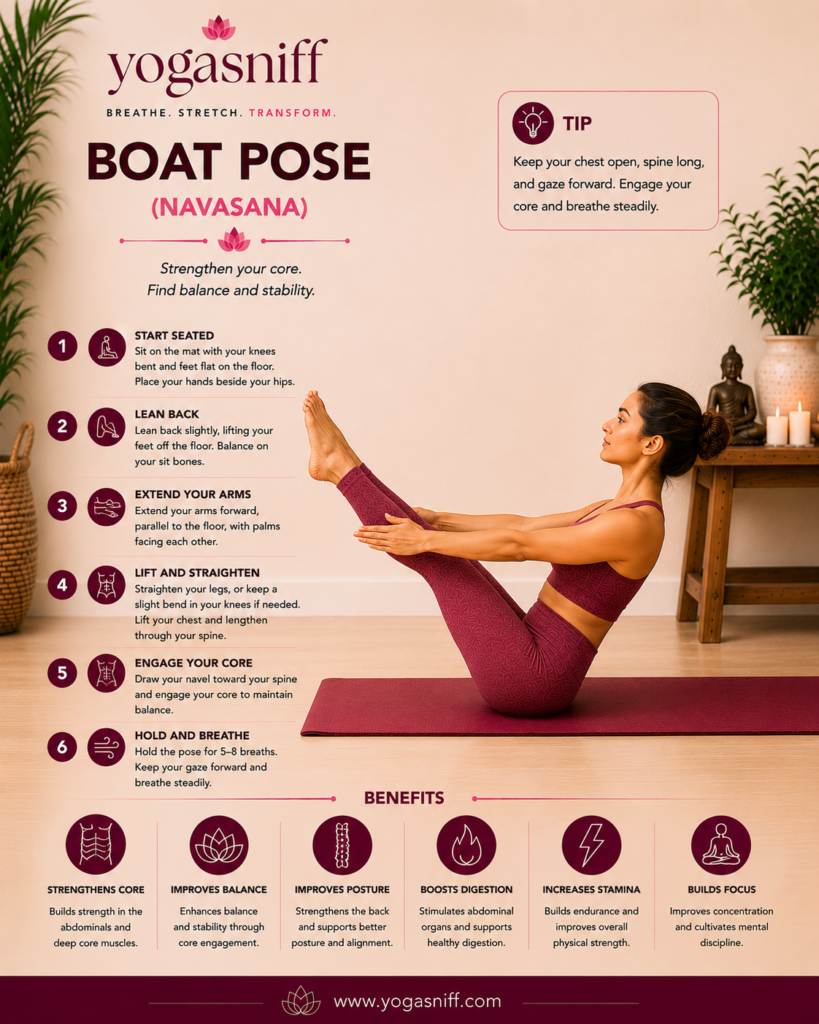
| Detail | Information |
| Sanskrit Name | Navasana |
| Level | Intermediate |
| Type | Core Strength |
Boat Pose is one of the most challenging and effective yoga poses for core strength. Navasana requires you to balance on your sitting bones while extending the legs at a 45-degree angle and reaching the arms forward parallel to the floor. It is a pose that builds both physical core strength and the mental fortitude to stay calm under pressure.
Key Benefits
- Builds powerful core strength
- Strengthens the hip flexors
- Tones the lower abdomen
- Improves balance and coordination
- Stimulates the kidneys and digestive organs
Expert Tip
| Keep the spine long and the chest lifted. Most beginners collapse their chest toward their knees to hold the pose. Instead, bend your knees generously (Half Boat) and focus on keeping the spine tall and the chest proud. |
27. Legs Up the Wall (Viparita Karani)
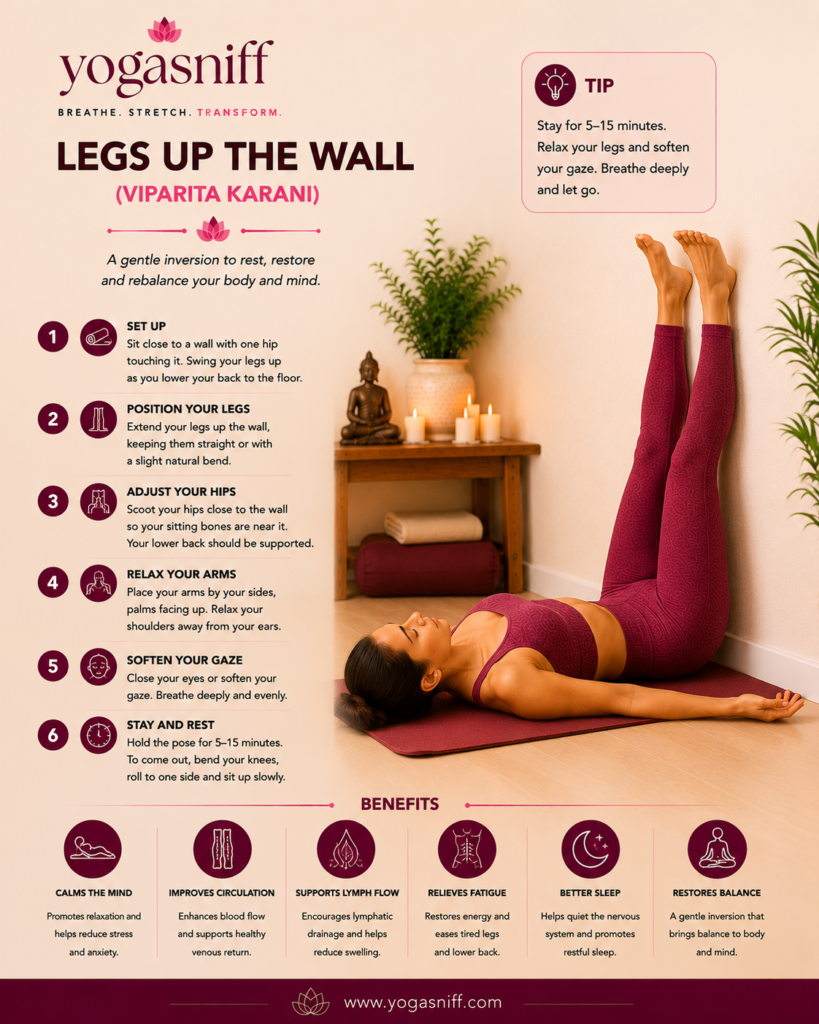
| Detail | Information |
| Sanskrit Name | Viparita Karani |
| Level | Beginner |
| Type | Restorative / Inversion |
Legs Up the Wall is one of the most accessible inversions in yoga and is considered one of the most profoundly restorative yoga poses in the entire practice. Viparita Karani reverses the effects of gravity on the lower body, reduces swelling in the legs and feet, calms the nervous system, and is one of the best yoga poses for sleep and recovery.
Key Benefits
- Relieves tired and swollen legs
- Calms the nervous system
- Reduces anxiety and insomnia
- Gently stretches the hamstrings
- Improves circulation
Expert Tip
| If your hamstrings are very tight, keep your hips about 6 inches away from the wall instead of pressing them all the way against it. You can also place a folded blanket under your hips for a gentle restorative backbend. |
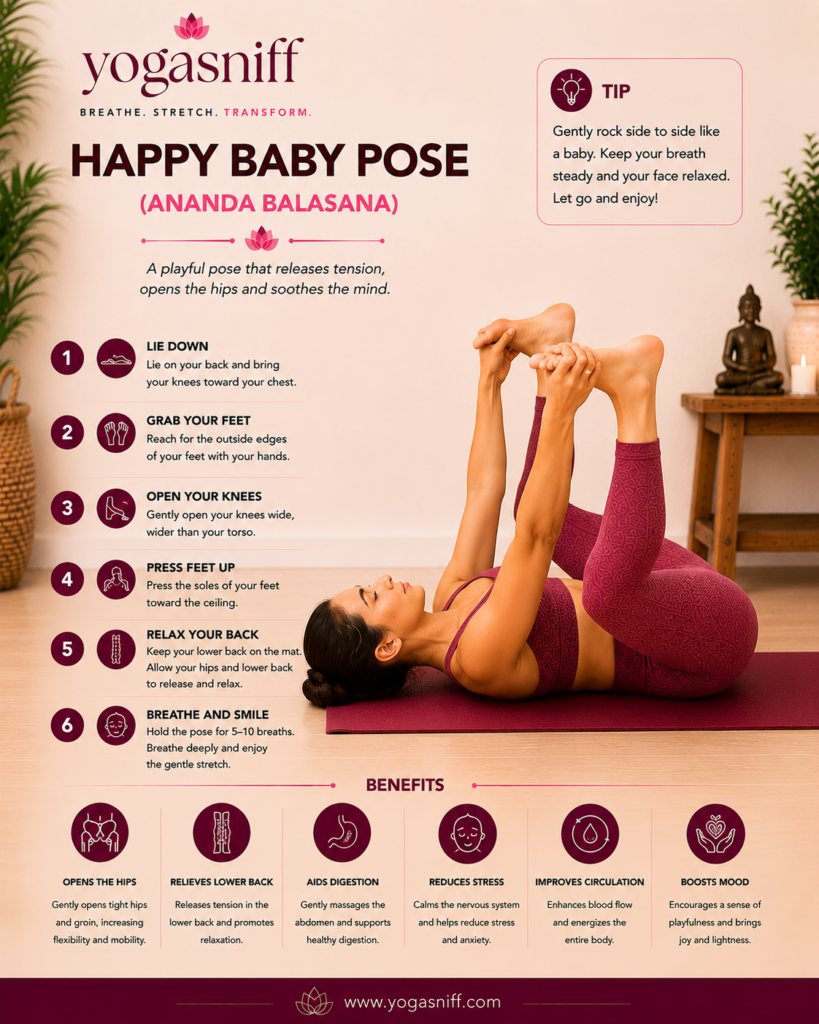
28. Happy Baby Pose (Ananda Balasana)
| Detail | Information |
| Sanskrit Name | Ananda Balasana |
| Level | Beginner |
| Type | Hip Opener / Restorative |
Happy Baby Pose is one of the most universally loved yoga poses because it is simultaneously deep, effective, and joyful. Ananda Balasana opens the hips and inner thighs, decompresses the spine, and releases tension in the sacrum and lower back. It is a wonderful option as yoga for relaxation and is one of the most popular poses for stress relief.
Key Benefits
- Opens hips and inner groins
- Gently stretches the lower back and spine
- Calms the nervous system
- Releases sacral tension
- Promotes joy and playfulness
Expert Tip
| Hold the outer edges of your feet or ankles, keeping your knees wide and drawing them down toward your armpits. If you cannot reach your feet, hold a yoga strap looped around each foot for equal benefit. |
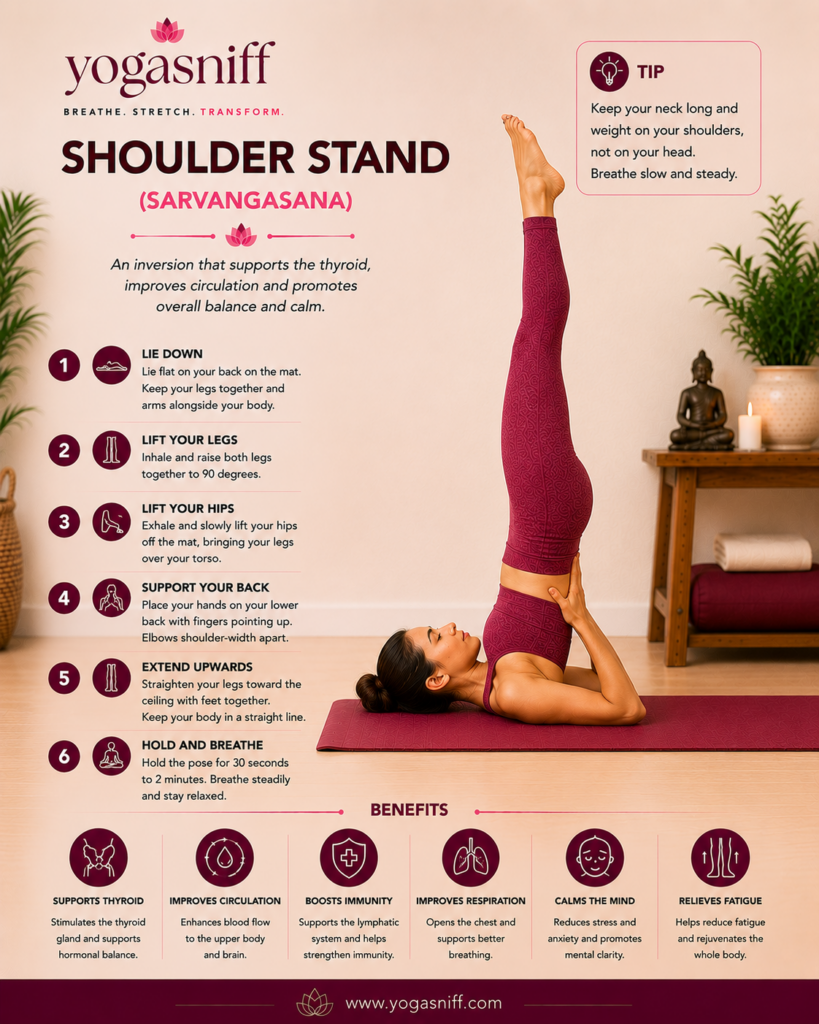
29. Shoulder Stand (Sarvangasana)
| Detail | Information |
| Sanskrit Name | Sarvangasana |
| Level | Intermediate to Advanced |
| Type | Inversion |
Shoulder Stand is sometimes called the ‘Queen of all yoga poses’ due to its extraordinary range of benefits for the entire body. Sarvangasana is a full inversion that stimulates the thyroid gland, improves circulation, calms the nervous system, and builds tremendous strength in the core and upper body.
Key Benefits
- Stimulates thyroid and parathyroid glands
- Improves circulation to the brain
- Calms anxiety and reduces fatigue
- Strengthens the core and upper back
- Improves digestion
Expert Tip
| Never turn your head once you are in Shoulder Stand as this can strain the cervical spine. Set up with a folded blanket under your shoulders to protect the neck, and gaze straight up at your toes throughout. |
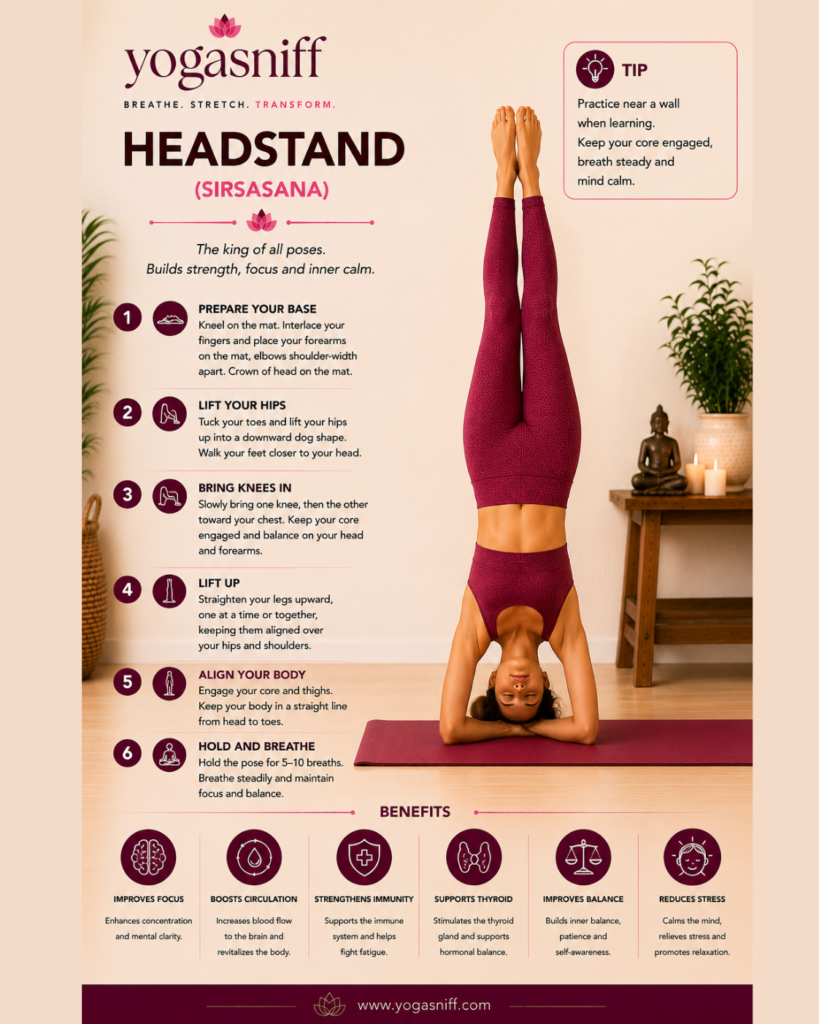
30. Headstand (Sirsasana)
| Detail | Information |
| Sanskrit Name | Sirsasana |
| Level | Advanced |
| Type | Inversion |
Headstand is called the ‘King of all yoga poses’ and is the most prestigious inversion in the practice. Sirsasana develops exceptional upper body strength, core stability, and balance, while improving circulation to the brain and calming the mind. It requires significant preparation, a strong foundation, and patient, consistent practice.
Key Benefits
- Builds exceptional upper body strength
- Improves circulation to the brain
- Dramatically develops core strength
- Calms the nervous system
- Builds confidence and mental resilience
Expert Tip
| Never kick up forcefully into Headstand. Learn with a wall behind you and work on coming up with control, one leg at a time, before attempting a freestanding inversion. The quality and safety of a Headstand lives entirely in the strength of the forearms and shoulders, not the head and neck. |
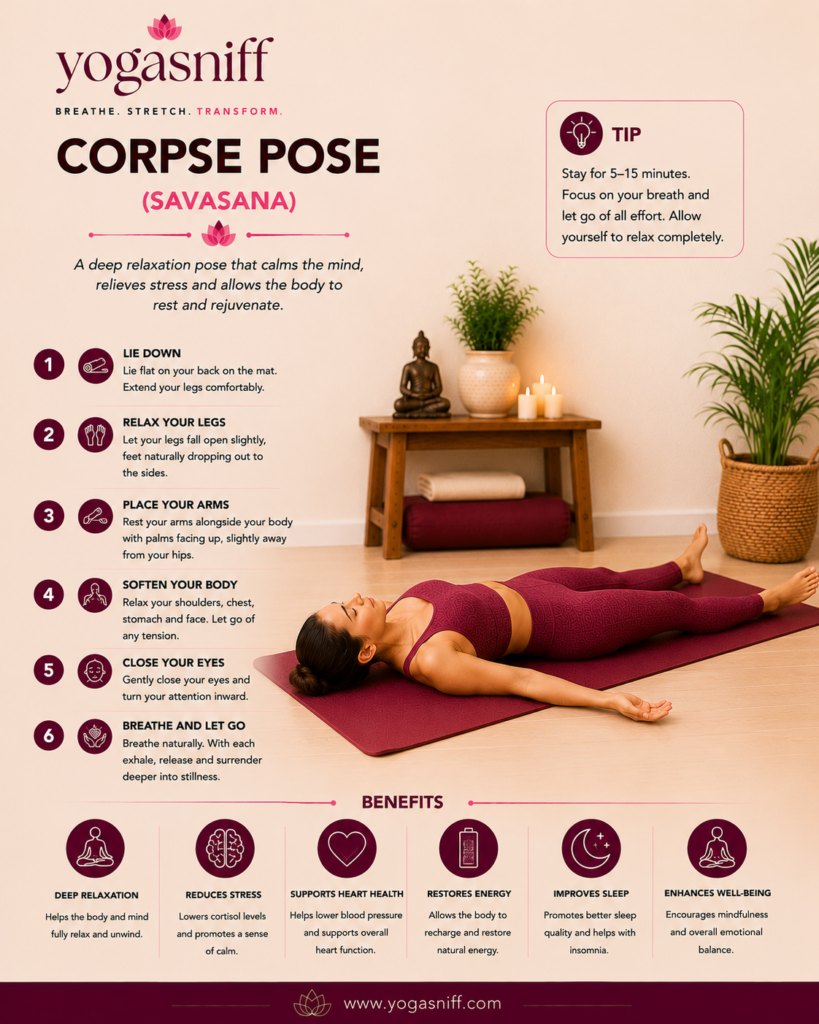
31. Corpse Pose (Savasana)
| Detail | Information |
| Sanskrit Name | Savasana |
| Level | All Levels |
| Type | Restorative / Final Relaxation |
Savasana is simultaneously the simplest and the most difficult yoga pose to master. Corpse Pose asks you to lie completely still and consciously surrender, which proves profoundly challenging for the modern, overthinking mind. It is the most important pose in any yoga session because it is the moment where all the benefits of the practice are integrated into the body and nervous system.
Key Benefits
- Integrates all benefits of the yoga session
- Completely relaxes the nervous system
- Reduces blood pressure and heart rate
- Promotes deep physical and mental rest
- Cultivates the witness consciousness of meditation
Expert Tip
| Cover yourself with a blanket and use an eye pillow to make Savasana as comfortable as possible. Allow your feet to fall open naturally and release every effort from every muscle in your body. Give yourself a minimum of 5 to 10 minutes in this pose. |
32. Lord of the Dance Pose (Natarajasana)
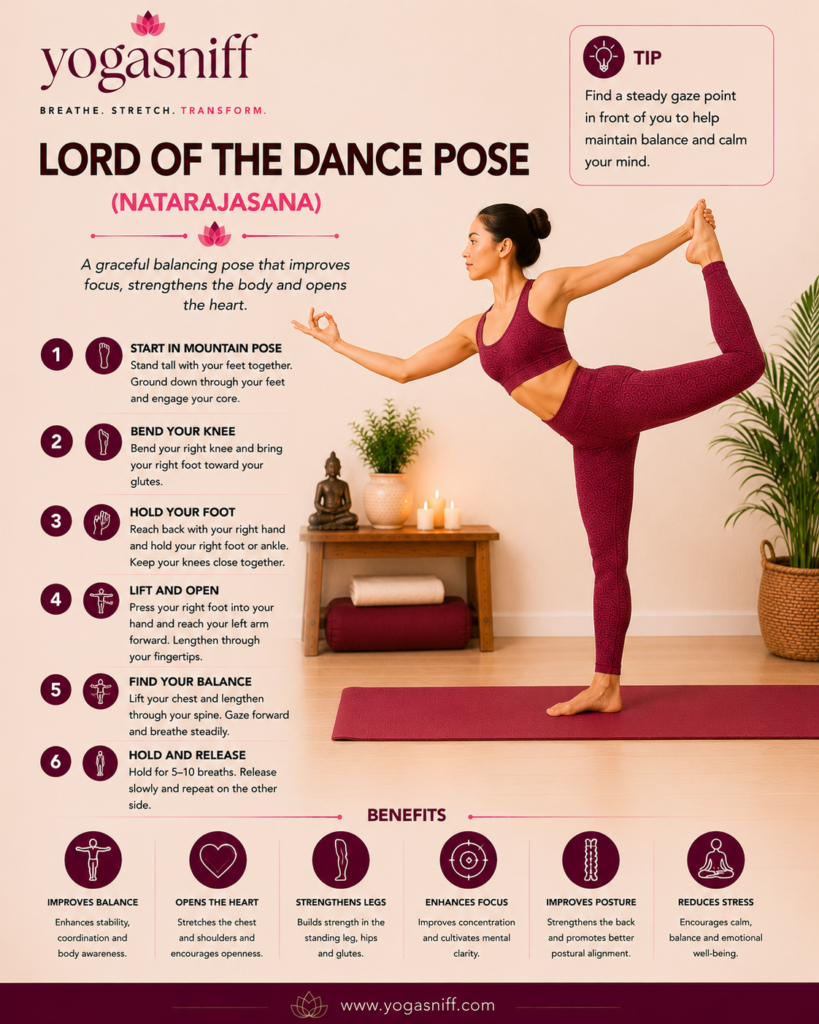
| Detail | Information |
| Sanskrit Name | Natarajasana |
| Level | Advanced |
| Type | Standing Balance / Backbend |
Lord of the Dance Pose is one of yoga’s most beautiful and demanding postures, combining a standing balance with a deep backbend and a hip flexor stretch simultaneously. Named after the cosmic dance of Lord Shiva, Natarajasana represents the perfect union of strength, flexibility, grace, and balance.
Key Benefits
- Improves balance on one leg
- Deeply stretches hip flexors and chest
- Strengthens the standing leg and core
- Builds focus and mental clarity
- Develops grace and body awareness
Expert Tip
| Use a strap looped around your lifted foot to help bridge the gap between your hand and foot. Pressing the foot back into the strap actively rather than simply holding it creates the back-kick that deepens the backbend and improves the pose dramatically. |
33. Reclining Hand to Big Toe Pose (Supta Padangusthasana)
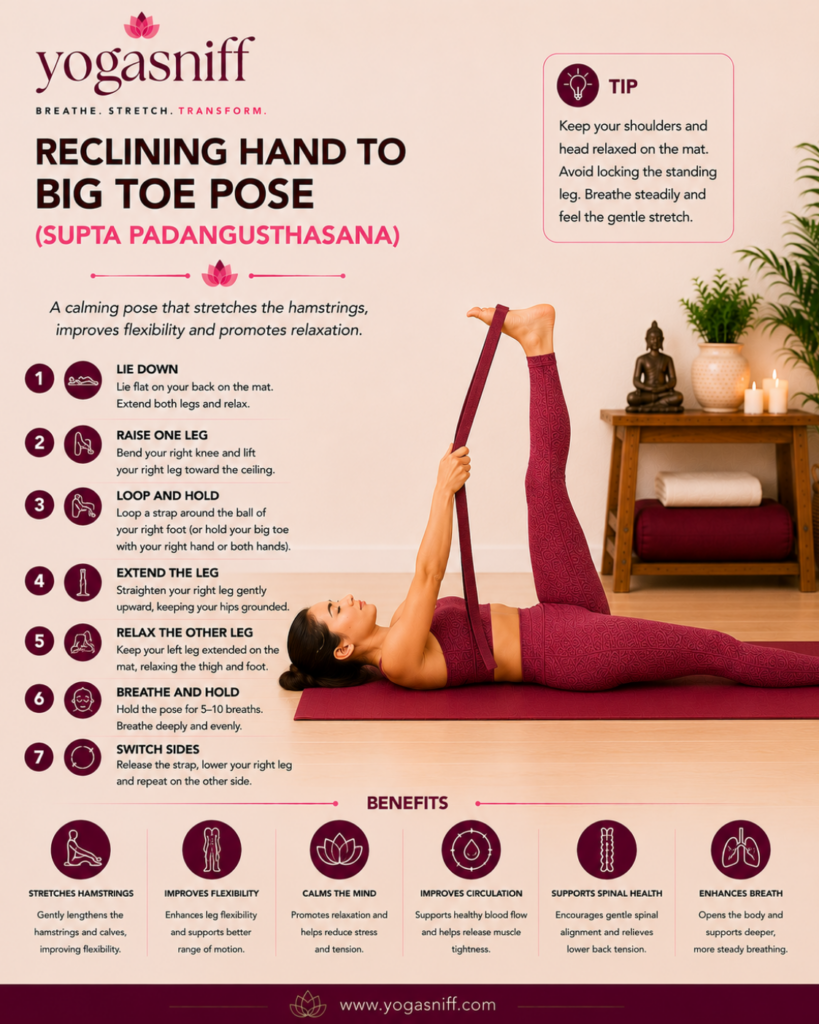
| Detail | Information |
| Sanskrit Name | Supta Padangusthasana |
| Level | Beginner to Intermediate |
| Type | Supine Stretch |
Reclining Hand to Big Toe Pose is one of the safest and most effective yoga poses for hamstring stretching because the back and spine are fully supported on the mat. Supta Padangusthasana allows you to stretch the hamstrings, calves, and inner thighs deeply without the risk of lower back rounding that can occur in seated forward folds.
Key Benefits
- Deeply stretches hamstrings and calves
- Improves hip flexibility
- Relieves lower back tension and sciatica
- Strengthens the knee joint
- Promotes relaxation
Expert Tip
| Keep the foot of the extended leg actively pressing into the mat throughout the pose. This grounding of the bottom leg prevents the hip from lifting and ensures you get the full hamstring stretch in the lifted leg. |
34. Revolved Triangle Pose (Parivrtta Trikonasana)
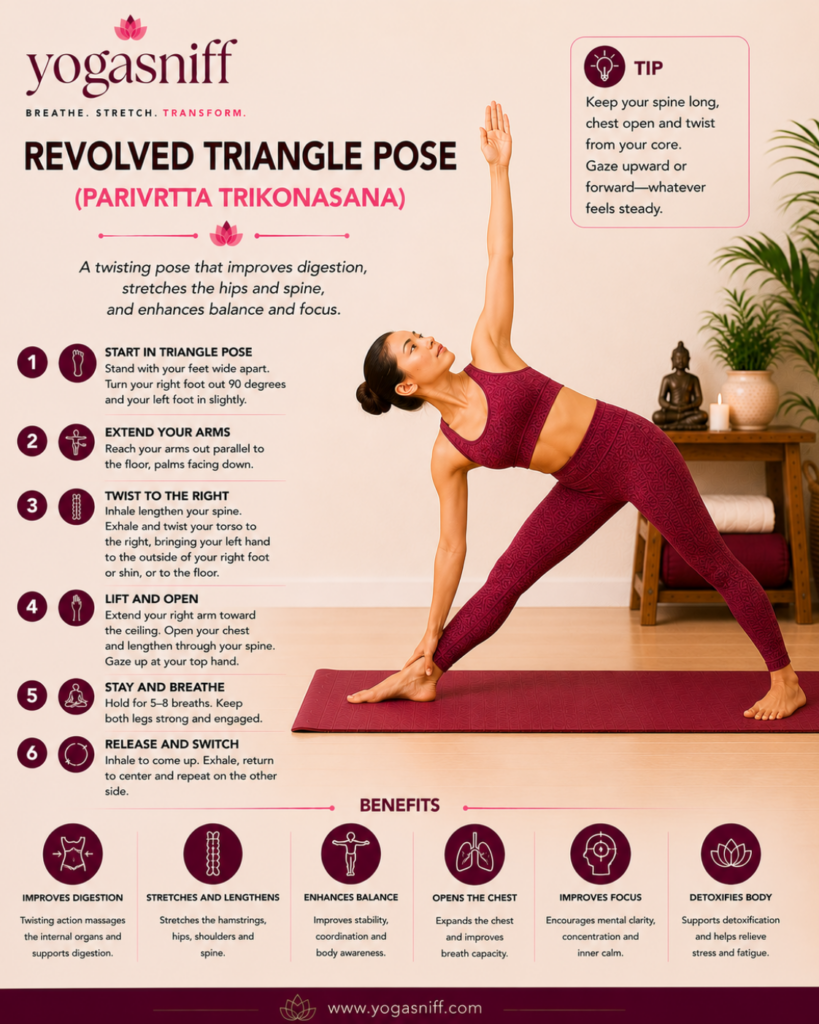
| Detail | Information |
| Sanskrit Name | Parivrtta Trikonasana |
| Level | Intermediate to Advanced |
| Type | Standing Twist |
Revolved Triangle Pose is one of the most challenging standing yoga postures and combines balance, hamstring flexibility, spinal twist, and hip opening all in one movement. Parivrtta Trikonasana is among the top yoga poses for detoxification because the deep spinal twist wrings tension from the torso and stimulates digestive organs.
Key Benefits
- Deep spinal detoxification twist
- Stretches hamstrings and outer hips
- Improves balance and coordination
- Stimulates liver and digestive organs
- Opens shoulders and chest
Expert Tip
| Use a block under your bottom hand without exception. Reaching the floor in this pose without a block almost always compromises the rotation, which is the most important element. Height of the hand matters far less than depth of the twist. |
35. King Pigeon Pose (Raja Kapotasana)
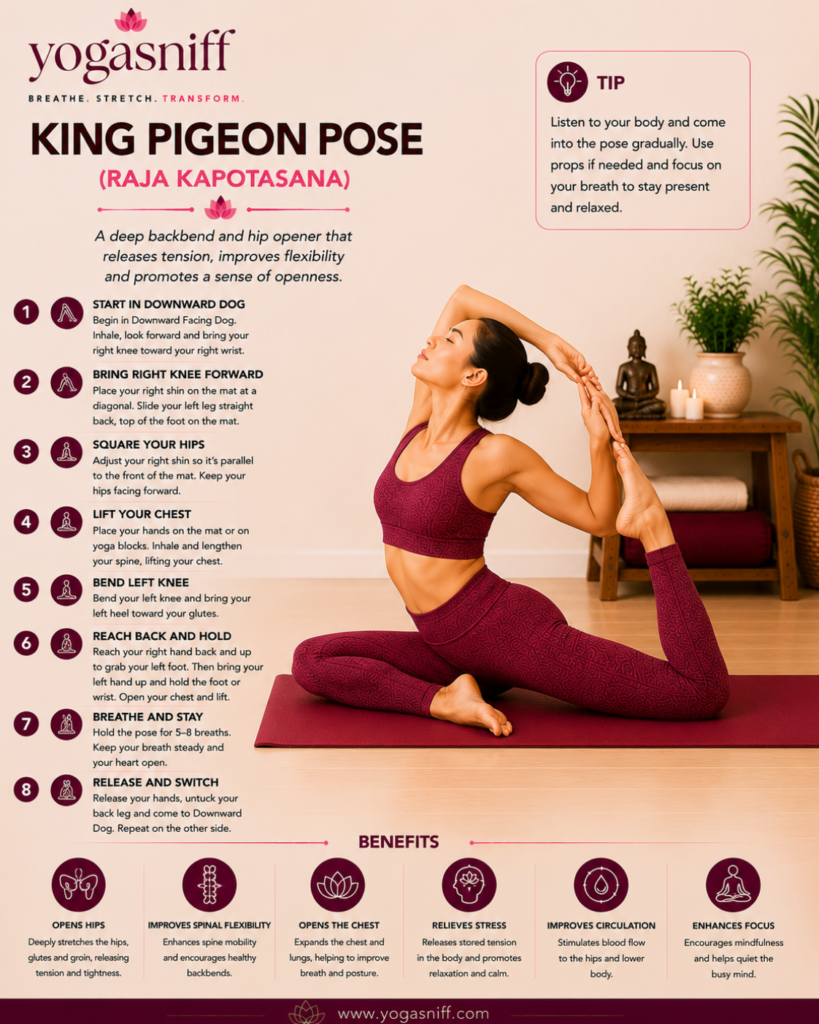
| Detail | Information |
| Sanskrit Name | Raja Kapotasana |
| Level | Advanced |
| Type | Deep Backbend / Hip Opener |
King Pigeon Pose is the full expression of Pigeon Pose and one of the deepest hip openers and backbends in all of yoga. Raja Kapotasana combines a deep hip flexor stretch in the back leg with a dramatic backbend that requires extraordinary spinal flexibility. It is a pinnacle pose that may take years of consistent practice to achieve safely.
Key Benefits
- Extremely deep hip opening
- Intense spinal and chest opening
- Stretches both hip flexors and quadriceps
- Builds exceptional back flexibility
- Deeply energizing and emotionally releasing
Expert Tip
| Never rush toward the full expression of this pose. Practice Half Pigeon, Low Lunge backbends, and Camel Pose for months before attempting to reach for the back foot. The body must be comprehensively prepared. |
Yoga Poses for Specific Goals: Targeted Sequences That Get Results
One of yoga’s greatest strengths is its versatility. The same practice can be customized to serve completely different goals. Below are expert-curated sequences of yoga poses for the most popular health and wellness goals that people search for today.
Yoga Poses for Beginners at Home
yoga for beginners at home, easy yoga poses for beginners
This beginner-friendly sequence covers all the fundamental yoga postures you need to start a safe and effective home practice. Practice this sequence daily for 30 days and you will notice significant improvements in flexibility, strength, and mental calm.
- Mountain Pose (Tadasana)
- Cat-Cow Pose (Marjaryasana-Bitilasana)
- Child’s Pose (Balasana)
- Downward Facing Dog (Adho Mukha Svanasana)
- Low Lunge (Anjaneyasana)
- Warrior II (Virabhadrasana II)
- Tree Pose (Vrikshasana)
- Bridge Pose (Setu Bandhasana)
- Happy Baby (Ananda Balasana)
- Corpse Pose (Savasana)
Yoga Poses for Weight Loss and Metabolism
To get the best results from this yoga sequence for weight loss, pair your daily practice with smart nutrition tracking. Healup is an AI-powered health and fitness app that tracks your calories, macros, and nutrients simply by scanning a photo of your meal, making it the perfect companion to your yoga journey.
yoga for weight loss, yoga poses to lose weight
While yoga is not a traditional cardio workout, certain dynamic yoga poses build significant muscle mass, boost metabolism, and increase caloric burn. Combined with a healthy diet, this sequence can meaningfully support a healthy weight management journey.
- Sun Salutation A (Surya Namaskar A) x 10 rounds
- Chair Pose (Utkatasana)
- Warrior I (Virabhadrasana I)
- Warrior II (Virabhadrasana II)
- Warrior III (Virabhadrasana III)
- Plank Pose (Phalakasana)
- Side Plank (Vasisthasana)
- Boat Pose (Navasana)
- Crow Pose (Bakasana)
- Locust Pose (Salabhasana)
Yoga Poses for Back Pain Relief
yoga for back pain, yoga poses for lower back pain
Back pain affects over 540 million people globally and is one of the most common reasons people turn to yoga. The following poses specifically target the muscles and structures that support the spine, providing both immediate relief and long-term protection.
- Cat-Cow Pose (Marjaryasana-Bitilasana)
- Child’s Pose (Balasana)
- Cobra Pose (Bhujangasana)
- Locust Pose (Salabhasana)
- Bridge Pose (Setu Bandhasana)
- Reclining Hand to Big Toe Pose (Supta Padangusthasana)
- Supine Twist (Supta Matsyendrasana)
- Pigeon Pose (Eka Pada Rajakapotasana)
- Legs Up the Wall (Viparita Karani)
- Corpse Pose (Savasana)
Yoga Poses for Flexibility
yoga for flexibility, yoga poses to improve flexibility
Flexibility is one of the most common goals for yoga beginners and intermediate practitioners alike. This sequence systematically addresses the major areas of tightness in the modern body: hips, hamstrings, shoulders, and thoracic spine.
- Downward Facing Dog (Adho Mukha Svanasana)
- Low Lunge (Anjaneyasana)
- Warrior II (Virabhadrasana II)
- Triangle Pose (Trikonasana)
- Extended Side Angle (Utthita Parsvakonasana)
- Seated Forward Bend (Paschimottanasana)
- Pigeon Pose (Eka Pada Rajakapotasana)
- Camel Pose (Ustrasana)
- Happy Baby (Ananda Balasana)
- Reclining Twist
Yoga Poses for Stress Relief and Anxiety
yoga for stress relief, yoga for anxiety, yoga poses for mental health
Yoga is one of the most evidence-based tools available for managing stress and anxiety. This sequence combines forward folds, gentle inversions, and restorative poses that directly activate the parasympathetic nervous system and signal the body that it is safe to relax.
- Child’s Pose (Balasana)
- Seated Forward Bend (Paschimottanasana)
- Reclining Hand to Big Toe (Supta Padangusthasana)
- Happy Baby (Ananda Balasana)
- Bridge Pose (Setu Bandhasana)
- Shoulder Stand (Sarvangasana)
- Fish Pose (Matsyasana)
- Legs Up the Wall (Viparita Karani)
- Supported Child’s Pose
- Savasana (10 minutes minimum)
Yoga Poses for Core Strength
yoga for core strength, yoga poses for abs
A strong core is the foundation of every yoga pose and every movement in daily life. These yoga poses target the deep core muscles, the transverse abdominis, obliques, and multifidus, that support the spine and provide genuine functional stability.
- Plank Pose (Phalakasana)
- Side Plank (Vasisthasana)
- Boat Pose (Navasana)
- Crow Pose (Bakasana)
- Warrior III (Virabhadrasana III)
- Chair Pose (Utkatasana)
- Locust Pose (Salabhasana)
- Downward Facing Dog (Adho Mukha Svanasana)
- High Lunge
- Forearm Plank
Yoga Poses for Specific Populations and Conditions
Yoga for Seniors: Safe and Effective Poses for Older Adults
Yoga is one of the most beneficial and accessible forms of exercise available to older adults. Studies consistently show that regular yoga practice among seniors improves balance (reducing fall risk), increases flexibility, reduces arthritic joint pain, improves cognitive function, and enhances overall quality of life. Chair yoga, which adapts all poses to be practiced seated in or using a chair, makes yoga accessible for anyone with limited mobility.
The best yoga poses for seniors and older adults include Mountain Pose for posture and body awareness, seated Cat-Cow for spinal mobility, Warrior II at a reduced depth for leg strength, Tree Pose with chair support for balance, Bridge Pose for glute and back strength, and Legs Up the Wall for circulation and recovery.
Yoga for Athletes: Cross-Training Poses for Runners, Cyclists and Swimmers
Athletes in virtually every sport benefit enormously from adding yoga to their training regimen. For runners, yoga for hamstring tightness and hip flexor release are the most critical focus areas. For cyclists, yoga for posture and thoracic spine mobility counteract the hunched-forward riding position. For swimmers, yoga shoulder openers and thoracic rotation poses improve stroke mechanics and prevent overuse injuries.
Key yoga poses for athletes include Pigeon Pose for hip flexor release, Downward Facing Dog for hamstring and shoulder flexibility, Warrior II for hip strength and stability, Low Lunge for deep hip flexor work, Seated Forward Bend for hamstring lengthening, and Camel Pose for thoracic extension.
Yoga for Office Workers: Poses to Combat Desk Posture
Modern desk work creates a predictable pattern of postural dysfunction: tight hip flexors, weak glutes, rounded shoulders, forward head posture, and a compressed thoracic spine. Yoga is uniquely positioned to address every single one of these issues because its poses naturally counteract the shapes we hold during prolonged sitting.
The most effective yoga poses for desk workers and office workers include Cat-Cow for spinal decompression, Bridge Pose for glute activation and hip flexor release, Cobra Pose for chest and shoulder opening, Downward Dog for full-body stretching, Thread the Needle for thoracic rotation, and Legs Up the Wall for evening recovery from a long day at the desk.
Yoga Safety: Essential Precautions Before You Begin
Yoga is a safe practice when approached with knowledge and respect for your body’s current limits. However, certain precautions are important to understand before beginning:
- Consult a doctor before starting yoga if you have any pre-existing medical conditions, recent injuries, chronic pain, or are pregnant. This is especially important for inversions, deep backbends, and intense twisting poses.
- Never practice through sharp or acute pain. A deep stretch sensation and mild discomfort are normal and appropriate in yoga. Sharp, shooting, or joint pain is a signal to stop immediately and consult a professional.
- Warm up before attempting advanced poses. Cold muscles and connective tissues are far more vulnerable to strain. Always include at least 5 to 10 minutes of gentle warm-up before attempting demanding poses.
- Honor your body on every individual day. Your practice will vary from day to day based on sleep quality, stress levels, what you have eaten, and a dozen other variables. Yoga is not a competition and there is no point of arrival.
- Progress gradually and systematically. The most serious yoga injuries come from rushing toward advanced poses before the body is genuinely ready. Patience and consistency always produce better results than aggression.
- Learn from a qualified teacher when possible. Even if you primarily practice at home, taking occasional classes with an experienced teacher provides invaluable feedback on your alignment and technique.
Pranayama: The Yoga Breathing Practices That Transform Your Asana
Pranayama means the control and expansion of prana, the life force energy, through the regulation of breath. Learning to breathe correctly is not merely a supplementary skill in yoga. It is the very foundation of the practice. The breath is the bridge between the body and the mind, and the quality of your breathing directly determines the quality of your asana practice.
| Practice | Description and Benefits |
| Ujjayi Breath | Also called ‘Victorious Breath’ or ‘Ocean Breath.’ A slight constriction at the back of the throat creates a soft, oceanic sound with each inhale and exhale. Ujjayi breath builds internal heat, focuses the mind, and is the primary breathing technique used throughout Vinyasa and Ashtanga yoga practices. |
| Nadi Shodhana | Alternate Nostril Breathing. Using the thumb and ring finger to alternate closing each nostril, this practice balances the left and right hemispheres of the brain, calms anxiety, and is one of the most powerful yoga breathing exercises for stress relief. |
| Kapalabhati | Skull-Shining Breath. Rapid, sharp exhales through the nose with passive inhales. Kapalabhati cleanses the respiratory system, energizes the body, and is one of the best yoga breathing exercises for mental clarity and fatigue. |
| Bhramari | Humming Bee Breath. A gentle humming sound on each exhale creates vibration in the skull that is profoundly calming for the nervous system. Bhramari is one of the most effective yoga practices for anxiety, insomnia, and headaches. |
| Dirga Pranayama | Three-Part Breath. Expanding the breath sequentially into the belly, the ribcage, and the chest on each inhale, then releasing in reverse order. Dirga Pranayama teaches complete diaphragmatic breathing and is ideal for beginners. |
Meditation and Yoga: The Inner Practice That Completes Your Journey
Asana practice prepares the body for meditation by releasing the physical tension and restlessness that make sitting still uncomfortable. Meditation is the next natural step in any yoga journey and is where the deepest transformations in consciousness occur.
Even 10 minutes of meditation after your yoga asana practice creates a profound shift in your mental state. The body is already settled, the breath is regulated, and the mind has been calmed by the movement practice. This is the ideal window for meditation because you are simultaneously awake and relaxed.
Simple meditation techniques that pair beautifully with yoga asana practice include breath awareness meditation (simply observing each inhale and exhale without controlling it), body scan meditation (systematically bringing awareness to each part of the body in Savasana), mantra meditation (silently repeating a chosen word or phrase with each breath), and loving-kindness meditation (generating feelings of compassion toward yourself and others).
Frequently Asked Questions About Yoga Poses (FAQ for SEO)
SEO NOTE: These FAQs are written to capture Google’s Featured Snippets and People Also Ask results. They directly target high-volume question-based searches.
Q: How many yoga poses are there in total?
A: The classical Hatha Yoga Pradipika describes 84 primary asanas. Modern yoga traditions, particularly the Ashtanga system, catalog hundreds of poses across primary, intermediate, and advanced series. In total, there are considered to be between 84 and over 900 yoga poses depending on the tradition and counting methodology. However, a thorough understanding of 30 to 50 core poses is more than sufficient for a complete and transformative practice.
Q: What are the best yoga poses for complete beginners?
A: The best yoga poses for beginners are Mountain Pose (Tadasana), Child’s Pose (Balasana), Cat-Cow Pose (Marjaryasana-Bitilasana), Downward Facing Dog (Adho Mukha Svanasana), Warrior II (Virabhadrasana II), Tree Pose (Vrikshasana), Bridge Pose (Setu Bandhasana), Seated Forward Bend (Paschimottanasana), and Corpse Pose (Savasana). These poses introduce all the fundamental movement patterns of yoga and build the strength and flexibility needed to progress safely.
Q: How long should I hold each yoga pose?
A: For beginners, holding each pose for 3 to 5 breaths (approximately 15 to 30 seconds) is appropriate. As your practice deepens, you can extend holds to 5 to 10 breaths (30 to 60 seconds). Restorative and Yin yoga poses are held for 2 to 5 minutes or longer. The most important principle is to hold a pose long enough for your body to genuinely respond and open, which rarely happens in under 15 seconds.
Q: Can I lose weight with yoga?
A: Yes, yoga can contribute meaningfully to weight management. Dynamic yoga styles such as Vinyasa, Power Yoga, and Ashtanga burn significant calories while building muscle mass, which raises the resting metabolic rate. Yoga also addresses the emotional and psychological drivers of overeating through stress reduction and improved body awareness. For best results, combine dynamic yoga practice with a nutritious diet.
Q: How often should I practice yoga to see results?
A: Three to four sessions per week of 45 to 60 minutes each is widely considered the optimal frequency for building a meaningful yoga practice. However, even daily practice of just 15 to 20 minutes produces significant benefits over time. Consistency matters far more than duration. Practicing for 20 minutes every day will produce better long-term results than practicing for 2 hours once a week.
Q: What is the difference between yoga and stretching?
A: While yoga includes stretching, it is far more comprehensive than a simple stretching routine. Yoga combines stretching with strengthening, breathwork, balance, body awareness, mental focus, and in many traditions, philosophical and spiritual dimensions. Yoga poses are specifically designed to work the body as an integrated whole rather than isolating individual muscles, and the breath-movement connection transforms what might otherwise be simple stretching into a deeply transformative practice.
Q: Is yoga good for back pain?
A: Yes, yoga is one of the most evidence-supported non-pharmacological treatments for chronic lower back pain. Research consistently shows that yoga for back pain reduces pain intensity, improves functional mobility, and decreases reliance on pain medication. Poses such as Cat-Cow, Child’s Pose, Bridge Pose, Cobra Pose, and Pigeon Pose are particularly effective for back pain when practiced consistently and with correct alignment.
Q: What yoga poses should you avoid during pregnancy?
A: During pregnancy, particularly after the first trimester, you should avoid deep twists that compress the abdomen, poses lying flat on the back for extended periods (which can compress the vena cava), intense inversions such as Headstand and Shoulder Stand, deep backbends, and any poses that put pressure directly on the belly. Prenatal yoga classes or working with a teacher trained in prenatal yoga is strongly recommended throughout pregnancy.
Q: Do I need to be flexible to start yoga?
A: Absolutely not. Flexibility is a result of yoga practice, not a prerequisite for it. This is one of the most persistent and damaging myths about yoga. Every experienced yoga practitioner began as a beginner with a stiff body. The beauty of yoga is that wherever you are, whatever your current level of flexibility, you can start exactly there and make meaningful progress. Yoga meets you where you are, always.
Q: What is the hardest yoga pose?
A: Several yoga poses compete for the title of most difficult. Handstand (Adho Mukha Vrksasana), full Scorpion Pose (Vrschikasana), and eight-angle pose (Astavakrasana) are among the most challenging arm balances. For backbending, full Wheel Pose (Chakrasana) and King Cobra (Raja Bhujangasana) demand extraordinary spinal flexibility. Difficulty is always relative to the individual body, however, and a pose that is effortless for one person may represent months or years of work for another.
Conclusion: Your Yoga Journey Begins Right Here, Right Now
You have just completed the most comprehensive yoga poses guide available anywhere on the internet. From the foundational stillness of Mountain Pose to the exhilarating challenge of Crow Pose and the deep peace of Savasana, you now have a complete understanding of the yoga asanas that will carry you from your very first practice to a lifetime of deepening exploration.
The most important thing you can do with the knowledge in this guide is not to simply read it but to act on it. Roll out your mat. Begin with a single breath. Practice Mountain Pose for 60 seconds and feel what it does to your awareness. That single moment of mindful movement is the beginning of a yoga journey that has the genuine power to transform your body, calm your mind, and enrich your life in ways that will continue to reveal themselves for years to come.
Yoga is not about reaching a final destination or achieving a perfect pose. It is about showing up consistently, breathing consciously, and paying attention. It is about the willingness to be present with your body exactly as it is today, in this moment, on this mat.
At YogaSniff.com, we are here to support every step of your journey. Bookmark this guide and return to it as often as you need. Share it with anyone whose life might be enriched by yoga. And above all else, keep practicing. Your body, your mind, and your spirit will thank you.