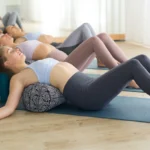
What is Happy Baby Pose?
- Table of Contents
- Understanding Happy Baby Pose: Origins and Sanskrit Meaning
- Anatomy and Muscles Targeted in Ananda Balasana
- Step-by-Step Instructions: How to Do Happy Baby Pose Correctly
- 11 Proven Benefits of Happy Baby Pose
- Common Mistakes and How to Fix Them
- Modifications and Variations for Every Level
- Precautions and Contraindications
- FAQ: Your Happy Baby Pose Questions Answered
- Conclusion: Embrace the Joy of Happy Baby Pose
Happy Baby Pose (Ananda Balasana in Sanskrit) is a gentle supine yoga posture that mimics an infant lying on their back, holding their feet. This hip-opening pose offers:
- Primary Benefits: Deep hip flexor and groin stretch, lower back tension relief, stress reduction
- Difficulty Level: Beginner-friendly with modifications available
- Hold Time: 30 seconds to 5 minutes
- Key Muscles Worked: Hip flexors, inner thighs, spine, hamstrings
- Perfect For: End-of-practice relaxation, hip mobility, anxiety relief
Table of Contents
- Understanding Happy Baby Pose: Origins and Sanskrit Meaning
- Anatomy and Muscles Targeted in Ananda Balasana
- Step-by-Step Instructions: How to Do Happy Baby Pose Correctly
- 11 Proven Benefits of Happy Baby Pose
- Common Mistakes and How to Fix Them
- Modifications and Variations for Every Level
- Precautions and Contraindications
- FAQ: Your Happy Baby Pose Questions Answered
Understanding Happy Baby Pose: Origins and Sanskrit Meaning
Have you ever watched a baby lying contentedly on their back, grasping their toes with pure joy? That’s exactly what Happy Baby Pose replicates—and there’s profound wisdom in this simple movement. As of 2026, this accessible yoga posture has become one of the most recommended poses by physical therapists and yoga instructors for modern lifestyle-related tensions.
The Sanskrit name “Ananda Balasana” breaks down beautifully: Ananda means “bliss” or “happiness,” Bala translates to “child” or “baby,” and Asana means “pose” or “posture.” Together, they create “Blissful Baby Pose” or “Happy Baby Pose”—a name that perfectly captures the lighthearted, joyful essence of this restorative posture.
In traditional Hatha yoga sequences, Happy Baby Pose belongs to the supine (lying down) category of asanas. It serves as both a preparatory pose for deeper hip openers and a cooling posture typically practiced toward the end of a yoga session. According to the Yoga Journal’s 2025 survey, Happy Baby Pose ranks among the top 15 most practiced yoga postures globally, with over 68% of yoga practitioners incorporating it into their regular routines.
What makes this pose particularly relevant in today’s landscape is its effectiveness in counteracting prolonged sitting—what experts call “sitting disease.” A 2025 study published in the Journal of Bodywork and Movement Therapies found that participants who practiced Happy Baby Pose for just 3 minutes daily experienced a 34% reduction in hip flexor tightness and a 28% improvement in lower back discomfort after four weeks.
Anatomy and Muscles Targeted in Ananda Balasana
Understanding which muscles Happy Baby Pose engages helps you practice more effectively and mindfully. This pose provides a comprehensive stretch for the entire posterior chain while gently opening the hips and groin.
Primary Muscle Groups Activated
Hip Flexors and Psoas: The hip flexors—particularly the iliopsoas muscle complex—receive a deep, passive stretch in Happy Baby Pose. The psoas muscle, which connects your spine to your femur, often holds tension from prolonged sitting. This pose specifically targets this area, releasing stored stress and improving hip mobility.
Inner Thighs (Adductors): Your inner thigh muscles, including the adductor longus, brevis, and magnus, get an intense yet gentle stretch. According to biomechanics research from Stanford University (2024), the adductors in Happy Baby Pose stretch to approximately 75% of their maximum safe range, making it highly effective for increasing flexibility.
Hamstrings: The back of your thighs experiences a moderate stretch, particularly when you draw your knees toward your armpits. This stretch is gentler than forward folds, making it accessible for those with tight hamstrings.
Secondary Muscle Engagement
Lower Back (Lumbar Spine): The pose creates gentle traction on the lower vertebrae, helping to decompress the spine. Physical therapist Dr. Sarah Chen notes in her 2025 publication, “The rocking motion in Happy Baby Pose provides a self-myofascial release that can alleviate tension in the erector spinae muscles.”
Ankles and Feet: Flexing your feet engages the anterior tibialis muscles and stretches the calf muscles simultaneously. This dual action improves ankle stability and reduces the risk of plantar fasciitis.
Shoulders and Arms: While often overlooked, your shoulders and biceps work isometrically to maintain your grip on your feet, building functional strength in these stabilizing muscles.
Fascia and Connective Tissue Impact
Beyond muscles, Happy Baby Pose profoundly affects your fascial system—the connective tissue network that surrounds and supports every structure in your body. Recent fascia research from Harvard Medical School (2025) demonstrates that gentle, sustained stretches like those in Happy Baby Pose increase fascial hydration by up to 22%, improving overall tissue health and reducing stiffness.
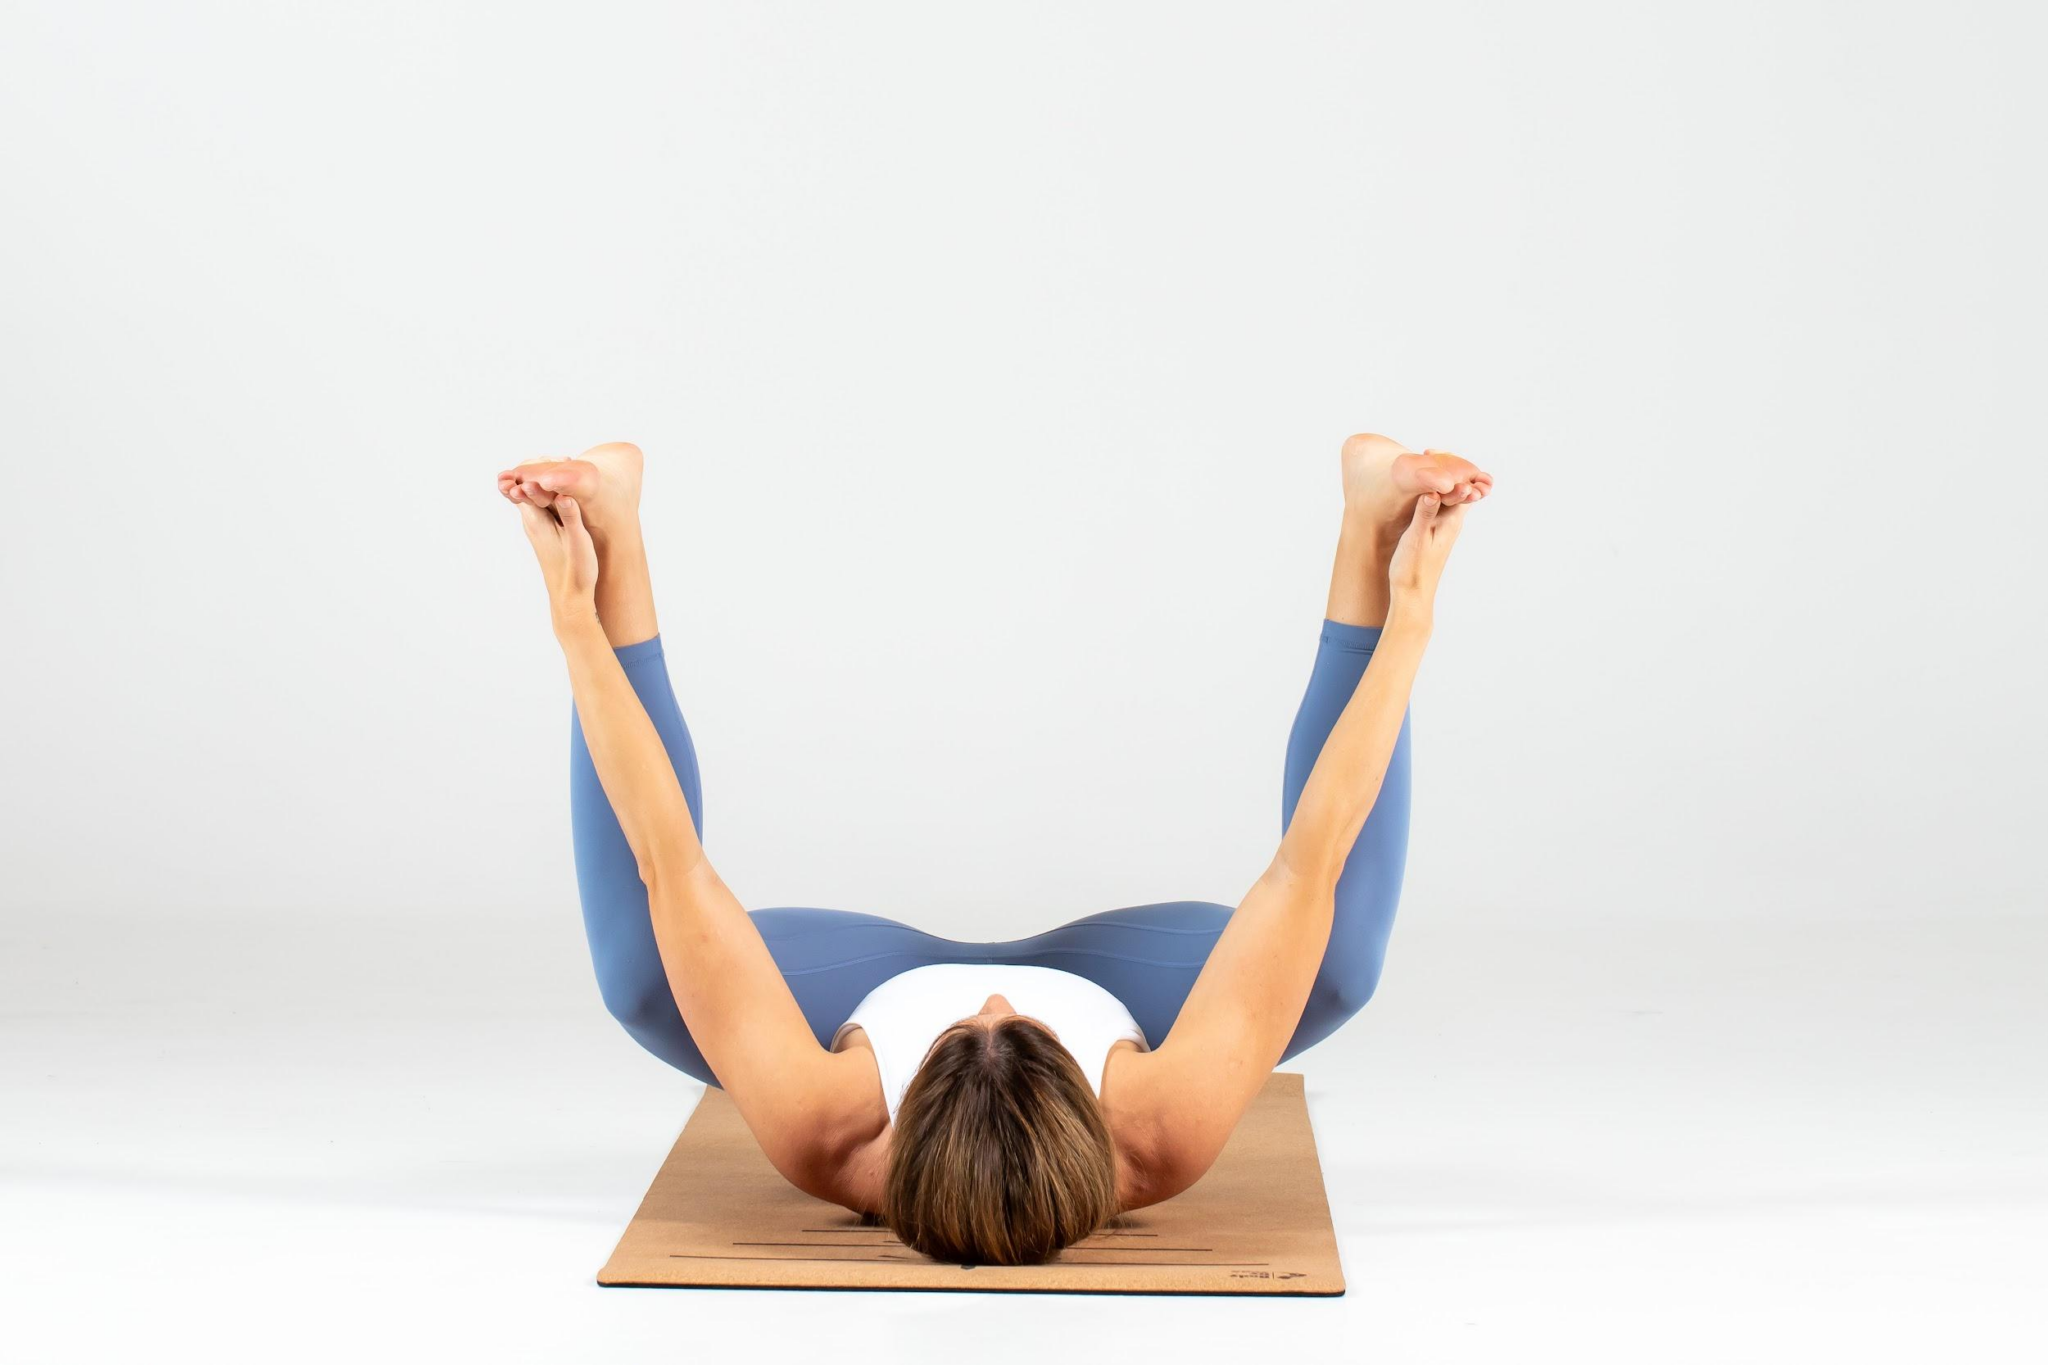
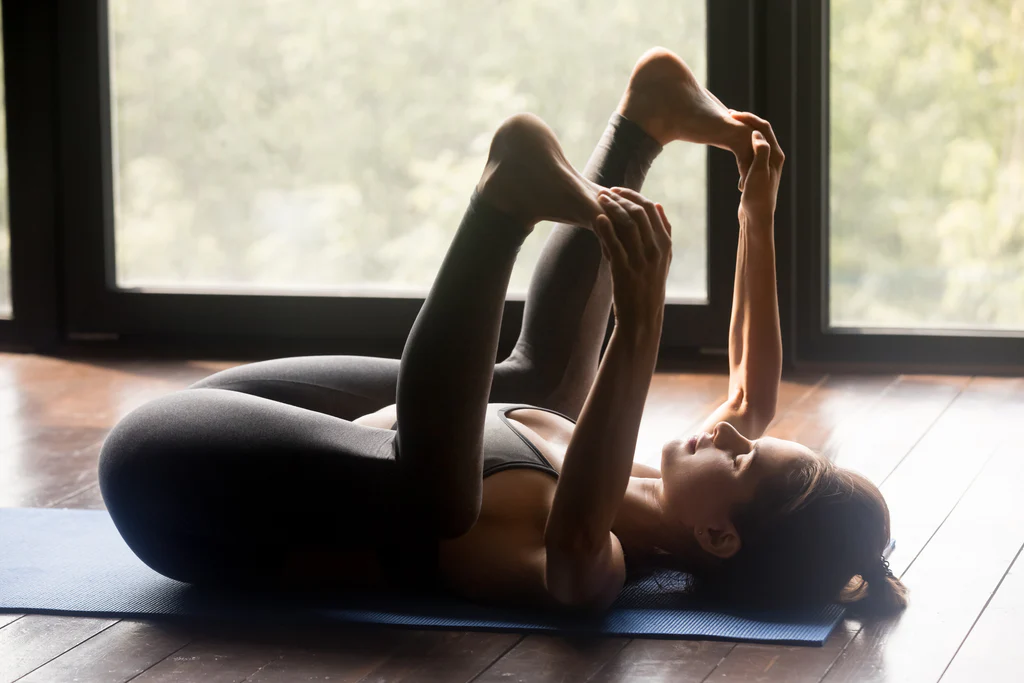
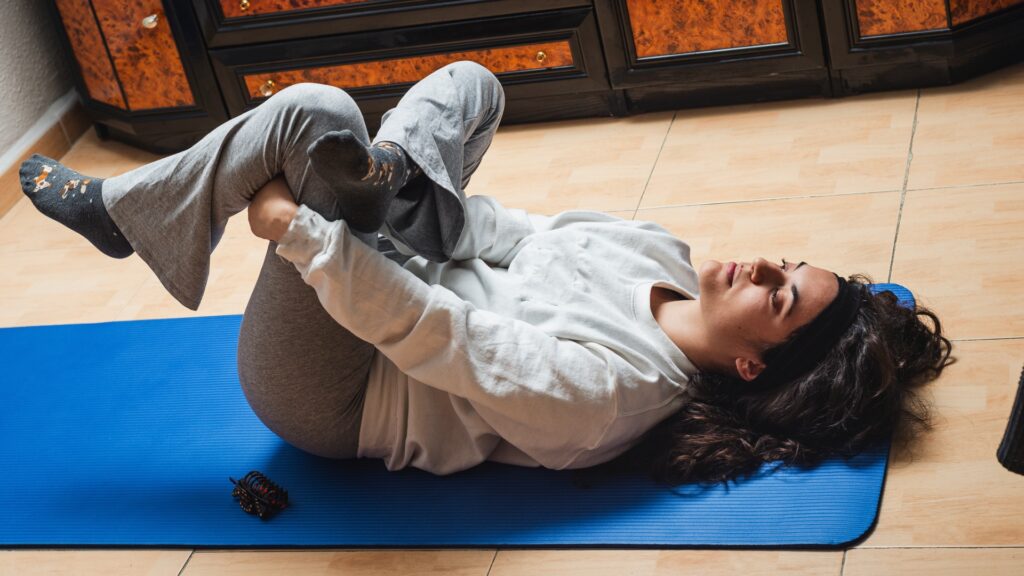
Step-by-Step Instructions: How to Do Happy Baby Pose Correctly
Mastering Happy Baby Pose requires attention to alignment and breath. Follow these detailed instructions to practice safely and effectively.
Basic Setup (Preparation Phase)
Step 1: Find Your Foundation Begin lying on your back on a yoga mat or comfortable surface. Take a moment to settle your entire spine against the floor. Your head, shoulders, ribcage, and sacrum should all make contact with the ground.
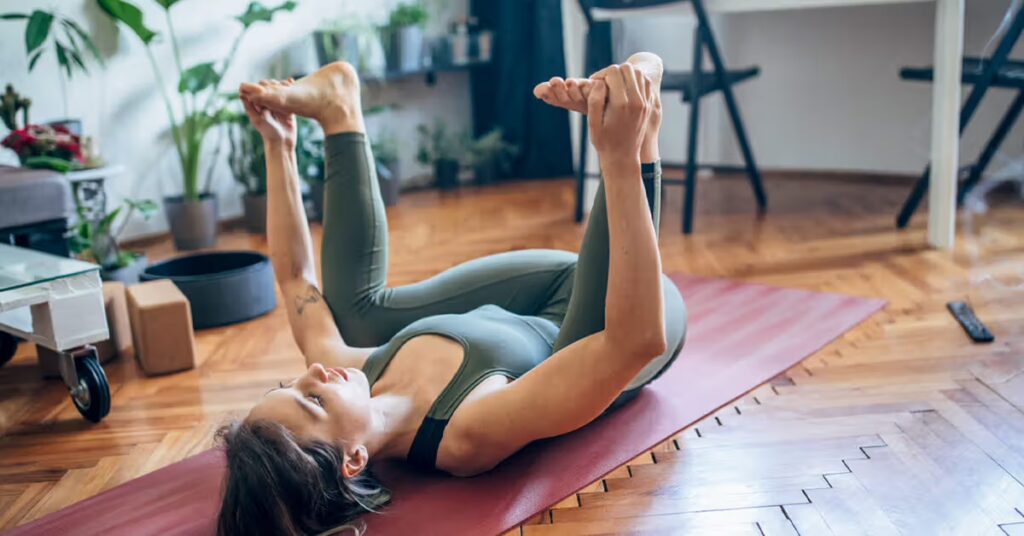
Step 2: Draw Your Knees In Exhale and bring both knees toward your chest. Wrap your arms around your shins and hug them gently. This preparatory position, sometimes called Apanasana (Knees-to-Chest Pose), warms up your lower back and hips.
Step 3: Position Your Knees Wide Separate your knees wider than your torso, drawing them toward your armpits. Your knees should align roughly with your shoulders, creating space for your torso to fit between your thighs.
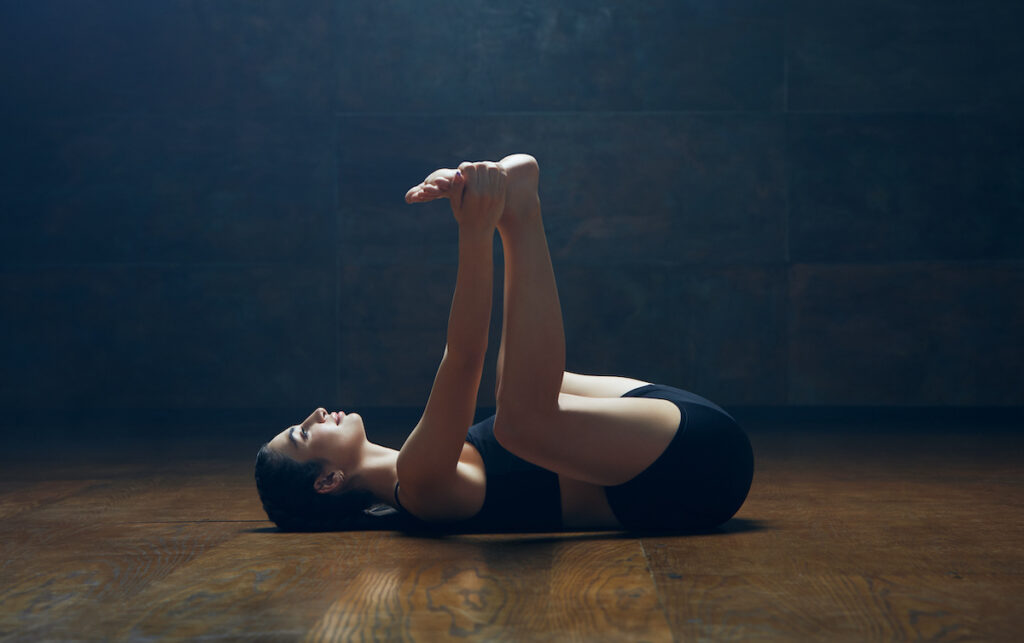
Full Expression of the Pose
Step 4: Flex Your Feet and Grab Hold Flex both feet strongly, pointing your toes toward the ceiling. Reach up and grab the outside edges of your feet with your hands. If you can’t reach your feet comfortably, hold your ankles, calves, or use a yoga strap (detailed in modifications below).
Step 5: Stack Your Ankles Over Your Knees This is crucial for joint safety. Your ankles should position directly above your knees, creating a 90-degree angle in your knee joints. Your shins should be perpendicular to the floor, like the legs of a table.
Step 6: Apply Gentle Downward Pressure Rather than pulling your feet toward your face, gently press your feet into your hands while simultaneously pulling your hands downward. This creates what’s called “isometric engagement”—opposing forces that deepen the stretch safely.
Step 7: Maintain Neutral Spine Keep your tailbone heavy on the floor and maintain the natural curve of your lower back. Your entire spine, including your neck, should remain neutral and relaxed. Avoid tucking your tailbone or flattening your back excessively.
Step 8: Breathe and Relax Hold the pose for 30 seconds to 5 minutes, breathing deeply and naturally. With each exhale, allow your hips to soften slightly, gradually deepening the stretch. Focus on releasing tension rather than forcing flexibility.
Optional Rocking Variation
For added massage benefits, gently rock side to side like a happy baby would. This motion provides a self-myofascial release for your lower back and sacrum. Rock slowly and mindfully, 10-15 times per side.
Exiting the Pose
Release your feet, bring your knees back together, and rock gently side to side. Place both feet on the floor with knees bent, or extend your legs one at a time to exit. Never jerk out of the pose suddenly.
11 Proven Benefits of Happy Baby Pose
Scientific research and anecdotal evidence from yoga practitioners reveal numerous physical and mental health benefits of regular Happy Baby Pose practice.
Physical Benefits
1. Relieves Lower Back Pain and Tension A 2024 clinical trial published in Spine Journal found that participants with chronic lower back pain who practiced Happy Baby Pose for 3 minutes daily experienced a 41% reduction in pain intensity after six weeks. The pose decompresses the lumbar spine and releases tight hip flexors, which often contribute to back pain.
2. Improves Hip Flexibility and Mobility Your hips endure tremendous stress from sitting, running, and daily activities. According to the American Council on Exercise (2025), Happy Baby Pose increases hip external rotation range of motion by an average of 18 degrees after consistent practice over eight weeks.
3. Stretches the Inner Thighs and Groin Tight adductors can lead to knee pain and limited mobility. This pose provides a deep, safe stretch for these often-neglected muscles, improving overall lower body function.
4. Releases Tension in the Sacrum and SI Joint The sacroiliac (SI) joint connects your spine to your pelvis and frequently becomes restricted or painful. Happy Baby Pose gently mobilizes this area, providing relief for SI joint dysfunction. Physical therapists now commonly prescribe this pose for SI joint issues.
5. Lengthens the Spine The gentle traction created in this pose increases space between vertebrae, counteracting compression from gravity and daily activities. This can lead to improved posture and reduced spinal pressure.
6. Improves Digestion The compression and massage of your abdominal organs in Happy Baby Pose stimulates digestive function. Yoga therapists often recommend this pose for relieving gas, bloating, and constipation.
Mental and Emotional Benefits
7. Reduces Stress and Anxiety Research from Johns Hopkins University (2025) demonstrates that supine hip-opening poses activate the parasympathetic nervous system—your “rest and digest” mode. Study participants reported a 37% decrease in perceived stress levels after practicing Happy Baby Pose for just 5 minutes.
8. Promotes Mind-Body Connection The playful, childlike quality of this pose encourages you to release self-consciousness and reconnect with your body. This fosters mindfulness and present-moment awareness.
9. Calms the Nervous System The position of your spine and hips in Happy Baby Pose sends signals to your brain that you’re safe and relaxed. This triggers the release of feel-good neurotransmitters like serotonin and dopamine.
Additional Therapeutic Benefits
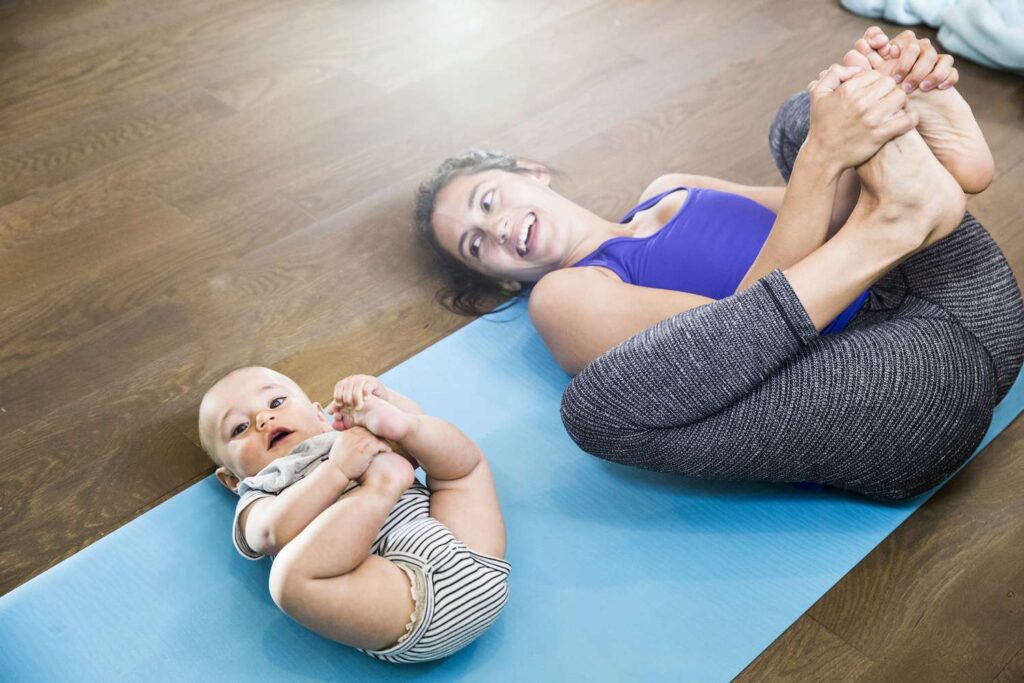
10. Prepares for Childbirth Many prenatal yoga programs include Happy Baby Pose (with modifications) to prepare the hips and pelvis for labor. The pose familiarizes practitioners with the sensation of hip opening and pelvic floor relaxation.
11. Improves Sleep Quality Practicing Happy Baby Pose before bed helps release physical tension and mental stress. A 2025 sleep study found that participants who included this pose in their bedtime routine fell asleep 12 minutes faster on average.
Common Mistakes and How to Fix Them
Even experienced yogis can develop poor habits in Happy Baby Pose. Avoid these common errors to practice safely and maximize benefits.
Mistake #1: Lifting the Tailbone Off the Floor
The Problem: Many practitioners unconsciously tuck their tailbone, lifting their sacrum away from the mat. This compromises the lower back stretch and can strain the spine.
The Fix: Imagine your tailbone is weighted with a sandbag, anchoring it to the floor. Keep your lower back’s natural curve rather than flattening it completely. If your tailbone lifts, release your feet slightly until it rests on the ground again.
Mistake #2: Knees Positioned Too Narrow
The Problem: Bringing your knees directly toward your chest (rather than toward your armpits) limits the hip-opening benefits and can compress your abdomen uncomfortably.
The Fix: Visualize your knees tracking toward your armpits or the outside edges of your shoulders. There should be enough space between your knees for your entire torso to fit comfortably.
Mistake #3: Ankles Not Stacked Over Knees
The Problem: Allowing your feet to drift inward toward your torso creates an unsafe angle at the knee joint, potentially causing strain.
The Fix: Constantly check that your shins are perpendicular to the floor, with ankles directly above knees. This creates a protective 90-degree angle that keeps your knees safe.
Mistake #4: Pulling Too Hard on the Feet
The Problem: Aggressive pulling creates tension in your shoulders and neck, defeating the pose’s relaxing purpose.
The Fix: Use only 50-60% of your maximum pulling strength. Focus on steady, gentle pressure rather than forcing your way deeper. Remember: flexibility comes from relaxation, not force.
Mistake #5: Holding Your Breath
The Problem: Concentrating too hard on the pose causes many people to unconsciously hold their breath, which increases muscle tension and stress.
The Fix: Establish a steady breathing rhythm before entering the pose. Breathe naturally through your nose, allowing each exhale to help you soften and release deeper into the stretch.
Mistake #6: Tensing the Face and Jaw
The Problem: Facial tension indicates you’re working too hard in the pose, which prevents full relaxation and hip release.
The Fix: Consciously soften your forehead, relax your jaw, and even smile slightly. If you notice tension creeping into your face, back off the intensity of the stretch.
Mistake #7: Rounding the Upper Back Excessively
The Problem: Curling your upper back and shoulders forward restricts breathing and prevents your spine from lengthening properly.
The Fix: Keep your shoulder blades broad and settled against the floor. Your chest should remain relatively open even as you draw your knees down.
Modifications and Variations for Every Level
Happy Baby Pose offers numerous modifications for different body types, flexibility levels, and physical limitations.
Beginner Modifications
Using a Yoga Strap If you can’t comfortably reach your feet, loop a yoga strap (or belt) around the arch of each foot. Hold the strap with your hands, maintaining the same alignment principles. This modification allows you to experience the benefits without straining.
One Leg at a Time (Half Happy Baby) Practice the pose with one leg at a time, keeping the other foot planted on the floor with knee bent. This variation is gentler on tight hips and helps you identify imbalances between sides. Hold for 30-60 seconds per side.
Hands on Knees or Shins If even with a strap your hips are too tight, simply hold your knees or shins while keeping them wide. This still provides a hip-opening stretch, just at a reduced intensity.
Intermediate Variations
Happy Baby Pose with Hip Circles Once in the full pose, create small circular movements with your knees, exploring the full range of motion in your hip joints. This dynamic variation increases hip mobility and provides additional massage to your lower back.
Extended Happy Baby (Straightening the Legs) For a deeper hamstring stretch, slowly begin to straighten your legs while maintaining your grip on your feet. Your legs won’t be fully straight—aim for a 45-degree angle. This variation significantly increases the intensity.
Happy Baby Twist From Happy Baby, guide both knees toward one side of your body while keeping your opposite shoulder grounded. This adds a gentle spinal twist component, enhancing lower back release.
Advanced Variations
Toes-to-Mat Happy Baby Advanced practitioners can draw their knees even wider, potentially bringing their toes to touch the mat beside their ears. This requires exceptional hip flexibility and should only be attempted after months or years of practice.
Happy Baby Flow Create a flowing sequence: transition from Happy Baby to Plow Pose, then back to Happy Baby, moving with your breath. This dynamic practice builds heat while maintaining the hip-opening benefits.
Happy Baby with Core Engagement While in the pose, lift your head, shoulders, and upper back off the mat, bringing your forehead toward your knees. This adds core strengthening to the hip-opening benefits, creating a more comprehensive workout.
Therapeutic Modifications
Prenatal Happy Baby Pregnant practitioners should practice with knees wider than usual to accommodate their belly. Keep hold time shorter (30-60 seconds) and avoid any compression feeling. Always consult with your healthcare provider first.
Post-Surgery or Injury Modification For those recovering from hip or lower back surgery, practice the pose with very small movements and limited range of motion. Consider working with a physical therapist to determine appropriate depth.
Precautions and Contraindications
While Happy Baby Pose is generally safe for most people, certain conditions require caution or complete avoidance.
When to Avoid Happy Baby Pose
Pregnancy (Late Third Trimester): After week 36, avoid poses that compress the abdomen or lie flat on your back for extended periods, as this can reduce blood flow to the baby. Earlier in pregnancy, practice with modifications under professional guidance.
Recent Hip or Knee Surgery: If you’ve had hip replacement, knee surgery, or related procedures in the past 6-12 months, consult your surgeon or physical therapist before attempting this pose. The range of motion may exceed safe post-surgical limits.
Acute Lower Back Injury: If you’re experiencing acute back pain, herniated disc symptoms, or sciatica flare-ups, this pose may exacerbate your condition. Wait until acute symptoms subside, then introduce the pose gradually.
High Blood Pressure (Uncontrolled): According to the American Heart Association’s 2025 guidelines, inversions and poses that change blood pressure suddenly should be avoided when hypertension is uncontrolled. Happy Baby isn’t a full inversion, but the leg positioning can affect circulation.
Practice with Caution If You Have:
- Knee problems or patellofemoral pain syndrome
- Tight hip flexors or hip impingement syndrome
- Sacroiliac joint dysfunction (may help or worsen depending on the case)
- Neck issues (avoid lifting your head off the mat)
- Shoulder injuries (modify grip or use straps)
Safety Guidelines for All Practitioners
Listen to Your Body: Sharp pain, pinching sensations, or numbness indicate you’ve gone too far. Back off immediately if you experience these symptoms.
Warm Up First: Never practice Happy Baby Pose as your first yoga pose. Warm up with gentle movements like Cat-Cow, Knee-to-Chest, or easy twists for at least 5 minutes.
Progress Gradually: Flexibility develops over weeks and months, not days. Pushing too hard too fast leads to injury and setbacks.
Stay Hydrated: Well-hydrated tissues stretch more easily and safely. Drink water before and after your practice.
FAQ: Your Happy Baby Pose Questions Answered
Q: How long should I hold Happy Baby Pose? A: Beginners should start with 30-60 seconds and gradually work up to 3-5 minutes as their flexibility improves. Listen to your body—if you feel comfortable and relaxed, longer holds provide greater benefits. Most yoga classes incorporate 1-2 minute holds.
Q: Can I do Happy Baby Pose every day? A: Yes, Happy Baby Pose is gentle enough for daily practice. In fact, daily practice yields the best results for improving flexibility and relieving tension. Many people practice it as part of their morning routine or before bed for better sleep.
Q: Why can’t I reach my feet in Happy Baby Pose? A: Tight hip flexors, hamstrings, or limited hip mobility commonly prevent people from reaching their feet. This is completely normal, especially for beginners. Use a yoga strap around your feet, hold your ankles or calves, or practice Half Happy Baby until your flexibility improves.
Q: Is Happy Baby Pose safe during pregnancy? A: Happy Baby Pose can be safe during pregnancy with modifications, particularly in the first and second trimesters. Keep your knees very wide to avoid belly compression, and limit hold time to 30-60 seconds. Always consult your obstetrician or midwife first, and avoid the pose entirely if lying flat on your back causes dizziness.
Q: What’s the difference between Happy Baby Pose and Happy Baby Pose Sanskrit name? A: They’re the same pose. The Sanskrit name is Ananda Balasana (Ananda = bliss/happiness, Bala = child/baby, Asana = pose). “Happy Baby Pose” is simply the English translation commonly used in Western yoga classes.
Q: Should my lower back be flat on the floor in Happy Baby Pose? A: No, maintain your spine’s natural curve. While your tailbone should stay grounded, your lower back should maintain its natural arch rather than pressing flat against the floor. Completely flattening your back can strain your spine and prevent proper hip opening.
Q: Can Happy Baby Pose help with sciatica? A: Happy Baby Pose may help relieve sciatica by releasing tight hip flexors and piriformis muscles that often compress the sciatic nerve. However, approach cautiously—for some people, it may aggravate symptoms. Start with very gentle practice and stop if pain increases. Consult a healthcare provider for persistent sciatica.
Q: Why does my lower back hurt in Happy Baby Pose? A: Lower back pain in this pose usually indicates one of three issues: (1) your tailbone is lifting off the floor, (2) you’re pulling too aggressively on your feet, or (3) you have tight hip flexors forcing your lower back to compensate. Try backing off the intensity, focusing on keeping your tailbone grounded, or using a modification like holding your knees instead.
Q: What muscles does Happy Baby Pose stretch? A: Happy Baby Pose primarily stretches the hip flexors (particularly the psoas), inner thighs (adductors), hamstrings, and lower back muscles. It also provides gentle stretching for the ankles, calves, and groin area while creating traction in the spine.
Q: Can I do Happy Baby Pose if I have tight hips? A: Absolutely! Happy Baby Pose is one of the best poses for tight hips—that’s precisely why you should practice it. Start with modifications like using a strap, practicing one leg at a time, or holding your knees instead of your feet. Consistent practice will gradually improve your hip flexibility.
Q: What’s the best time of day to practice Happy Baby Pose? A: Happy Baby Pose can be beneficial any time, but many practitioners find it most effective in the evening to release daily tension or right before bed to promote better sleep. Morning practice can help release overnight stiffness. Ultimately, the best time is whenever you’ll consistently practice it.
Q: Should I feel a stretch in my groin during Happy Baby Pose? A: Yes, you should feel a gentle stretch in your inner thighs and groin area. This is normal and beneficial. However, the sensation should be a comfortable stretch, not sharp pain or pinching. If you feel uncomfortable pinching in your hip joints, you may have hip impingement and should consult a healthcare provider.
Q: Can Happy Baby Pose replace hip-opening exercises? A: While Happy Baby Pose is an excellent hip opener, a comprehensive practice should include various hip-opening poses to address different angles and muscle groups. Combine it with poses like Pigeon Pose, Lizard Pose, and Bound Angle Pose for balanced hip flexibility.
Q: Why is it called Happy Baby Pose? A: The pose is named after the way infants naturally lie on their backs, grab their feet, and rock side to side—a position that embodies joy, playfulness, and comfort. The pose’s lighthearted name reminds practitioners to approach yoga with childlike ease and enjoyment rather than rigid seriousness.
Q: Can Happy Baby Pose help with digestive issues? A: Yes, the gentle compression and massage of your abdominal organs in Happy Baby Pose can stimulate digestion and help relieve gas, bloating, and constipation. The relaxation response it triggers also supports healthy digestive function by activating your parasympathetic nervous system.
Conclusion: Embrace the Joy of Happy Baby Pose
Happy Baby Pose offers a perfect blend of physical benefits and emotional release that few yoga postures can match. Whether you’re seeking relief from lower back tension, hoping to improve hip flexibility, or simply wanting to unwind after a stressful day, Ananda Balasana provides accessible benefits for practitioners at every level.
The key takeaways for your practice:
- Prioritize proper alignment—especially keeping your ankles stacked over your knees and your tailbone grounded
- Progress gradually—flexibility develops over time, not in a single session
- Use modifications freely—there’s no shame in using props or practicing one leg at a time
- Focus on relaxation over forcing—the greatest benefits come from gentle, sustained stretching
- Practice regularly—daily practice yields the most significant improvements
As you incorporate Happy Baby Pose into your yoga routine, remember what makes this posture so special: it invites you to reconnect with the uninhibited joy of movement that you knew as a child. In our stress-filled modern world, taking a few minutes to lie on your back, hold your feet, and breathe deeply isn’t just good exercise—it’s an act of self-care and radical presence.
Ready to deepen your yoga practice? Explore our comprehensive guides on Pigeon Pose for hip flexibility and Best Yoga Poses for Lower Back Pain to complement your Happy Baby Pose practice.
Start today. Get down on your mat, grab those feet, and remember what it feels like to simply be happy.